Yesterday was my 50th birthday and 27th wedding anniversary. I figure reaching the half-century mark entitles me to be a pontificating blowhard, er, I mean ponder deeply, for a moment. Mastering the craft; not as in, "I am a master," for I am not, but as in "How long is the path?"
I'll start with an update on the class I've been teaching. For the students, this is part of their first steps on that path. For me, I find that teaching a subject forces me to focus, improving my own skills, another step on the path. It's not necessary to be a master in order to teach, but you do have to be competent.
(Before we get too far, I'd like to thank my wife, who let me spend my birthday and anniversary evening teaching my class. Just one of the many reasons I love her! And don't worry, she got to decide how we spent the rest of the weekend. Thank you, dear!)
The class has been going well. I spent too much time talking the first two nights, so I got permission to add another night to help make up for it. The students have been gracious as I get things sorted out. I've found I need to get their hands on the tools quickly, because the time really flies. No time for gabbing!
There were big grins all around when they ripped 5' lengths off their practice boards. Same when they planed the rough pine to smoothness. There really isn't enough time to do any single skill justice, but there's enough to show them what's possible and give them a taste of the joy and satisfaction. Another step on the path.
I've scheduled a part 2 class to pick up where this one leaves off, starting January 10 at Littleton High School. The basic skills leading up to fine joinery make a good break point. The part 2 class will focus on the joinery itself. I'll also be repeating the part 1 introductory class in a full-weekend format February 13 and 14 at Littleton Town Hall. I enjoyed the intensity of Al Breed's weekend carving class, and I know for some people that's an easier thing to fit on their schedule. I've increased both sessions to 12 hours. As before, the winter brochure will be listed
here on the Littleton Parks, Recreation, and Community Education site.
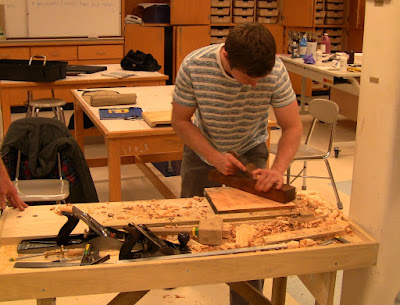
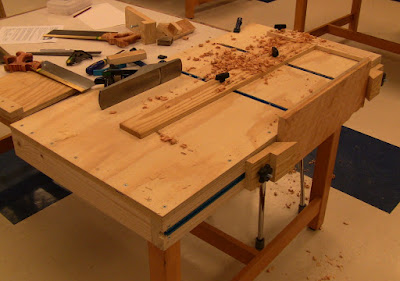
Rob using a wooden jack to surface a rough board. We butted the portable bench up against a post in the middle of the room to keep it from sliding around.
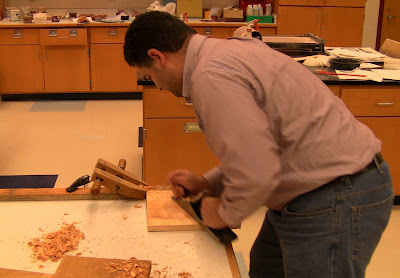
Lance using an improvised stop while surfacing a board left-handed. That gives me an idea!
One thing I didn't prepare for was left-handers. There are two lefties among the students, and the built-in stops on my portable workbench are set up for righties. Lance, in the photo above, improvised a stop on one of the art room tables and was able to work that way, and it gave me an idea. The tables are good and sturdy, and just the right height. If I added a portable work surface, basically a giant bench hook, they could easily be converted to woodworking use. That would protect the surface (I'm sure the art teacher wouldn't be happy if someone ran a tool into a table) as well as provide good work-holding.
The portable work surface I came up with is just a pre-cut quarter-sheet of 3/4" CDX plywood, with 2x4 cleats screwed to the front and one end (left end for the left-handed version, right end for the right-handed version). I originally bought extra pieces to double-up the thickness so I could drill holes for using short bench dogs; I would use battens with dowels glued in as surface stops. However, I started to worry about the weight. The mass is good for a stable work surface, but makes them harder to carry around.
Then I remembered
this post where Chris Schwarz showed a Roubo built by Jan Goris. It includes a T-track on the front with movable crochets. There are also a variety of plans online showing T-track layouts for fences and workholding. Perfect! I already had two unused
Rockler T-track kits and
hold-downs, so I bought some more
track to have enough for two setups.
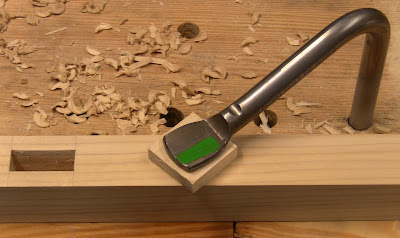
I used Goris' idea for movable crochets in a track on the front cleat, and added two parallel tracks on the surface for the movable batten. Since routing a stopped dado for the track left only 3/8" remaining thickness in the plywood, I epoxied the surface tracks in. These can all use the Rockler hold-downs and other T-bolt jigs; I also made a simple wooden hold-down, similar in effect to a holdfast. The end-stop batten has a dowel glued in at one end to fit in a dog hole in the front cleat. The other end secures to the surface with a T-bolt in a slot; it engages a 1" section of track epoxied into a small mortise.
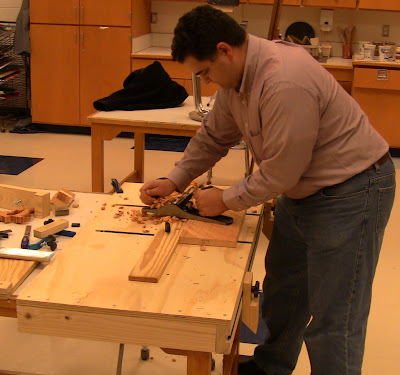
Lance surface planing on the portable work surface. It's just hooked over one corner of the table, with a clamp on the far corner to secure it. The rear batten stops the workpiece in that direction. The knobs are a bit of an obstacle. I might epoxy nuts into flat wooden knobs for a lower profile.
A piece held in the movable crochets on the front track for edge jointing. Here you can see the rear batten and the end batten as well.
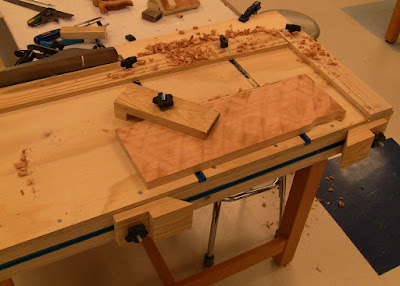
The piece held down flat.
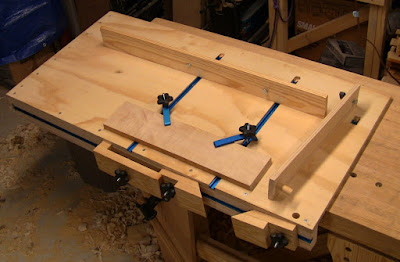 Back in the shop hanging off the corner of my Roubo, showing some details from the other end. You can see the T-bolts in the bottom of the rear batten, and the dowel and T-bolt that secure the end batten, as well as the tiny section of T-track that the end locks into. The dados are long enough to allow space for the T-bolts to exit at the back. A workpiece is held in place with aluminum hold-down arms. The wooden hold-down is mounted in the front track for the moment, forming a convenient carry handle.
With this setup, you can do any edge, end, and surface operations needed, such as planing, boring, chiseling, and cutting joinery. Given a stable base to set it on, it's quite versatile. The track and fittings do add to the cost of an otherwise dirt-cheap solution. A track kit with 4' section and assorted T-bolts and knobs is $32, plus $20 for another 4' section. The aluminum hold-down arms are $8 each, although it's easy to make custom wooden ones in any size you need using the bolts and knobs in the kit.
Now back to pontificating. Over the past few years, I've invested hundreds of hours in learning this craft. But how much is that really? Just how far does it take you down the path? I've been thinking about this for a while, and apropos,
this thread recently appeared on the Sawmill Creek Neanderthal Haven forum.
As a hobbyist, I get to spend 4 to 8 hours a week woodworking (and occasionally, zero hours). Compared to a full-time job, that's only a tenth to a fifth of the time.
If someone spends 5 years doing something, would you consider them a master? Probably not; just hitting their stride, maybe. But at 40 hours a week, 50 working weeks a year, that's 10,000 hours. Hundreds of hours? That's just a drop in the bucket, a few months' worth, barely time to dry out behind the ears.
Consider that an apprentice in the woodworking trades typically spent 7 years before being called a journeyman, let alone master; that's 14,000 hours. At my current rate, I'll reach that point in 35 years! What that apprentice accomplished in a day takes me one to two weeks. The progress he made in a month takes me nearly a year. That's a pretty long path.
Meanwhile, I've been a software engineer for 28 years. Though I feel I've mastered some areas, in all that time there are still others I haven't even begun to explore. There's still an infinite amount to learn. Another long path.
Looking at it that way, it's pretty daunting. It would seem to be a hopeless task to try to master this craft without an early start. You can see what mastery means. People like Al Breed, Roy Underhill, Phil Lowe (I got the opportunity to see a presentation Phil gave to the Lexington Arts and Crafts Society last week. Wow!). They've invested not hundreds, not thousands, but tens of thousands of hours, across decades. And it shows.
Then you have people like George Wilson, who are simply spectacular. He's recently been posting some of his work from Colonial Williamsburg on Sawmill Creek (Roy is another Williamsburg alumnus). He makes things of great beauty, a true master of his craft.
George doesn't call himself a woodworker. He calls himself a "maker." And that's appropriate. It's clear from his postings he can make anything. He can work metal and wood with far more skill that most of us will ever hope to achieve. Half the things he made were the tools he needed to make the other things. I admire that versatility and self-sufficiency.
Daunting, indeed! But rather than be daunted, I choose to be inspired. The reality is I will never achieve such mastery. There simply isn't time left in this life. But I can follow them and learn what I can, and pass that on to others, spreading the knowledge. I can enjoy the trip.
I'll be happy wherever I end up on the path. Maybe I'll get to increase to full-time pace when I retire, and perhaps complete my apprenticeship before age 70. I enjoy the fact that there's always something new to learn.
I won't ever delude myself into thinking I've mastered it.
Recommended Items
Click on the photo for T-track kit with knobs and T-bolts; extra track; and hold-downs.