Sunday, February 27, 2011

Workshop Reorganization, part 2

(Go back to part 1)

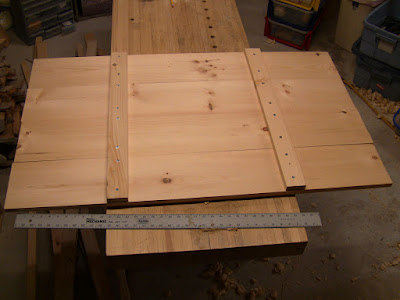
The next task was to build the unit to hold the plane rack. It's just a pair of upright sides with shelves, and a space for the rack. The bottom shelf is dovetailed to the bottom edge of the sides, and the other shelves are in dadoes.

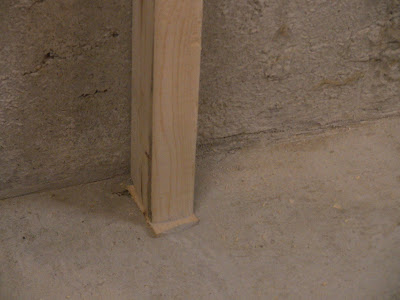
Since the rack needs to be angled, I molded a lip into the edge of the front ledger where the rack would rest.


Molding the lip with the corner of a shoulder plane.


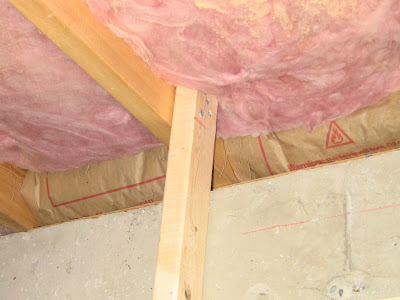
Rear view detail showing the front ledger in place in a stopped dado.


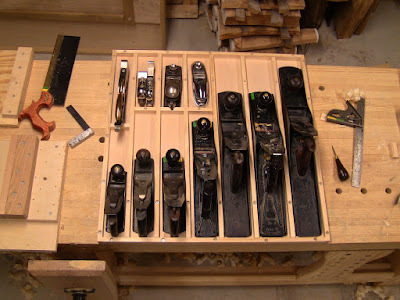
The rack in place resting in the lip.


Rear view of the assembled unit. The top of the rack rests against the top of the upper mounting stretcher. Since this stretcher will bear most of the weight of the unit once it's hung, it's wide and securely glued and screwed in. The lower stretcher will provide some additional support. The lower portions of the sides have extensions glued on to widen them. This deepens the unit to accommodate the rack at the right angle. It would have been angled too high without the extra width.


A consequence of using cheap lumber that's cupped: some of the sloppiest dovetails I've ever done. You can see light through them. But things are still solid because this is such a good mechanical joint.


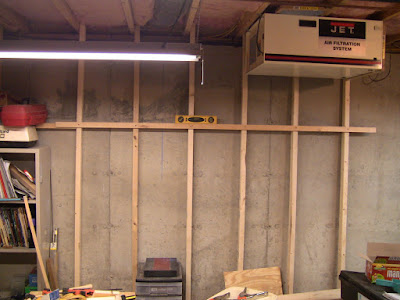
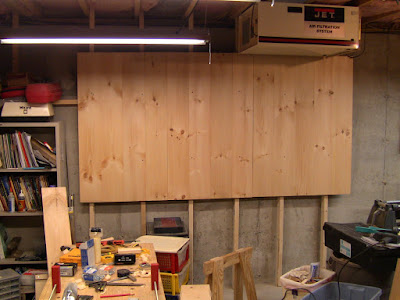
The unit mounted to the wall boards. I used a light cleat just to get things aligned working alone, then plenty of beefy screws through the upper and lower stretchers, including into the studs. Then I set the rack in place and drove two screws through the bottom edge into the front ledger, and two more near the top edge into the rear stretcher.


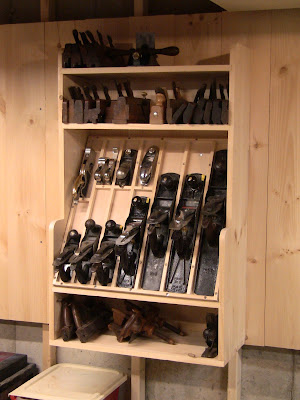
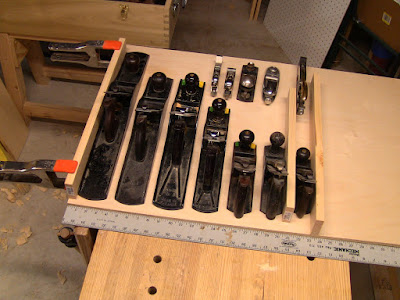
The rack and shelves loaded for bear. The bottom shelf with the extended depth accommodates my longer wooden molding planes. With the upper shelves, I have 6 linear feet of storage space for molders.

Having completed the plane storage, the next item was a saw till.


Planning the saw storage, all ripsaws followed by all crosscuts.


A nicer layout: rip and crosscut in each size.


The saw till mounted. Similar construction to the plane storage, though it needs to support much less weight. The center stretcher has 2x3 blocks nailed in from behind, with space for each saw blade. The blocks on the bottom are glued and screwed to the bottom to catch the horns on the saw handles.


The till loaded, with a coping saw hung from nails above the short saws.


Detail showing how the lower blocks catch the handles, acting as a pivot to cant the saws into their slots. After fiddling around for a bit, this proved to be a very effective method, providing solid support. The different handle sizes meant no single front support would work with all the saws.

I made one significant error in designing the till. It was originally four sides dovetailed together. Unfortunately, even though it was longer than the longest saw, it was too short to allow pivoting the saw in and out. So I cut the top end off, resulting in the open-end design you see above.


The leftover top end. Maybe I'll turn this into some kind of little shelf thingy.

Next on the list: chisel storage! Per Carl Swensson, the chisels will go on simple racks with cutouts designed to allow them to lift out slightly (as opposed to sliding them all the way out of holes).


Chisel planning.


Two rows of chisel racks and other assorted items mounted. Boring tools will go in that big empty space under the chisels.

The chisel racks are surprisingly time-consuming to layout and cut because of the number of slots, trying to get a good spacing. My random collection of chisels looks a bit ragtag, and I need to make handles for several of them.

I may redo the chisel racks a little more carefully. I just cut straight slots, but a better design I've seen is to bore and counter-bore holes to accommodate the slope on the chisel necks, then cut the slots to those. That way the chisels sit better in the holes.

But this will do for now. Making these little racks, you invariably leave out a tool or break something off while cutting, or you change your mind about something or buy another tool, so you can expect to have to rebuild one or two. For instance, because I have all the hammers flat against the wall, they take a lot more room than if I rotated them, so I may redo that one to make room for something else, like my Yankee screwdrivers.

The construction here is very simple, easily within the skill of a beginner, and the results are very satisfying. Total cost of materials and hardware (screws and nails) is about $170, though I may add another panel for about $20 more.

I've seen pictures of magnificent workshops where the tool storage is more like fine furniture. While we'd all like to have a shop like that, it's pretty intimidating for a novice. This simpler method allows you to get organized quickly. Then you can upgrade things over time, as your skills improve.

(Continue to part 3)

Sunday, February 20, 2011

Workshop Reorganization

Whew! After 7 weeks unemployed and storm after storm leaving me exhausted clearing snow from driveways and roofs, I was getting desperate for shop time.

Now that I'm settling into a new job, I decided to tackle something that's been nagging me for a while, a popular topic on many blogs: shop reorganization. I wanted to put away the unused power tool accessories and make my hand tools more accessible. However, I also wanted to keep it simple and not turn it into a major home-improvement project.

My current tool storage consists of pegboards on the wall, a hodge-podge of small cabinets and plastic drawers spread around the shop, and a shop-built rolling cart. My biggest complaint, as always, is lack of space and accessibility. I have to move all around the shop, open things up, and hunt around for tools. That inevitably leads to me leaving things out and piled up, which just makes finding them again harder.

After taking note of various hand tool setups I've seen in photos for the past year, I picked a couple ideas I liked. I hate the look of pegboards, plus the hooks are always falling out, so replacing them was a high priority.

I much prefer the look of wooden-walled shops, but lining entire walls with pine boards gets expensive. In the book Great Workshops from Fine Woodworking, Carl Swensson has a brief article on making modular wooden panels that can be hung from a cleat, so that offers the attractiveness of natural wood at modest cost, with a lot of flexibility. Various simple holders can be nailed to the panel and reconfigured easily.

I also wanted to make my planes easy to grab, so I'm building an angled plane till similar to the one Christian Becksvoort featured in a recent tool cabinet. Derek Cohen and Kari Hultman also have similar tills.

My guiding design principles are pretty simple: have everything out where I can see it, and place tools at roughly arm height just a couple steps to the side of my bench. And no horizontal surfaces where I might be tempted to pile things up!

That way I can put my hand out and grab something quickly, and just as easily put it back in its proper place. The angled plane till will hold the planes in approximately the proper orientation for use, so I don't have to pull them out at some awkward angle and twist my wrist around. Just grab and go.


Laying out the plane till first on a quarter sheet of plywood. Allowing for 1/2" dividers and an extra margin a little over 1/4" per plane, this comes out to 24" wide by 24" tall. Now I know how much space it'll take up.

Swensson's panels require anchoring cleats securely to the wall. However, my basement shop has solid concrete walls and floor, so attaching anything to them is difficult. The simple solution I used for my original pegboards was to hang half-length 2x3 studs from the exposed floor joists overhead with screws, and secure the pegboards to those.

For these panels, which I expect to hold more weight, I used full-length studs, wedged at the floor for rigidity. A fancier option would be to build a proper stud frame with top and bottom plate and secure it to the bottom of the joists as a curtain wall.


The studs in place against the concrete wall, with a 1x2 cleat mounted level across them.


Detail showing the sophisticated method for screwing the stud tops to the floor joists.


Detail showing the even more sophisticated method for wedging the stud bottoms against the floor. The wedges are ripped from the end of a stud scrap.

Swensson's panels are glued up to 24" widths, with a French cleat across the top edge. In order to be able to screw mine directly to the studs, I made them about 32" wide, with 1x3 cleats across the middle like fence sections. With studs on 16" centers, each panel spans two of them.


One panel built up, made from cheap home-center 1x8 pine, complete with authentic twist, warp, and cup. The boards are edge-glued, with cleats securely screwed across the back. Other than jointing the edges for a secure bond, I left them as is, no attempt to clean them up; I like the rustic look. You may prefer a more finished appearance.

The panel top cleat hangs on the stud cleat. This is more for ease of mounting single-handed than for permanent support, like hanging cabinets. One side or the other can be shimmed to get a close fit between panels before putting in four heavy screws through panel front, back cleat, and stud.


Squaring up a panel to fit against its neighbor.


Three panels hung on the studs. This gives me plenty of room for hanging tools, and there's room to add another on the right.

It took me three tries to decide on the mounting height, experimenting with one panel. I started flush with the top of the wall, but that looked too high. Then I tried down a foot, and that looked too low. This ended up looking just right, with my eye line 18" down the 48"-high panels. In addition to being pleasing to the eye, that puts everything within easy reach without having to stretch or stoop.


The assembed rack for the plane till, 1/2"x3/4" borders and dividers screwed to a 1/2" plywood base. The borders are also glued, but the dividers just have two screws to allow easy rearrangement.

The rack of the plane till will sit at an angle in a simple shelf unit. The unit will have upper and lower shelves for wooden molding planes, and will be mounted on the second wall panel. At that position, it will be directly to my right as I work. Two steps to the right, grab a plane, two steps to the left back to the bench.

I experimented with the loaded rack at different angles to see how shallow I could make it. At a comfortable 60 degrees, it extends out 12". At higher angles, the larger shoulder plane starts looking a little unstable. I've seen setups with planes mounted vertically, but they always require additional cleats or latches to hold the planes in place, which is something that slows down access, violating my design principle.

(Continue to part 2)