Saturday, December 31, 2011

Portable Sharpening Station


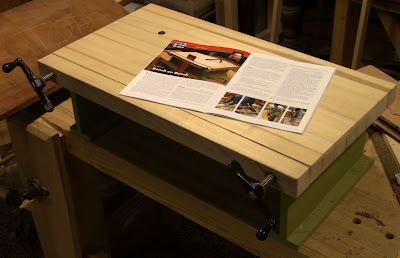
Mocking up my portable sharpening station. I want my sharpening stones and strop to be laid out ready to use wherever I am. The folded-back cardboard is to figure out the articulated lid.

I bought my first 10-speed bike over 30 years ago, when I lived in Houston, TX. It was a cheap, basic Sears bike. The derailleur for shifting gears was a decades-old design, with frame-mounted levers. I rode it along the paved Braes Bayou trail, which over its 5-mile distance probably had at most a 10-foot rise.

Shifting gears on the bike was a nuisance, because there was no way to know other than the sound of the chain when I had the shift lever in the right position, plus I had to lean down to reach the levers. So I'd be leaning over off-balance hunting back and forth to find the gear. Because of this and the flat terrain, I basically treated it as a 3-speed: starting, accelerating, and cruising. Once up to speed, I didn't change gears.

Five years later, living in hillier Dallas, I upgraded to a much nicer bike, six times the price. This had 12 speeds, but was still the same basic shifter design. New indexed shifting systems were just coming on the market at the time, along with step-in pedals, but were expensive. The terrain required me to shift more, but I was still young enough that I could just power through a limited range of gears.

By the time I bought my third bike fifteen years after that, I was living in Massachusetts, with much more varied terrain. By now we were up to 21 speeds (7-speed hub by 3-speed chain ring), and 12 times the cost of my first bike. Indexed shifting was standard equipment, with the shifters built into the brake levers. That meant I never had to remove my hands from the handlebars. Tap a brake lever sideways, and click! it shifts, the gear falling smoothly into place. No messing about trying to find the gear.

This was a major mechanical innovation in shifting systems, and completely changed the way I rode. The terrain dictated frequent shifting, and because it was easy to do, I shifted frequently. Click! Click-click! Constantly adjusting to the road. Think of driving a manual transmission car in city traffic. You constantly have to down shift after stopping, shift through a couple gears as you speed up, down shift again after hitting the brakes. You don't stay in two gears the whole time. That would put a huge load on the engine and transmission, causing failure.

Cycling is much the same, except that your legs are the engine. Hard pedaling is, well, hard! Too much of it takes the fun out. But with a good variable speed transmission that's easy to shift, you can keep pedaling at the same cadence and load no matter what. That opens up a whole new world of cycling, making it more enjoyable (especially when you've gotten old enough for enjoyment to take priority over machismo).

The point is, when it's easy to do, you'll do it more often, and enjoy the benefits of that increased frequency. In hand tools, sharpening is like that. When it's inconvenient, you put it off, and suffer as a result. For me it was inconvenient because I had to pull my stones out of a drawer, set them out on the bench, open up the cases, then put them away after use, as well as deal with the mess (sharpening is messy any way you do it). Too much interruption to my work.

I wanted to have a way to keep my sharpening stones accessible at all times, so at any moment I could step away from my work to take 30 seconds and sharpen a tool. A dedicated sharpening station is the obvious solution, but I also wanted to be able to do the same thing if I was off doing a demo or class somewhere.

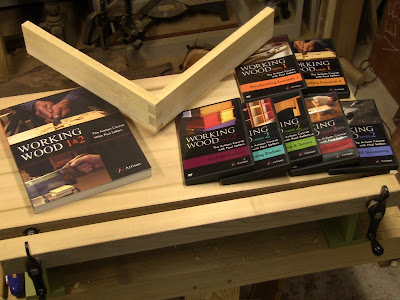
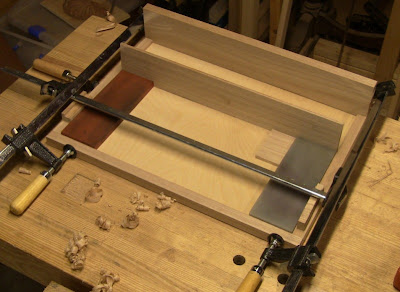
My solution is a portable sharpening station with a cover that allows me to open it up and go right to work, with the stones laid out and ready, yet secure in position. It also helps contain the mess. I use Norton 3" wide oilstones, but this will also work with their 3" waterstones. You can do the same thing with other brands of oil, water, or diamond stones. They don't even have to be the same size, though that makes layout easier (my Norton translucent Arkansas stone turned out to be 1/16" longer than my coarse India stone). I also made a matching strop to go in the set.

The design is roughly like a briefcase with fitted dividers and sections, and an articulated lid that folds back. The body is 1/2" and 1/4" baltic birch plywood panels with oak banding; the dividers are all oak. The banding is raised around the bottom to form a 1/4" basin. The stones sit in this, with 1/4" thick by 3/4" wide spacers separating them.

In addition to the fitted bench stone holders, it has a fitted box to hold a set of very nice Chris Pye carving slip stones that I got recently from Tools For Working Wood, and a larger box for holding oil, strop compound, file and burnisher for sharpening scrapers, and small clamps for clamping the station to a surface. The finish is heavy duty "spar varnish" outdoor grade polyurethane, to resist the sharpening residue.

The dividers and boxes start making for some tight tolerances. Because they are small and thin, you have to be careful forming them. One half-stroke extra on the saw can ruin the appearance of a joint (though it should still be fine structurally). Fortunately, a little sawdust and glue pressed into any little imperfections cleans them up, especially in the busy open-grained oak. But in general, I give credit to Paul Sellers' Working Wood series for the tight joints and hinge mortises I was able to get.


Crosscutting a piece of 1/2" plywood for the bottom panel. I scored the cut line with a knife to avoid tearing of the outer ply.


Ripping off the excess.

Once the plywood was cut to size, I worked on the oak banding and interior parts. The bottom banding is 3/4" square cross section, with a 1/2" x 1/4" rabbet for the plywood. The dividers that form the interior boxes are 1/4" and 3/8" thick oak, which I got by resawing 3/4" stock.


Ripping down a 3/4" width of oak for the banding.


Edge jointing a section of the banding to final dimension.


My fillister plane needed a minor repair first: gluing the boxing back in place.


Ripping a section of oak for the interior dividers.


Resawing the divider stock to get a 1/4" thickness.


With the glue on the plane boxing dry, molding the rabbet in the banding. I need to make a sticking board for this.


Precision tuning of the rabbet with a small shoulder plane. Any humps or crud in the corner will prevent a good fit around the plywood edge.


Using my Tite-Mark as a thickness gauge to check the rabbet.


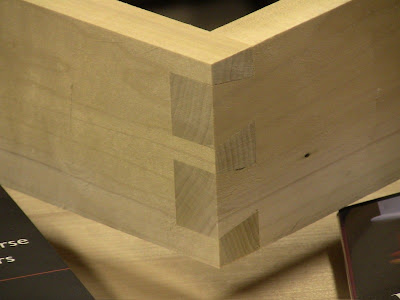
Closeup of the joint at the rear corner. On the left is the back piece, rabbeted to be the rear edge of the banding over the plywood. On the right is a side piece, rabbeted and notched to fit into the back piece.


With back and banding dry fitted, marking the main divider to fit.


Shooting the divider for a precise fit.


Another piece of the same stock, showing how to test for a well-shot board: if it can stand on end and stay standing when you bang on the bench, the end is dead flat and square.


With a couple of oilstones in place, fitting the position of the divider. After taking this photo, I decided to add a flat spacer between the stones and the divider. You'll see the reason for that in part 2. This also threw off the measurements in my layout sketch a bit.


The divider is the long side of an interior box. Here's one of the short-side pieces in 3/8" stock, dadoed into the back without glue. Paul Sellers says a dado should fit snug enough that you can lift the board without the crosspiece coming out.


Ripping off a 1/4" thick piece of 3/4" stock. This will be a flat spacer between stones.


Planing the surface of the 1/4" stock. Holding this thin stuff is a bit of a challenge. I had to plane it in sections, moving the holdfast around.

A brief diversion. My wife had asked me to repair the support leg on the back of an antique picture frame for a friend. The backing board is heavy fiberboard covered with velvet on one side and some kind of liner paper on the other. The leg is the same construction, hinged at the top with cloth. At some point, the frame got knocked down flat, bending the leg so that it fractured in the middle, flopping about and no longer supporting the frame.

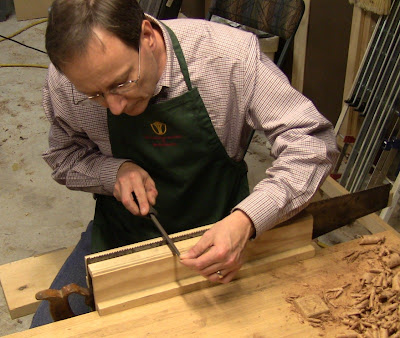
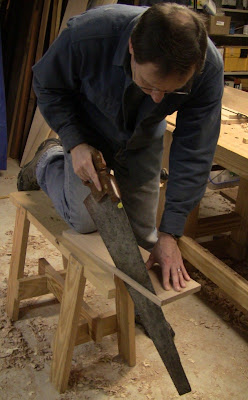
My vague plan for repair was to glue slips of wood into the leg. I needed some more 1/4" oak divider stock, so rather than planing the remainder from the first resaw down to thickness, I decided to see if I could resaw it again and save the thin cutoff layer for the picture frame. Time to pull out my ryoba (with hardwood tooth pattern).


This is ridiculously thin resawing, but the ryoba handled it well.


Success! That's a useful skill to have.


After trimming the ultra-thin oak to shape, I glued it in between the layers of fiberboard and lining paper. That should last a hundred years. You can see the picture frame back face down on the bench-on-bench, with its bent support leg.

Back to the project. I glued up the interior box corners in multiple subassembly stages. This all goes together as a bit of a puzzle, so it's impossible to do as a single glue-up. That also allowed me to plane the dovetails flush once they were dry.


Dry fit. Except for the leftmost dado here, all the small dado and dovetail joints on the interior box and dividers are snug enough to be self-supporting without glue.


Glue-up detail of the corner of the small box: using a tiny caul to pull the dovetail in tight. I made it by chiseling a small depression in a bit of scrap pine.


Glue-up of the banding and the box assembly. I installed the hinges before gluing up the box.


To ensure good bonding of the back to the plywood, I put a caul on the underside and clamped it in place. I added two more clamps to those shown here to apply even pressure.

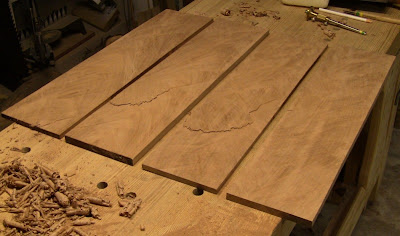
While the glue was drying, I made the dividers for the Chris Pye slip stones. These stones are 3" squares in several thicknesses, in coarse India and hard Arkansas, with different curve profiles one each edge. The dividers are made up from thin resawn pine, covered with a continuous layer of felt in sort of an accordion fashion.


I told you thin resawing was a good skill to have! Here's a piece of 3/4" pine resawn into 5 layers. I planed them smooth by holding down one end at a time with a holdfast.

That thing next to the plane? From Jim Kingshott's books and videos, an oil wick, made of felt rolled into a small plastic spice jar fitted into a base with sandpaper on the bottom. Just put a dab of linseed oil on the wick, then pull the plane over it on the return stroke whenever you need to lubricate the bottom. This is faster than stopping to rub wax on it. Also good for passing a saw blade across on each side. I keep it in an old tea tin to limit its oxygen supply. Linseed oil-soaked rags are notorious for starting shop fires by spontaneous combustion.


The felt-covered dividers glued-up, with spacing custom-fitted to the stones. A layer of wax paper keeps the glue off the stones.


After the glue has dried. You can see how strips of felt have been glued to the wood in a continuous fashion. This drops into the small box, no need to glue the sides in place.

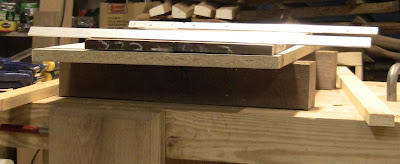
Once I removed the main base from the clamps, I fitted up the bench stone spacers. Using my long shooting board, I trimmed them in succession to width until everything dropped into the main base snugly.


Test fit of the bench stones and their spacers, and the slip stones in their dividers. I was a little too tight on clearances: I had to shave off the outer layers of felt with a chisel to make the slips move smoothly.

The photo above reveals another clearance problem. Remember I said I had thrown off the measurements in my layout sketch when I moved the long divider back? Notice how the hinge rests on the corner of the slip stones. That wasn't supposed to happen. My goal in all this was to have the hinge on the top side of the case, not the back, so that when the case was standing up on its back, it would sit flat on the floor, no hinge spines in the way.


How I had drawn it up: the hinge would attach to the outside of the edge banding for the lid, which would clear the slip stone box as it pivoted up. But now as you can see the box is in the way.


New plan: rather than having the hinge close down all the way, have it close down to the quarter-open position. It will attach to the underside of the banding, leaving plenty of clearance. That means there will be a ledge at the back when the lid is closed down. Not ideal, but I can live with it.


The lid rear banding molded and mortised for the hinges. Notice how it is not flush with the back: that's because it's mortised deeply...


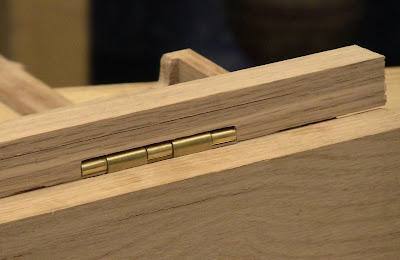
... so that when the lid is down, it leaves a minimal gap at the hinge line. Note the ledge formed by the banding and the back.

There are various ways I could have dealt with the hinge, but with it already secured to the back, this was simple and effective, if not the prettiest. Design changes midway through construction are bound to cause problems later! That's why you do mockups and prototypes and stare at them for a while before making any decisions. However, since this is shop furniture, I just need it to be functional.

Next will be building the articulated lid.

(Continue to part 2)

Friday, December 23, 2011

Review: Paul Sellers' Working Wood DVD and Book Series


Paul Sellers' Working Wood book and DVDs, and one of my practice dovetails using his method.

Paul Sellers has released an excellent and thoroughly enjoyable DVD and book set on hand tool woodworking.

I first found out about Paul when his blog posts starting appearing on Luke Townsley's excellent aggregator site UnpluggedShop.com. I quickly realized he and I are on the same wavelength.

Paul has been a woodworker for over 45 years, apprenticing at the age of 15 in the UK. He's been published in Woodwork, Fine Woodworking, and Popular Woodworking Magazine, and now runs the New Legacy School of Woodworking in North Wales, UK. The school is in Penrhyn Castle, which is maintained by the National Trust. I think he wins the award for most amazing workshop venue!

In one of those minor coincidences of life, I was living in North Wales, PA, when I took my first woodshop class in 8th grade (from the first of three shop teachers missing a fingertip; jointer accident).

That was a couple years after Paul had completed his apprenticeship. So for most of the time that he's been a woodworker, I've been wishing I was a woodworker.

Paul is currently in the process of launching a US New Legacy School of Woodworking in upstate New York, scheduled to open in the Spring. You can read about it here. You can also see him this winter at several of the Woodworking Shows. He'll have a New Legacy booth at the Baltimore, Springfield, Somerset, and Fredericksburg shows. I'm hoping to meet him in Springfield.

There are several videos of him on YouTube, both in his workshop and at shows. These give a hint of his skills and presentation style. Note that for demonstration purposes, they emphasize speed more than accuracy. His DVDs show a much more accurate method for dovetailing, the results of which you can see in the following photo:


Closeup of my practice joint, the best I've ever done (ok, so this was my sixth attempt!). That black speck along the middle pin? Always be sure to THOROUGHLY wipe the honing oil off your chisel before returning it to the wood.

After watching the videos and reading through his blog, I saw that he offers the newly published Working Wood 1 and 2 DVDs and companion book. I promptly ordered the full set.

There are 7 DVDs total. They're available individually or as a set from Amazon, Lee Valley (US), Classic Handtools (UK), or directly from Artisan Media (full disclosure: I earn a small commission on sales through Amazon and Highland Woodworking links via their affiliate programs, though not through other links).

I watched the DVDs over a 3-day period, about 12 hours total viewing time. Series 1 consists of two DVDs, Woodworking Essentials 1 and 2. Series 2 consists of the remaining 5:
  • Master Dovetails
  • Master Housing Dadoes
  • Master Mortise and Tenons
  • Master European Workbenches
  • Master Sharpening
The production style of the transitions and interstitial elements borrows from video gaming and Who Wants to Be A Millionaire, which some people may find distracting, but it keeps things dynamic. The workshop segments are filmed well, with good pacing. And that castle!

The book is gorgeous, suitable for the coffee table (at least in a woodworker's home). It's best treated as a companion volume rather than a standalone text. In addition to background information, it has matching chapters for each of the DVDs. The whole package works best by seeing and hearing Paul work, then referring to the book when following along in the workshop.

Paul's educational philosophy is a bit different from mine. After briefly introducing methods, he likes to use projects to develop the skills. I like to focus on skills separately, removing the fear of mistakes ruining a project. But that's why there's chocolate and that's why there's vanilla. There will be those who prefer to learn by one method and those who prefer another.

The methods he presents are a mix of elements I've seen before and some new things. If you're a beginner who's never used hand tools, this would be an excellent series to use as your primary reference. If you're an experienced hand tool woodworker, it adds versatility and reinforces things from a new perspective. 

Just remember that you're seeing a practiced hand here, so don't be upset if you don't immediately get the same results he does. As always, good dovetails require accurate sawing to a line. The reason it took me 6 tries to get the joint pictured above is that I was homing in on that with each one. How do you develop a practiced hand? The same way you get to Carnegie Hall: practice, practice, practice, like this!

I like learning from a variety of instructors, because each one will have a favored set of tools and techniques which he emphasizes, and those he glosses over. Comparing and contrasting different instructors fills in the whole picture to give me the broadest range of skills.

In this case, Paul starts with lumber that's been dimensioned and squared up with machines (of course, you can do it with hand tools as well if you don't have access to machines). He introduces a minimal set of tools necessary to produce fine joinery, emphasizing three concepts: accuracy, sharpness, and technique. He present three fundamental joints, then use those to build a series of projects.

He presents a number of fine details in the process. Throughout, he emphasizes listening to the sound the tool makes, as well as the feel of the wood. These sensory aspects not only make the work more satisfying, they are critical to achieving the best results.

In Series 1, the first DVD is actually somewhat more organic than the rest. While the main focus of the overall series is on joinery, this starts with shaping wood to get an understanding of grain and how the tools interact with it.

He uses chisel, gouge, spokeshave, and axe to quickly shape a spatula, a spoon, a bowl, and a three-legged stool. These are great introductory projects, quite a treat to watch. If they don't have you itching to put tools to wood, nothing will. They remind me of the work of Robin Wood, Drew Langsner, and Peter Follansbee.

The second DVD introduces the tool set and techniques for accuracy. Paul goes through making a housing dado, a single-tail through dovetail, and a mortise and tenon (with multiple ways of forming the tenon).

Series 2 expands upon the information from Series 1 and applies it to several projects. Simple in design, they do an excellent job of focusing on a particular joint. First is a dovetailed box in the Shaker style. Second is a four-shelf wall unit in the Arts and Crafts style, using interlocked housed dadoes and through mortise and tenon. Third is a small side table, using haunched mortise and tenons. From here you can use these techniques to build anything.

The last project is a very nice English workbench. Paul addresses the logistical problem of trying to build a workbench without a workbench. The bench uses a classic Record-style quick-release vise. While Record is no longer in business, Anant versions of the vise are available from Highland Woodworking and Tools For Working Wood.

The final DVD covers sharpening of a variety of tools. Interestingly, Paul uses a convex bevel method similar to Jacob Butler's, which I wrote about in the Grimsdale Method. Jacob encountered quite a bit of negative reaction when he discussed it on woodworking forums, yet here we see another professional who has used it to great effect for decades. The DVD is organized differently from the rest, as a series of short reference videos by tool rather than a linear presentation.

If you enjoy reading this blog, you'll enjoy this set. Paul is currently at work on Working Wood 3.

Tuesday, December 13, 2011

Journal of the Guild Of New Hampshire Woodworkers


Fall 2011 issue of The Journal.

I'm very pleased to announce that Close Grain is now a column in The Journal of the Guild of New Hampshire Woodworkers. This is a gorgeously-printed magazine published three times a year for Guild members. It extends Close Grain to those who prefer the permanence of hard copy.

Editor Jim Seroskie had seen me give a demonstration of dovetailing to the Guild's Hand Tools subgroup and picked up one of my cards. A couple of days later, having perused the blog, he called to ask if I would be interested in turning it into a column for the Journal. He said there were a number of posts that could serve as the raw material for articles, and he liked my emphasis on hand tools.

I didn't hesitate. The Guild is an outstanding organization, consisting of a broad mix of hobbyists and professionals, with some very talented and accomplished members and active subgroups. They're also open to members outside of New Hampshire. Click here for information about membership, and here to join for $45 a year.

Thank you, Jim, for the opportunity! He also let me include my blue stacked-saws logo on the column heading.

This is my first real foray into print media. My post on using a ryoba for sawing tenons was turned into a Tricks Of The Trade entry in the October, 2010 issue of Popular Woodworking Magazine (and selected as the winning entry for the month, earning me a nice Lee Valley gift card, thanks, Kari!), and I had a letter printed in the December, 2011 issue of Fine Woodworking arguing for hand tools over benchtop sanders, but this is more extensive.

The inaugural column arrived today in the mail, based on my bench-on-bench project. I had used the BOB during my demonstration, and a number of onlookers had expressed interest in it.


The first column: Building a Bench on Bench. The article is 6 pages long.


The bench-on-bench article on the bench-on-bench on the bench.

It's great to see my name in print! Plus, I'm flattered to be in the same issue as Al Breed, winner of the SAPFM 2012 Cartouche Award. The opportunity to spend time with people like Al is one of the real benefits of Guild membership.

Thursday, December 8, 2011

Building A Townsend Document Chest, part 3

(Go back to part 2)


When good resaws go bad. Ouch!

With the time for Al Breed's next presentation fast approaching, I got to work resawing the pieces for the case. In the photo above is the second of two pieces that didn't go well. Using up all my shop time to ruin prize lumber was a major setback.

Fortunately, there's enough lumber to still get enough pieces sawn out, so I chalked this up to experience. What went wrong? I think the main issue is this is by far the widest I've ever tried to resaw. It's also very dense stuff.

Even though I tried not to force the saw and it was sharp, it bowed enough in the cut that it eventually cut through the surface in the middle of the piece; that's the dark triangular patch you see, the unplaned original surface after I pulled the remainder apart. It also bowed enough in the other side to dig deeply into the wood, making it too thin. I'll be able to salvage some of this for small parts, but some is just pure waste.

I even finally finished building my Hyperkitten framesaw and tried using that with a Putsch 5tpi rip blade. It worked, but introduced yet another variable in the motion as a result of side force causing twist while holding onto the frame. I think this is just a matter of skill and developing control, because I know people have used this style of saw with success, but for the moment it didn't solve my problem.

Time for a change of strategy. Resawing is not the focus here. That's just an obstacle in the way of what this project is really about. I still want to do it by hand, I just have to adjust my approach.

But first, the day arrived for Al's presentation to the Guild. He started off by going over the drawing. It's a bit confusing for those not used to this drawing style, because it packs some plan views in the elevation views and shows different layers of cuts and joints on different sides. This makes it all fit on one sheet, but means the drawing is not a one-for-one representation of the piece.


Al explaining some of the details on the drawing, relating them to a chest built by one of his students.

From there, he demonstrated processes for forming the beaded molding and  methods for fitting the various dividers. Thanks again, Al, for another great presentation! Congratulations are also in order; Al was just named the 2012 winner of the SAPFM Cartouche Award, no surprise to any of the participants in this program.

Back home, I decided to borrow some ideas from luthiery. Luthiers resaw stock into thin pieces for guitar backs and fronts, then open them up and join the edges in a bookmatch.

I don't need such thin stock, but I figured the methods would be useful. My plan was to crosscut to length, rip the piece in half, resaw the two 6" widths individually, then rejoin the thin pieces on edge back to their full width. Hopefully the much narrower resaw operation would be the key to success.

The first step was to plane both sides of the piece so it would lay flat. I didn't want to plane to finished surface, just take out the roughness from the sawmill. Before I did that, I also decided it was time to camber my jointer and smoother irons.

The advice on this is mixed. Phil Lowe is a strong proponent of it. I've seen other authors recommend against it, or not mention it one way or another. Deneb Puchalski of Lie-Nielsen, in an article in the December, 2011 issue of Popular Woodworking Magazine, recommends learning how to sharpen a straight profile well before worrying about cambering.


For the jointer iron, just 10 strokes of focused finger pressure on each corner feathered out on the rough India stone, followed by medium, fine, and hard Arkansas stones. For the smoother iron, just 4 strokes.


The resulting very minor camber.

Cambering the iron results in shavings that feather out to nothing on their edges. Because the corners aren't digging into the surface, this reduces drag and eliminates plane tracks. With small camber like this, the surface scalloping is negligible, and you just overlap the width of your strokes to flatten that out. I did find it a touch easier to plane with the iron like this (at least, that's what I tell myself!).

I planed the piece just enough to make both faces flat and remove the bulk of the sawmill marks. Then I marked both sides of the board with angled lines, one pair on one side, two pairs on the other.

These lines clearly indicate which faces constitute the original board. Once I rip it and resaw the halves, I'll have 4 separate pieces. I want to be sure I can mate the matching pieces back together so the grain lines up.


Using a panel gauge to mark a center line. Note the angled white lines to mark the surface.


Ripping down the center.

Before resawing, I took the time to resharpen the saw teeth. I need to make sure every factor is contributing to success here.


Making sure the teeth are sharp before resawing.

I resawed the two halves exactly the same way I did the earlier full-width pieces, repeatedly coming in from each corner until they all met in the middle. The only difference was the narrower width. I also tried to be a little lighter on the saw and avoid any forcing through the cut that might cause it to bow.


The first half resawn to yield what will become 1/4"- and 1/2"-thick pieces. I still got a bit of flap on the thicker piece (note the curved shadow line across it), but just on the order of 1/16" thick, well within the margin of extra stock thickness.


After resawing the second half. Again, a bit of flap, but within acceptable tolerances.

The pattern in the flaps between the two resaws is surprisingly consistent. That must mean there's something in my technique causing it. Maybe I'll be able to work out how to avoid that by the time I finish all the resawing on this project.


The resulting pieces stacked and stickered on my bench. Other than the flaps, I was happy with the consistency of the thicknesses. These narrower pieces worked out well.

The next day, I lightly planed the sawn faces, again just enough to take out the flaps and make them lie flat. Then I built a large edge-shooting board. This is one of those luthier's tools. It's also one of the ways Toshio Odate shows using a Japanese planing beam in his book, Japanese Woodworking Tools: Their Tradition, Spirit, and Use.

This is very simple, takes less than half an hour to build. The end stop doesn't even need to be perfectly square to the side, because this is not used for squaring up that way. I made mine from some good quality Baltic birch plywood scraps screwed together.


Make the shooting board long enough for your pieces plus some extra length for starting the plane.


Match up the two mating pieces, and fold them over the center line like closing a book. The spine of the book is what needs to be jointed. Then when you open it back up, the pieces should fit seamlessly.


Everything setup for shooting. The work pieces overhang the ledge by 1/4" or so. The end stop may be enough to hold things steady, but I like the added security of the holdfast. It also keeps the shooting board from slipping around. Again, trying to align every little factor for success.


Jointing the overhanging edges. Also experimenting with different ways of orienting the holdfasts.

The key to all this is that the plane is referencing in two dimensions, along its length in usual jointer fashion, and on its side to keep a consistent angle. By matching the edges up like this, as long as you hold everything consistent, any deviation in the setting of the jointer iron from 90 degrees is canceled out when you open the pieces up, since the angles are then complementary. Wax the side of the plane so it moves smoothly along the ledge.

Even with all this, it takes a bit of practice to learn how to handle the plane and avoid any rocking or rounding of the ends. The luthier's trick is to plane out a very slight concavity between the ends (just the thickness of a shaving), then take a full length shaving.

Because two halves of the same piece are folded over, one edge is guaranteed to be oriented against the grain, so don't try to take a heavy cut. A few normal thickness shavings quickly even up the edge, then take light cuts to refine it.


Checking for square. Looks pretty good! However, removing the pieces and holding them together along the joint shows a little light coming through. 


Additional delicate refinement of one piece. When doing single pieces, make sure to put them on the shooting board in their original orientation.


Now that's a tight joint!

Time for glue-up, again relying on luthiery techniques. I watched a number of different videos of gluing up guitar backs. Those are made from 1/8" stock, so luthiers have to be careful about causing buckling at the joint or in the piece when they apply clamping pressure. That makes them very creative in clamping setups. This stock is probably thick enough that I don't need to be quite that fussy, but I still followed general precautions.

I used a piece of plastic-laminate-covered panel as my gluing surface, resting on blocks. It's very flat, and the glue won't really stick to it. I clamped a length of 1x2 on one side as a side rail, then laid the first piece of mahogany along it, good face down. I spread glue along the jointed edge of the second piece and set it by the first, rubbing the two up and down the joint for good adhesion. Then I added a second side rail, left loosely clamped for the moment.

I put two long V-blocks upside down over the joint, and loosely clamped another piece of 1x2 across them as a caul. The V-blocks apply down pressure to both pieces while accommodating any difference in their thickness, since I haven't bothered to make them uniform. This keeps the pieces down flat and prevents buckling at the joint as I tighten up the bar clamps across them. Then I tightened everything up a bit at a time, watching out for anything to shift or lift out of place. It all sounds more complicated than it really is.


Rube Goldberg clamping setup sitting overnight.

This morning before work, time for the unveiling. Will all this trouble have been worth it? I removed the clamps, pushed a bit to make the glue release from the laminate surface, and flipped it over.


Yeah, baby, that's what I'm talkin' about!

Success! The glued-up panel was dead flat on the side referenced against the laminate. Just a slight glue line showing from squeeze out; that will clean up easily as part of final surfacing.


Checking with winding sticks.


The sticks are hard to photograph, but by eye they were perfectly aligned.

Now I can plane this up on both sides to a uniform thickness. I'll do the remaining 1/2"-thick panels for the case this way. That will leave plenty of thin stock for other parts, some of which needs to be glued back up like this.