Update Aug 1: Corrected the title: Convex Double Bevel Sharpening!
After I had made the video in part 1, I was reading a discussion on Woodnet about sharpening A2 steel. As usual there were strong feelings and opinions, but one of the things that came up was how to demonstrate the resulting sharpness.
Obviously, the only thing that really counts is how well the iron or chisel cuts the wood, but even that's not easy to measure. There are a lot of variables, the type of wood, the grain pattern, how you setup the tool, how you hold it, how much force you apply, the quality of the resulting shaving. It's hard enough for the same person to evaluate sharpness consistently, how about different people with different skill levels trying to compare results? It's all highly subjective.
Why care? Well, other than bragging rights ("I can shave the hair off a razorback hog at 20 paces"), you need to know when you're done sharpening and can get back to work. You need to be able to tell if the method is effective or not, and whether you might need to change something to get better results.
This is especially true for beginners, who may not yet have enough experience to know what level of sharpness they can expect to achieve, or whether their results are consistent from one time to the next. I know that what I thought was sharp 2 years ago doesn't come near to what I can do now.
This is of course a huge can of worms and will remain unsettled forever, but Stu Tierney, who runs the Tools From Japanonline store and blog, brought up the method of slicing through copier paper. I've seen this before, for instance Paul Sellers does it. You might regard it as a useless stunt, but I think it's useful because it's very visible on the macro level. You can easily see it work or not and see the resultant cut edge. It's also a lot of fun.
Naturally, there are still variables. Copier paper varies in weight and quality, you can push the blade or slice with it, hold it at an angle. But at least from a given stack of paper, you can hold things consistently and apply the blade consistently to judge for yourself. When you can't make it work, you know for sure there's room for improvement. Once you pass that point where it does work, you can try and control those variables to see how easily it works. Do you have to give it a little push or a little slicing motion? Or will it cut without any help?
I decided to try this with the convex double bevel sharpening method. In the video below, I go through the full sharpening sequence on my IBC Pinnacle A2 plane iron, with India stones, Arkansas stone, and strop. Then I hold the iron over the edge of the paper and let just its weight apply the cutting force. The results are quite satisfying.
You'll notice a new source of music credited in the video. It's by Jason Shaw, who runs audionautix.com. There he provides downloadable music tracks he's created for any use, DRM-free, copyright-free, and royalty-free under Creative Commons license 3.0. It's perfect for people like me making hobby videos. Thanks, Jason!
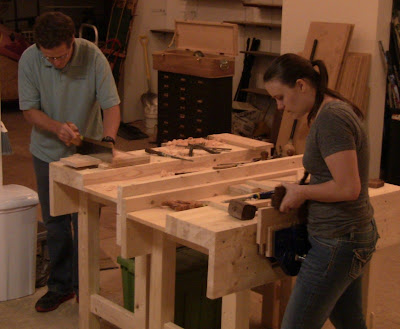
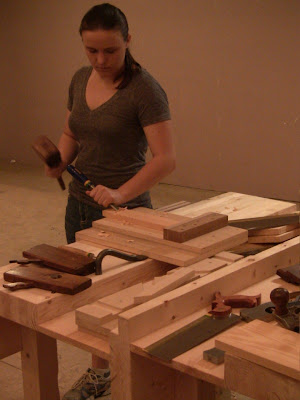
Wednesday evening I taught the fourth class at the Close Grain School of Woodworking, simple joinery. This covers rabbets, grooves, dadoes, full and half laps, and tongue-and-groove. Once again my students were Reeve Goodenough and my daughter Shelby.
Reeve sawing down the wall of a dado while Shelby uses the tonguing plane.
I showed them how to cut rabbets and fillisters (end-grain rabbets, although I've seen conflicting terminology on this) with a wooden skew rabbet plane, with just a chisel, and with just a backsaw. I showed them how to make dadoes with chisel only, with saw and chisel, and with saw, chisel, and router plane. Then I showed them how to make lap joints, essentially wide dadoes, and half-laps, with two ways to remove the waste. I showed them cleanup with small and medium shoulder planes. Finally, I showed them how to use a matched pair of tongue-and-groove planes.
Why show multiple ways to do the same thing? I prize versatility above all else. Your favorite tool for doing an operation may not always be available, and sometimes the conditions of the wood or the workspace may not be conducive to your favorite method. Some methods may just appeal to you more than others.
Knowing multiple ways broadens your abilities so that you can tackle an unusual variation easily. It's nice to know how to do it with both the most limited set of tools as well as the fullest set.
This was a lot of information, so I told them to pick the things that interested them most and try them out, then try additional variations as time allowed. Of course, the key to getting these skills down is then to practice them repeatedly at home. Doing a joint once just gets you started, and it's slow going. You don't really get comfortable with it until you've done it 10 or 20 times.
The tonguing plane produces beautiful little ribbons of wood.
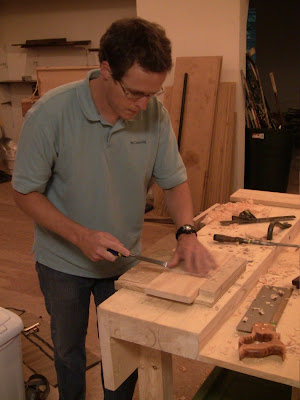
Reeve chiseling out the waste in the dado.
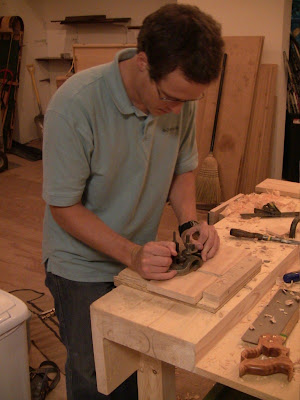
Cleaning up the floor of the dado with a router plane.
Hogging out the waste in a half-lap with a chisel.
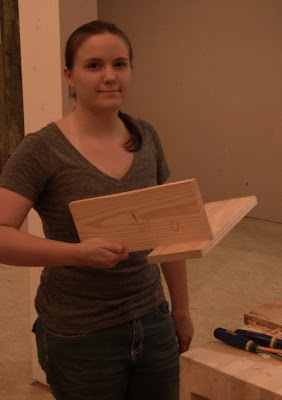
Shelby tests the fit of her dado joint: snug enough to lift the dadoed piece up and hold together without glue.
The next class in the series will be mortise-and-tenon joints. If you're interested in taking a class, you can sign up for one of the pre-scheduled group classes, or schedule a private class.
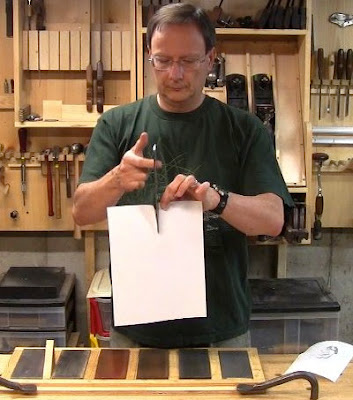
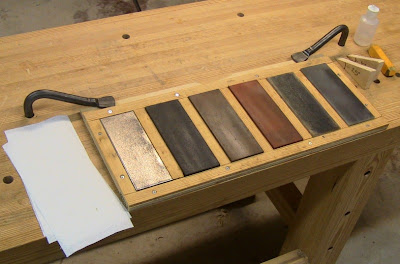
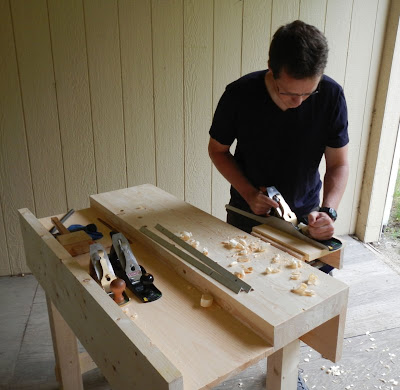
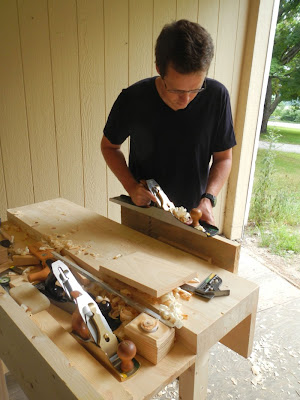
The sharpening setup I used, a variation of my portable sharpening station. I made the holder from shop scraps in half an hour; the oversize base provides a clamping edge for clamping front or back. From left to right, DMT extra-extra coarse diamond plate, Norton coarse, medium, and fine India stones, leather strop block, and Norton translucent Arkansas stone. I'm currently using Flexcut gold compoud on the strop.
For the past couple of years I've been using two somewhat different freehand sharpening methods, double bevel and convex bevel. Both seek to sharpen an edge to the same 30 degrees. However, where double bevel explicitly tries to achieve it by very precise control, often using a sharpening guide rather than freehand, convex bevel is a much freer method, where the angle back behind the edge is irrelevant.
For some time I've been thinking it might be useful to combine the two, and the idea finally converged when I thought of them in terms of tolerances. Double bevel is a matter of tight tolerances, even on the 25 degree primary bevel. Convex bevel is much more a matter of loose tolerances back behind the edge.
I like to apply tolerances at their appropriate scale wherever applicable. Some things require tighter tolerances, and some things can tolerate looser ones. Looser tolerances generally require less work and are more forgiving, so when appropriate, they can actually be better. Save the tight tolerances for when they're actually needed.
Sharpening is a contentious topic. Some might see this as a worthwhile compromise, while others might view it as a horrifying abomination that satisfies no one, like Republocrats and Demublicans. Heresy or revelation, I find it combines the best attributes of both methods while remaining fast, simple, and effective. If you're just learning to sharpen or are having problems with your current method, give this a try and see if it helps.
Think of the sharp end of a chisel or plane iron as having two regions: the region behind the edge, referred to as the primary bevel when using the double bevel method, is at 25 degrees; the region at the edge, referred to as the secondary bevel, is at 30 degrees. The convex bevel method forms them as one continuous curve, but still produces essentially the same two regions.
These regions have different requirements. The primary bevel doesn't need to be precisely angled. It just needs to be strong to support the edge. Because it's thicker, it can be ground at the narrower angle.
The edge would cut more readily at that narrower angle, but it would break down too easily. Because it's the vanishing line where two planes meet, it's thin. In order to provide usable durability, it has to be ground at the higher angle. Careless sharpening can easily ruin a good edge, so more precision is called for.
So let's combine the carefree convex bevel approach behind the edge with the controlled double bevel approach at the edge.
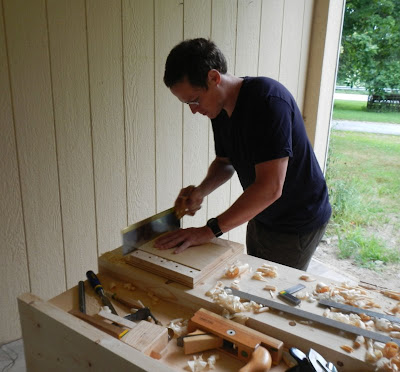
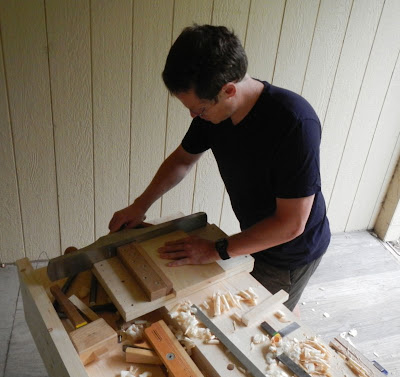
The video below demonstrates the method, first on an old Stanley socket chisel, presumably O1 steel, then on a wide IBC Pinnacle A2 steel plane iron. A2 has a reputation for being harder to sharpen, but other than needing a few more strokes on each stone, I didn't find it any more difficult with this method.
One thing I forgot to mention in the video, I don't put oil on the Arkansas stone because there's usually enough on the tool even after a quick wipe with the paper towel. The Arkansas stone doesn't take much before the tool is just skimming across on a film of oil instead of honing.
I start with a primary convex bevel coming up to 25 degrees at the edge; it probably falls off by 5 degrees as it curves back. You can certainly hold it to a closer tolerance if you feel the need to do so. Then I follow up with a much more careful flat secondary bevel.
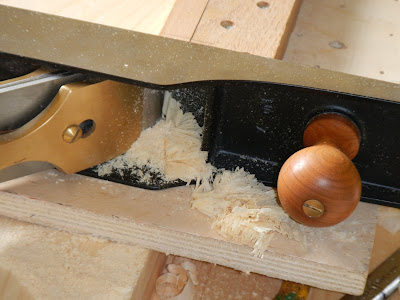
I do heavy, rough shaping of the convex bevel on a DMT extra-extra coarse diamond plate. This removes material very fast, and in fact you need to pay close attention with chisels so that you don't take the end out of square. Once I've established the desired shape, I don't need to use the plate again. Thereafter I maintain the convex bevel on a Norton coarse Index stone, requiring just a few strokes each sharpening. I leave the primary bevel at this coarse surface.
For the secondary bevel, I start with coarse India stone, then progress through medium and fine India stones, Norton translucent Arkansas stone, and leather strop with compound. The coarse stone nips off the end of the 25 degree convex primary bevel quickly, leaving the flat 30 degree edge. The remaining stones and strop then polish that edge.
I maintain control of the secondary bevel by using simple pull strokes. Body geometry implies that pulling the tool back over a distance will alter the angle a bit, so the result is another convex bevel, not a true flat, but at a much finer scale. So this method actually forms a double convex bevel, primary bevel at loose tolerances, and secondary bevel at fine tolerances.
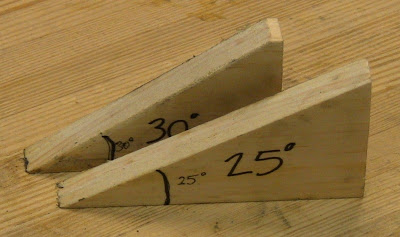
For both angles, I use simple angled wooden blocks cut to the desired angles as sight guides. I set them next to the stones, and angle the tool up or down until it appears to be parallel with the top of the guide. This is simple and provides adequate precision. As you practice with the setup, you can elminate the sight guides.
The sight blocks, 25 and 30 degrees. Easily made from shop scraps ripped at the desired angle.
Depending on the abrasive and the metal in the tool, you only need between 5 and 10 strokes on each stone. This quickly raises a burr. You can raise a larger burr with more strokes, but that just produces a larger flap of metal that will take more work to polish off. Might as well stop as soon as you've gone far enough.
Keeping to a minimum of strokes also makes it fast. The video draws the process out, but I was able to do the entire sequence on the chisel in 58 seconds without feeling rushed. So say you only need at most 90 seconds for any given tool. You can further save seconds during a couple of touchups by only going back as far as the fine India stone. That might mean you need one or two extra strokes on the coarse stone when reforming the convex primary bevel.
Note that this all assumes you've already ground flat and polished the flat back of the blade, as least the inch at the end. Without a flat back, all your work to form the flat plane of the bevel will be meeting up with a rough surface, so will not produce a good edge.
I used oilstones, but this works with any abrasive. The focus here is not on any particular abrasive, use whatever type you prefer, but on the technique.
The stone holder with a sanding block and a Norton 8000 grit water stone replacing the DMT extra-extra coarse plate and the Norton translucent Arkansas stone.
The final word I'd pass on is not to view this as wholly prescriptive. Look at it as a starting point and adjust as you see fit, varying the motion, the number of strokes, whether you add forward strokes to the pull strokes, etc. Again, focus on the technique, finding what works for you. Experimentation is good, even if it doesn't work out, because it shows the limits and the things to avoid.
This past Saturday morning I taught the third class at the Close Grain School of Woodworking, covering final stock preparation. This is where you take your rough-cut pieces and size them to precise dimensions. Returning for this class was Reeve Goodenough. It promised to be a hot, hazy, sticky day, so we pulled the bench outside to the entryway.
Reeve flattens the face of a board with a #7 jointer. The #4 smoother and #5 jack are in the tool well; the two lengths of aluminum angle iron on the benchtop make great winding sticks.
The sequence I follow is known as FEWTEL: Face, Edge, Width, Thickness, End, Length. You first establish the Face and adjacent square Edge, which then serve as reference surfaces for all other operations. The Face, Edge, and End are all at whatever starting point is convenient on the board, but once they're established, the Width, Thickness, and Length then need to be at specific distances from them.
Where rough stock preparation only requires loose tolerances, to within 1/4" or 1/2" and a degree or two of square, this is where you can unleash your obsessive side. Now we're working to within 1/64", 1/128", even 1/1000" tolerances, and angles measured to 1/10 of a degree. The precision weapons that allow you to achieve this are hand planes and shooting boards.
Since most rulers are marked down to 1/32", you can approximate 1/64" and 1/128" by halving and quartering the divisions by eye. The jointer and smoothing planes then take shavings down near 1 or 2 thousandths. That means you can establish flat faces and edges to within less than the thickness of a piece of paper (by my dial caliper, 5 sheets of printer paper are just over 1/100").
You can fine tune width, thickness, and length to the same degree. And if you need to remove a fraction of a degree off an angle, you can. Of course, achieving high precision requires practice with the tools, which must be well-tuned. Work to the precision your current skill level allows, and tighten the margins as your skill improves. Eventually you'll reach the practical limits of the tools and the materials.
There's still a place for rough steps, even here. Having established the Face and Edge of a board, you may need to remove a bit of material to reduce it to proper width and thickness. The initial material removal can be done with scrub or jack plane, taking thick, heavy shavings, more like chips.
It's not unreasonable to remove up to half an inch of width, or a quarter inch of thickness. It may take a few passes, but once the parts have been broken down to rough size, these reductions are quick. Then the finer planes finish them to precise size. Similarly, excess length can be sawn off quickly, to be shot precisely on the shooting board.
For this class, I had Reeve start with a moderate-size piece of rough stock, such as might be used for a jewelry box lid. After going over some options for work-holding and reviewing the order in which the various planes are used (scrub if needed, then jack, jointer, and smoother), I took him through the FEWTEL sequence, dressing the board to smooth surfaces and square all around.
This size board is easy to work with, so is good for starting out. Larger boards and very small ones can add complications, as you try to cover the length with the plane, or find a good way to hold the work steady. He also had some questions about tapering, so we went over that.
Sawing to length on the bench hook, cutting just to the waste side of the line. That's a wooden scrub plane lying on it side in the well.
Using the #7 on the shooting board to precisely square up the sawn end and shave it down exactly to the line.
This is what I mean by fine-tuning. Look at those end-grain shavings from shooting!
After he had practiced with that piece, I gave him a bigger piece, so he could work on body mechanics over a larger length and area.
Reeve joints the edge of the longer piece.
The next class in the series will be simple joinery, such as half-laps and dadoes. If you're interested in taking a class, you can sign up for one of the pre-scheduled group classes, or schedule a private class.
Last month, the organizers of the WoodExpo at the New England Home Show in Boston contacted me with some news. They're relaunching the WoodExpo as The Furniture Project, and asked if I could make the announcement here and unveil their new website.
I'm very flattered that they've asked me to help out, and I'm glad to do it! One of my goals is to promote those helping to spread the craft. These guys have put a lot of effort into doing just that. The WoodExpo has been an excellent venue for showcasing the skills of woodworkers in the New England area, and for encouraging others to participate.
The tagline for The Furniture Project is Design, Build, Show, and that's the name of their new website: http://www.DesignBuildShow.com/.
You can find all the information about the past four WoodExpos there, all the photos, videos, critiques, interviews, and demos, as well as information about next year's event, The Furniture Project 2013.
In particular, you can find theCall For Entries, where you can get information about submitting your own work for possible inclusion in the show. The deadline is January 11, 2013. There's no fee for submission or participation.
This is a great opportunity to push yourself and let others see your work, great exposure for amateurs and professionals alike. Design something, build it, and show it. Once again, it will be at the Seaport World Trade Center in Boston, February 21-24, 2013, part of the New England Home Show. That's an expected audience of 25,000 attendees looking for things for their homes, connecting buyers directly to makers.
In addition to show information, the website is an interactive meeting place for experienced and aspiring makers. While you're there, fill out the NEWSLETTER SIGN-UP. You'll also see the FOLLOW US ON buttons for Facebook, Twitter, Google+, and BlipTV on the bottom right corner of the page. Things are still in the final stages of completion, so you may notice some minor changes in the website over the coming weeks.
So why the change? WoodExpo was a bit of a victim of its own success. It started at the 2009 New England Home Show, showcasing the work of Thomas J. MacDonald, aka Tommy Mac, host of the PBS show Rough Cut. When the Home Show invited him back for 2010, they opened it up to everyone, and Tommy continued to encourage others to join in over the next two years.
However, the growth of WoodExpo created the potential for conflicts with Rough Cut, due to branding restrictions and contractual obligations. To avoid that, the parties involved came to an amicable decision to split off. Since they didn't feel right having a WoodExpo without Tommy's name on it, they officially retired the name for a fresh start. But don't worry, they're still going to have Tommy there, along with many other familiar faces from the past four years. They anticipate a little restructuring that will allow them to provide an even better experience with more coverage.
As with last year's show, there are two categories for submissions, an "open" furniture category, and an "interpretive" category with the theme "Cabinet-on-stand". I've always admired James Krenov's elegant cabinets on stands, as well as various tansu-inspired styles, so that's what I'm planning to build for submission (somehow I always manage to get myself into a bunch of different projects at once, all making varying degrees of progress!).
I'd like to thank the crew of Eli Cleveland, Neil Lamens, Justin DiPalma, Scott Oja, Bruce Somers, and Rick Waters, the organizers of The Furniture Project, for asking me to make their announcement. I take that as a real compliment. Now go design and build something so you can show it!
Rincon de la Vieja volcano hiding in the clouds behind Finca La Anita.
Last week I spent my vacation in Costa Rica with my wife, Cat, and my daughter, Shelby. In addition to a couple of beach days, we did a number of tours, both adventure and tourist-bus style.
Costa Rica has made a significant investment in eco-tourism. I used to do some weekend adventure guiding in Massachusetts and New Hampshire, teaching beginner rock and ice climbing, year-round backpacking, and basic paddling, so this resonates strongly with me.
While we enjoyed all the tours, one that stood out for me was the "Costa Rica's Roots" tour. This was a small group, 4 others besides us, the guide, and the driver. We took a van north to the village of Colonia Libertad in the mountain rain forest surrounding the Rincon de la Vieja volcano, where we stopped at Finca La Anita (Farm of Anita), owned by Pablo Cespedes Trejos and his wife Anita. The last 10 miles or so was on gravel road.
Finca La Anita instantly connected with me on a number of levels. It's a beautiful place, the heat moderated by the forest and the slight elevation. Pablo is a graduate of EARTH University, whose mission is sustainable development, and he has taken on that mission to develop an organic, sustainable farm as an alternative to destructive high-impact methods. He's very engaging and intelligent, constantly experimenting to improve the economic yield of his farm while reducing its environmental impact, at the same time helping provide for the local community.
In addition to a 700-acre farm, Finca La Anita serves as an educational center and base camp for those wishing to learn about the rain forest, with 10 cabins for visitors. I loved the messages of self-sufficiency, preservation, education, and intellectual exploration.
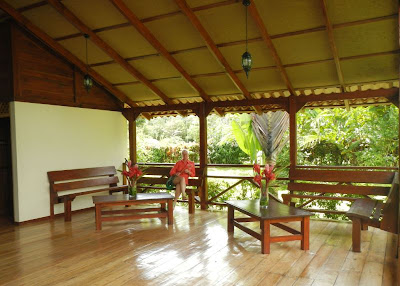
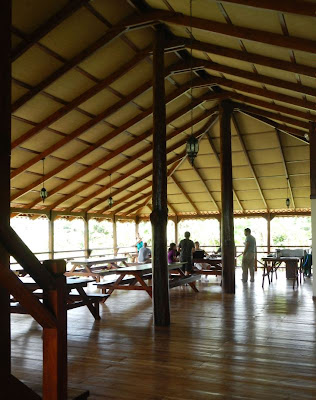
The tour started in the visitor center/dining pavilion, an open-air structure designed by Pablo and built with local woods harvested from the farm and another nearby property. Of course, "local wood" here means beautiful tropical hardwoods that would be exorbitantly expensive in the US.
Cat enjoys the open-air lounge in the visitor center. Look at all that beautiful tropical wood!
The dining area.
Note that timber use is a sensitive subject in Costa Rica due to the destruction of the rainforest. Everywhere I saw wood crafts for sale, there were signs indicating that the wood came from natural fallen timber and debris.
Pablo showed us how to make a simple heart of palm ceviche (see the video below). Heart of palm is literally the core of a 7-month-old palm plant farmed for that purpose. It has a delightful mild taste and texture, slightly nutty with a bit of crunch.
Ceviche is normally a seafood dish; other than the palm, this follows a typical recipe (measurements approximate):
4 cups chopped heart of palm (preferably fresh from the field!)
1 cup lime juice (note that in Costa Rica, the names of lemons and limes are reversed from US terminology, so I'm talking about the green fruit, not the yellow)
1/2 cup olive oil
1 cup chopped onion
1 cup chopped red bell pepper
1 cup chopped tomato
3/4 cup chopped cilantro (preferably wild)
1 tablespoon sea salt
1 teaspoon ground pepper
1 tablespoon Lizano sauce (Lea and Perrins can be substituted)
With the palm spread in a 9x13 dish, spread the lime juice and olive oil over it.
Add the onion, bell pepper, tomato, and cilantro.
Sprinkle on the salt and pepper.
Drizzle on the lizano sauce.
Mix loosely with a spoon, cover and refrigerate for an hour or so to marinate.
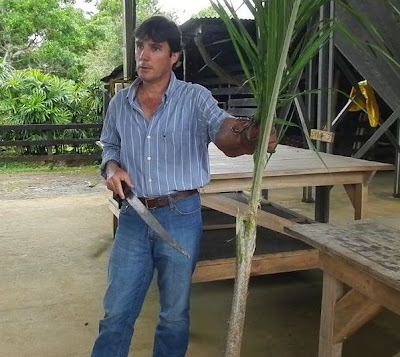
We went over to one of the farm buildings and Pablo showed us a freshly cut palm plant, about 12 feet tall. Wearing a heavy leather glove with chains along its length as blade guards, he used the ever-present machete to cut off the bottom stalk. This is the edible part, the rest is compost. The outer sheath is also waste, composed of layers of long leaf beds, with tiny sharp spines that he said indigenous people used to use for blowdart tips. He split this sheath and pulled the edible heart from within.
Pablo shows us a palm ready for processing. This 12-foot plant will yield one stalk about 2 feet long.
In addition to the ceviche, salad, and meat main dish, the menu included ginger lemonade. For those who like ginger, this is an awesome fruit drink. It starts with normal lemonade. Then you strain sliced fresh ginger root with boiling water to extract the flavor; add this water to the lemonade and chill. The strong ginger gives the flavor quite a kick.
We then toured part of the farm riding in a tractor-pulled cart. Pablo showed us various experimental and production planting areas. His main goal is to produce economically viable crops using a minimum of labor and a minimum of fertilizers (organic only), maximizing benefit at minimum cost. This requires a mixed strategy of spacing, mixed plantings that complement each other in some way (for instance, for pest control), and soil management. The volcanic soil in this area is fairly acidic.
Pablo explains the management strategy for mixing plants and filtering the light. Sprigs from these small decorative palms are used by florists all over the world.
Closeup of the mixed plantings.
One of the more fascinating things he explained to us was the effect of the bromeliads growing on the forest and orchard trees. These are epiphytes, non-parasitic plants that grow on other plants and capture rainwater. Micro-organisms living in this collected water exhale vapor as a biological waste product.
Amazingly, he said this vapor accounts for 30% of the world's cloud production. From such tiny processes in the rainforest emerge global effects. One of the many reasons why rainforest protection and preservation are vital.
We returned to the dining pavilion for lunch. The ceviche was delicious, as was the lemonade and the Central American beef.
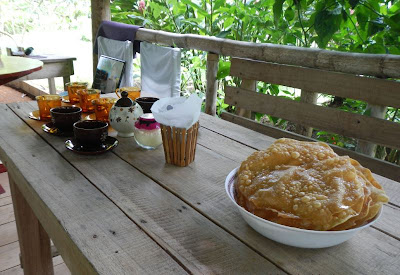
After lunch we bade Pablo adios and went into the village. The next stop was at the home of Araselis, a lady who made us traditional prestinos, a kind of fried pastry, and Costa Rican coffee. The prestinos are the thinnest crust imaginable, covered in sugar cane syrup.
Her house is a typical rural style, a small wooden building with a few rooms. In the back is a beautiful tropical garden with a covered picnic area (one guide told us that Costa Ricans judge their homes by the beauty of their gardens). We ate out here, meeting her husband and daughter, and playing with the family's puppy and parrot.
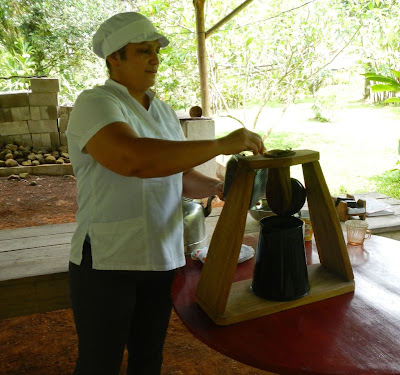
Araselis making coffee Costa Rican style. She fills the cloth filter bag with ground coffee, then pours boiling water through.
A bowl of prestinos ready to serve.
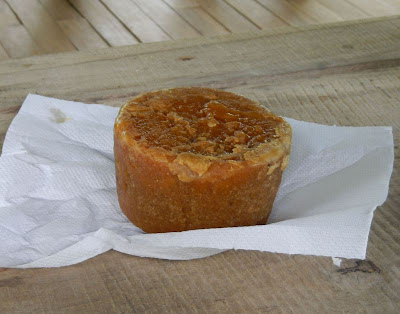
A molded cone of tapa de dulce, made from sugar cane juice, similar to New England maple sugar candy. Some of this is scraped off and dissolved in hot water to make thick agua dulce, syrup for drizzling over the prestinos.
This is the rain forest, and June is the rainy season. It poured for about 10 minutes, then cleared up.
This tour, as well as the others we did (half-day ATVing, visit to Nicaragua, "Pure Adrenaline" whitewater tubing and zip-lining, and visit to Arenal Volcano region) and our overall travel arrangements, were all through Swiss Travel Costa Rica. They did an excellent job, and were very well-organized.
Their guides were very capable and experienced, exceptionally knowledgeable in all kinds of topics including biology, geology, geography, history, politics, and economics. Their drivers were also excellent, a point I really appreciated when we went through the Nicaragua border crossings (picture one lane in each direction, with about a billion 18-wheeler trucks lined up waiting to get through). Everyone we met was friendly.
The Costa Ricans are justifiably proud of their achievements. While not all of their social ideas would be uniformly popular in the US, they get all of their electricity from renewable sources, 12 years of education is mandatory, all education including university level is free, health care is free (paid for through income taxes), there's no government-provided welfare, and literacy is over 95%. All able-bodied citizens are expected to learn how to make a living, and then work to earn their way.
Education is paid for by not having a military, though that makes them dependent on the protection of the UN and the US. While tourism has overtaken agriculture as their main source of employment, surprisingly, high-tech chip production has become their main source of income. They're very protective of their natural resources.
Costa Rica derives all of its electricity from renewable sources. Here's one major source, a line of windmills on a ridge. Hydro is first, followed by geothermal (this is a land of active volcanos), wind, then solar. If they ever switch over to electric vehicles, the entire country could be renewable-powered.
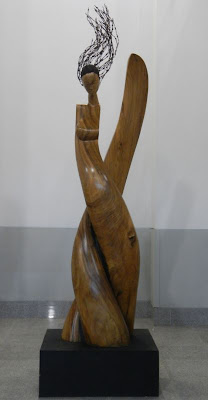
Finally, when I had told Pablo that I do woodworking with hand tools, and sometimes use green fallen wood, he said we should stop at Tony Jimenez' gallery on the way back. The guide was kind enough to have the driver make a quick stop. I didn't get to meet Tony, but I got to admire a number of his pieces.
He uses waste tropical wood for his sculptures, starting with chainsaws and progressing with finer tools to smooth, organic forms, some quite large. He often mixes in metal parts, such as bicycle chains and bits of barbed wire fencing. I recognized his work as one of the pieces at our hotel. There was another at the airport.
Tony Jimenez' 10-foot-tall sculpture "Lily" at the Daniel Oduber International Airport.
I'm a software engineer and woodworking hobbyist in central Massachusetts. "Hobbyist" means I'm free to spend unlimited amounts of time, energy, and money without expecting any return on my investment. I'm a firm believer in see one, do one, teach one.
You can find my book "Hand Tool Basics" at Amazon and other booksellers.