Tuesday, March 26, 2013

NWA Showcase 2013


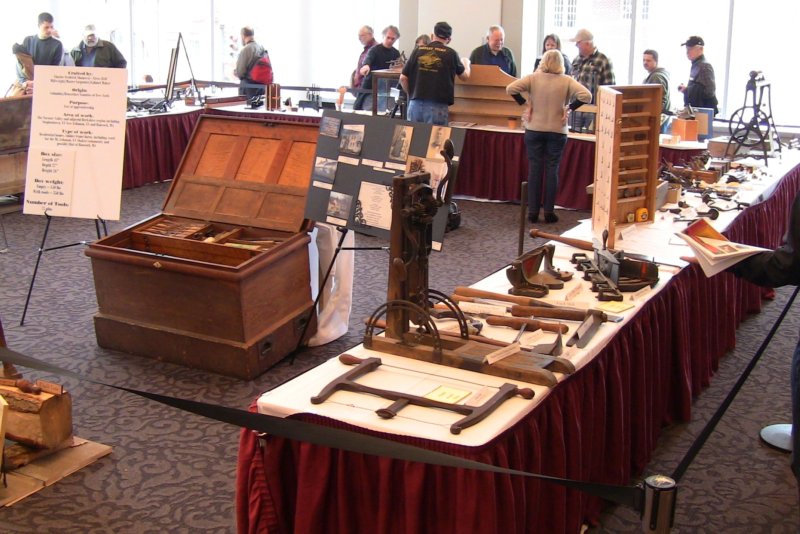
The antique tool display in the second-floor exhibit area.

This past weekend I participated in the Northeastern Woodworking Association's Showcase 2013, in Saratoga Springs, NY. The show combines exhibitions by regional craftspeople in several categories,  trade show, turning symposium, and classroom demonstrations.

I gave two demonstrations each day, one on stock preparation with handplanes, and the other on making cabriole legs with hand tools. Rob Porcaro was originally scheduled to demonstrate, but he had to cancel, and suggested my name in his place. Thanks, Rob!

My wife joined me and we had a great weekend, though we didn't get to see much of the area.

Judging
My first responsibility as a demonstrator was to help judge the exhibition Friday night. We paired up by twos and divided the categories. My co-judge was Peter Gedrys, an expert in finishing and restoration, with a number of articles in Fine Woodworking to his credit. He also teaches finishing classes.

This turned out to be quite fortuitous. As we looked at the various pieces in the amateur categories, we discussed the finishes among other aspects. Typical for amateurs including myself, most of the finishes were pretty basic.

Peter likes to get woodworkers out of their comfort zone and working with color to enhance their work. He said they only do half the project, the construction, then let it go to waste by not doing the finishing half. Don Williams, recently retired senior furniture conservator for the Smithsonian Institution’s Museum Conservation Institute, had previously told me the same thing.

To give you an idea of their attitudes, Don refers to "vomiting polyurinate" all over the work, and Peter refers to it as "polygoopathane" (Don and Peter are both colorful characters, even without dyes or stains).

After we completed the judging, I checked the schedule and noted that Peter's sessions interleaved with mine, so I made a note to attend both of them. The first was on using dyes to enhance color, and the second was on using shellac.

I realized later that all the pieces we selected as tied for first in one furniture category and first in another exhibited the strongest color contrasts. They also showed excellent execution and craftsmanship, but clearly the coloring in details contributed to the overall effect.

Peter and I both chose the fantastic sculptural piece below by Brad Conklin as first place in the "Other" category. The photo doesn't do it justice, but the rays were wonderfully sweeping curves.


Brad Conklin's awesome sculpture.

Demonstrations
For my handplane demonstration in the morning, I first noted that I was showing just one particular way of working with planes. Other people have other ways and prefer other styles of planes. As I've said before, I'm not necessarily showing the way to work, I'm showing a way, and there are plenty of other reasonable ones.

I also noted that these skills are hundreds of years old, and I'm just helping to pass them on to the next century. Most of what I know about handplanes I learned from the work of Chris Schwarz.

I covered the range of plane sizes, starting with the mid-size Stanley #5 jack plane with a cambered iron for roughing, then the longer sizes for flattening (using a Lie-Nielsen #7 Jointer) and the shorter sizes for smoothing (using a Lie-Nielsen #4 Smoother). I also showed an antique Stanley #18 block plane, as well as a modern wooden ECE scrub plane and an antique wooden jack plane.

I went through the FEWTEL sequence (Face, Edge, Width, Thickness, End, Length) to square up a rough piece. I showed how to use a shooting board on the end grain, for both square and miter ends. I told them if they didn't want to make their own like mine, they could get a nice one from Tico Vogt in the trade show.

At the end I asked if anyone wanted to try the tools out, and one fellow came up and went through the process of squaring an edge and taking a rough face down to a smooth surface.

Wilbur Pan was there with his son James, and after the show tweeted that thanks to my talk, James could now identify all of his planes. Thanks, Wilbur!


Demonstrating how to align the iron of the #7 jointer. Photo by Cat Branam.

For my cabriole leg demonstration in the afternoon, I took a squared-up mahogany leg blank and showed how to turn it into a cabriole leg completely by hand. Why do it that way? Two reasons: 1) because I can, and 2) because there are times when you may not have access to a lathe for the feet or a bandsaw for the roughing out.

I showed two methods for roughing out the curves, doing one side with a full-size bowsaw and my Gramercy Tools bowsaw, and the second with a full-size antique ripsaw and a Lie-Nielsen 12" crosscut tenon saw. Then I shaped part of the pad foot with a Gramercy Tools cabinetmaker's rasp.

I knew I wouldn't be able to complete it in the time available, so I borrowed a page from Roy Underhill's instructional method and had a leg already roughed out for the remainder of the demo. With the leg in my Al Breed carving vise, I used carving gouge, Lie-Nielsen spokeshave, and rasp to smooth the surfaces, fair the curves, and round the corners, finishing up with a scraper.

As before, I asked if anyone wanted to try things out, and Wilbur's son enthusiastically jumped up. I pulled up my toolbox for him to stand on and he tried out the spokeshave and rasp.


Roughing out a curve with a full-size bowsaw and turning blade, keeping a careful eye on the line. Photo by Cat Branam.


Wilbur Pan's son James rasping down a curved corner.

On Sunday, Kevin, one of the participants in my classes at the New England Home Show last month, came to the cabriole leg demo bearing the gift of two six-packs of The Alchemist's Heady Topper direct from Waterbury, VT. These have been secured at an undisclosed location in my basement fridge.

Peter Gedrys
Peter gave two excellent demos on finishing. The first was on working with dyes to subtly color the wood. He said most woodworkers are afraid to add color, leaving the wood its natural color. Yet no one is afraid to add salt and pepper to their food to enhance the flavor. Careful use of color can similarly enhance the appearance of wood, both in tone and chatoyance (the cat's-eye effect that makes the grain pop).

He said his bible is Johannes Itten's book The Art of Color, which unfortunately appears to have entered the realm of the high-end collector judging by its price. Fortunately, his later book The Elements of Color, which condenses and simplifies the earlier work, is more affordable.

The key is understanding the use of complementary colors in sequence to control the tones. He demonstrated by dying a piece of mahogany with yellow mixed up from Lockwood powdered dye. This looked nice wet, but once it dried looked horrible. However, not to panic, this was just step one.

He then added Lockwood antique cherry dye. The combination of yellow and warm reddish brown gave it a slight orange tone. He followed that with shellac with a little blue dye to neutralize the orange, since blue is complementary to orange on the color wheel. This produced a wonderfully warm, rich, deep, aged mahogany, the grain chatoyance flashing in the light. That was the effect he wanted us to see.

He emphasized the use of "ladders", test boards where he progressively overlays layers, always leaving some from the previous stages so he can see the effect of each one in comparison with the rest. This allows him to fine tune the color before committing to it. Just as with hand-cut dovetails, practice on scrap first before trying it on a prized project.

Peter's second demo was on using shellac. He showed how to add light coats of shellac with a goat hair wash brush. He also showed how to form a pad for French polishing, and demonstrated the process to build up a fine finish.

I was sold. I'll be practicing both of these in the shop. The final effects drew out the grain and natural colors dramatically, like spices on food.


Peter Gedrys spreading warm reddish brown dye onto yellow-dyed mahogany.

Don Boule
One of the professional pieces that we really liked during the judging was Don Boule's Dunlap-style highboy. Peter recognized the style before seeing the name, then realized whose piece it was. The work was incredibly crisp, with dramatic grain.


Don Boule with his tiger-maple highboy, winner of one of the professional excellence awards.

The style tweaked my memory as well. Then someone said hello to me as he walked by Saturday, and I was trying to remember who he was. During Peter's class where he was joking with Don, I made the connection.

It was Chris Boule, Don's son. You may remember his piece from my post on The Furniture Project at the New England Home Show. Father and son are a wonderfully talented pair.


Chris Boule with his highboy at the New England Home Show, winner of that show's Best Craftsmanship Award. Note the family resemblance in the furniture.


Don also had this beautiful Queen Anne side chair in the exhibition.

Trade Show
The trade show featured the usual array of power and hand tool vendors, as well as several continuous demonstration areas, and paid classes by Garrett Hack and John Wilson. I stopped by the Society of American Period Furniture Makers booth to say hello.

One of the booths I liked was Dave Nilson's pole lathe. He let me try it out. It took a bit of getting used to, and his lathe chisel had a high-angle grind on it, but once I switched to left-handed, I was getting long wet shavings off a piece of green pine.

This is the same lathe in Roy Underhill's The Woodwright's Guide: Working Wood with Wedge and Edge. I really need to build one of these. Dave used it to make parts for the Onrust Project.


Dave Nilson on his pole lathe.

Chuck Bender was there selling DVD's and promoting his school, The Acanthus Workshop. Even though I had just given two demos on making cabriole legs, I bought a copy of his Cabriole Legs Simplified; I'm a firm believer in learning as many approaches from as many people as possible. Even if you only end up integrating a few parts of it into your own work, it's worthwhile and improves your versatility.


Chuck Bender smoothing a cabriole leg with a spokeshave.

As I told people in my handplane demos, Tico Vogt was there selling his shooting boards. He had a new guide system to prevent rocking of a Lie-Nielsen shoot board plane.


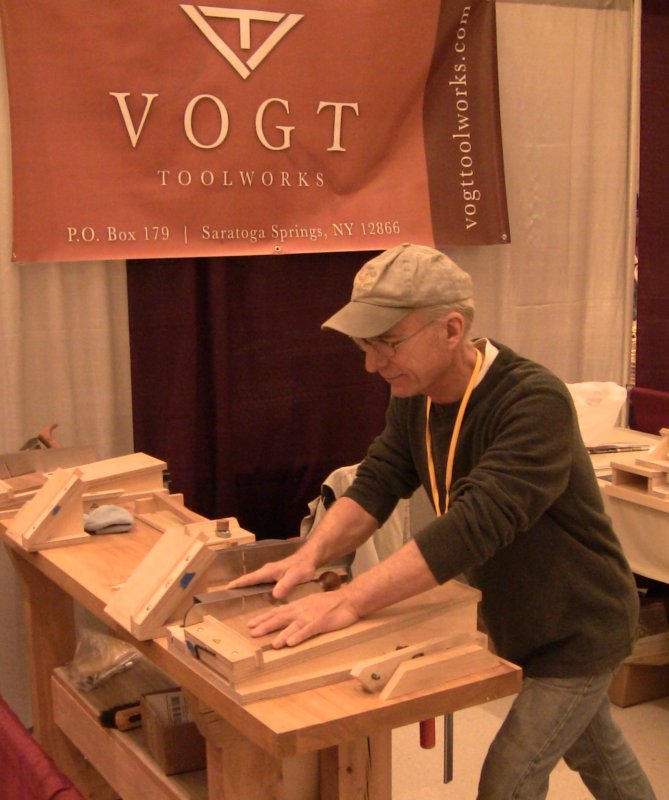
Tico Vogt demonstrating his shooting boards.

Another vendor I really admire is Matt Bickford. He makes fantastic wooden moulding planes, and has published an excellent book on using them, Mouldings In Practice. He also had a gorgeous tilt-top pie crust table in the exhibition.


Garrett Hack is one of my favorite woodworkers. He's a master of fine details. He was teaching a class on making scratch stocks and using them to do fine decorative moldings and inlays.


Garrett Hack teaching his scratch stock class.


He had this beautiful small cabinet, illustrating a number of details of shape and color.

Now that the show is over and I have four partially-completed mahogany cabriole legs, I guess I need to build another Queen Anne foot stool!

Sunday, March 17, 2013

How Do I Get Started With Hand Tools?

This question comes up repeatedly in demos and online woodworking discussions. Often it's the even more generic "How do I get started in woodworking?"

Invariably it elicits dozens of opinions, all of them perfectly valid, because there are many ways to skin a cat. Everybody has their favorite way of getting the job done and the tools to do it. This is my contribution to the fray.

The answers depend to a large extent on your interests in working with particular types of tools. There's an entire spectrum from all hand tools to all power tools. Here I'll cover what it takes to do at least some of the work with hand tools.

You can read my commentary on the motivational aspects in Why Use Hand Tools? and Why Use Power Tools?. This post is a brief instructional overview for those who are just learning about it. For more in-depth instruction, see Intro Hand Tools.

Say you've caught the woodworking bug and want to build a straightforward starter project, like a toy box for the kids. When you get home with a load of lumber, you're going to need to do the following:
  • Break the boards down into rough manageable size.
  • Take the parts down to the final dimensions in the plan.
  • Cut the joints for the parts.
  • Assemble the parts and any hardware.
  • Apply finish.
This is the basic procedure for any project starting from raw lumber, whether it's a bit of household carpentry, a piece of furniture, or a bit of cabinetry, no matter how simple or fancy the joinery.

The amount of rough and final stock preparation depends on the lumber you're using. If you're using surfaced and dimensioned stock from a home center, this might be fairly minimal, working with standard thickness and widths.

If you're using lumber from a woodworking store or a lumber mill, whether rough or surfaced, it will be more involved.

Even if they've done some rough cutting for you, you'll probably need to cross cut to final length, you might need to rip something to final width, and you might need to plane to thickness. If you're using rough lumber, you'll need to plane for surface.

In addition to the tools to do these operations, you need the skills to use them. It just happens to be a different set of skills depending on whether you do a given operation with hand tools or power tools. You need to learn the skills and practice them on scrap before you start on your good lumber.

Breaking boards down: to do this by hand, you need two full size saws, one crosscut and one rip. You need some kind of support for the lumber while you're cutting it, like sawhorses or a saw bench.

Taking parts to final dimension: to do this by hand, you need handplanes, typically a jack plane, jointer, and smoother, and a small or medium handsaw like a crosscut backsaw. You need a workbench to work on, and bench accessories like clamps, hold-downs, bench hooks, and shooting board. For marking out, you need a square, a marking gauge, and a marking knife.

Cutting joinery: to do this by hand, you need small rip and crosscut back saws, chisels, and a mallet; a coping saw is also useful.

Assembling parts and hardware: to do this by hand, you need hand drills, both egg-beater and brace style, an assortment of bits, screwdrivers, and a hammer, to drill pilot holes and drive screws and nails. Typically only rough carpentry jobs call for large nails and hammers; most other jobs where nailing is required use smaller nails and hammers. You need clamps for gluing up (there are a large variety of clamp styles, and you can take it on faith that you never have enough).

These are the basics to get started. There are plenty of other specialized tools as you advance your skills or need to take on specific tasks.

Unfortunately, most of the hand tools you can find in home centers and hardware stores are of such poor quality they're not worth using. You either need to get old ones from the time when everything was built with hand tools and people depended on them for their livelihoods, or get brands from modern specialty manufacturers, typically only available from woodworking stores or online.

Good tools are an investment. Avoid cheap junk, because you'll just have to spend more money replacing them with better ones.

There's one more important area: sharpening. Trying to learn how to use hand tools without learning how to sharpen is like learning how to drive without learning how to put gas in the tank. It's a basic frequent maintenance procedure, and despite all the mystique that's built up over it, it's not that hard. No harder than filling the tank.

You can have someone else do it for you, but after a few hours of use, you need to do it again. Maybe sooner depending on the wood you're using. Even the best sharp edge wears down in use, just as the gas in the tank gets used up.

If you don't learn how to sharpen your tools, they'll turn into single-use items. This is different from working with power tools, where power overcomes a dull blade until you replace it with a new one. Like a pencil, you sharpen it, you use it and wear it down, you sharpen it again. Unlike a pencil, a good tool will last for decades.

Sharpening: this is an entire topic unto itself due to the variety of methods available. But you'll need some kind of sharpening system, whether it's oilstones, waterstones, diamond stones, abrasive papers, or some kind of mechanical system.

Tuesday, March 12, 2013

CGSW 2013 Class Schedule Now Available


Some of the hand tools available for your use during classes.

The group class schedule for the Close Grain School of Woodworking is now online, and the school is also available for private classes. These are all hand tool classes. Here's the quick view:

Saturday Group Classes 2013:
Date Time Title Cost
Sat May 11 9AM-12PM Sharpening $75
Sat June 8 9AM-12AM Rough Stock Preparation $85
Sat June 299AM-12PM Final Stock Preparation $85
Sat July 13 9AM-12PM Simple Joinery $85
Sat Aug 17 9AM-12PM Mortise and Tenon $85
Sat Aug 24 9AM-12PM Dovetails $85

Weeknight Group Classes 2013:
Date Time Title Cost
Wed May 8 6:30PM-9:30PM Sharpening $75
Wed June 5 6:30PM-9:30PM Rough Stock Preparation $85
Wed June 266:30PM-9:30PM Final Stock Preparation $85
Wed July 10 6:30PM-9:30PM Simple Joinery $85
Wed Aug 14 6:30PM-9:30PM Mortise and Tenon $85
Wed Aug 21 6:30PM-9:30PM Dovetails $85

For full details, including links to blog posts about last year's class sessions with photos, click here.

Remember that you can also have private classes at your location. I've updated my distance criteria to accommodate people who are a little farther away. Full details here.

Wednesday, March 6, 2013

SAPFM NE March 2013 Meeting


Matt Cianci sharpening a saw.

Once again, the SAPFM New England chapter March meeting was held at Bob Van Dyke's Connecticut Valley School of Woodworking in Manchester, CT.

The place was full due to the excellent lineup of speakers on the agenda: Brock Jobe, Don Williams, and Mary May. In addition, planemaker Matt Bickford and saw wright Matt Cianci had tables setup.


Bob Van Dyke opens the meeting.


Freddy Roman, SAPFM New England chapter coordinator, talks about upcoming events for members.

Brock Jobe, Professor of American Decorative Arts at Winterthur Museum, gave the morning presentation. This was a study of turreted tea tables and their development from English card and tea tables.

He had some great photos showing various construction details, particularly how the legs were fastened. Some of this information will be published in book form in the future. I love the graceful form of all these table types and hope to build some of them.


Brock Jobe presenting a study of turreted tea tables.


Matt Bickford demonstrating his magnificent wooden moulding planes.


Look at the beautiful ribbons this plane produces!

One of the interesting projects in the area is the restoration of the Strong-Howard House in Windsor, CT, through the Windsor Historical Society. Christina Vida, WHS Curator of Collections and Interpretation, described how they'll be furnishing the house partly with replica furniture in partnership with the Connecticut Valley School of Woodworking.

CVSW will offer classes in these furniture designs, and students may submit their work for juried acceptance into the house. This is a great opportunity to learn new skills, build some beautiful furniture, and participate in a historical preservation project.


Christina Vida describing the restoration of the Strong-Howard House.


Mickey Callahan, SAPFM co-founder, talking about the new editorial board for SAPFM's annual journal, American Period Furniture.

Don Williams, now retired from his position as senior furniture conservator for the Smithsonian Institution’s Museum Conservation Institute, gave a presentation on restoration where he discussed balancing the decisions that had to be made among competing criteria.

He showed us the decision-making model he's used for decades to help guide him through the process of restoring a piece of furniture. This balances the needs of the object with the needs of the user, the technical limitations of the materials and skills with the desired outcome and quest for perfection, and the resource management of finite time and money with the ethical constraints to preserve historical materials and documentation and allow retreatability.

He showed us several examples of applying this process as well as some of the specific restoration methods. Some items were used everyday in private homes, while others were intended to remain for years in static displays. Each situation had different requirements and various ravages of time to overcome.

Meanwhile, he had to decide how much of the visible history of the object to leave in place. As he said, once you clean off the dirty patina to show the grain underneath, you can't put the dirt back if you don't like the results.


Don Williams demonstrating a wax finish burnished with a polissoir.

Carver Mary May gave a demonstration of carving various decorative moldings. These could be used for picture frames or for architectural moldings that might run into the hundreds of feet. She does beautiful work, and like all carvers, makes it look deceptively easy.


Mary May demonstrating sharpening a carving gouge.

Matt Cianci finished up the day with a presentation on one of his hand-made handsaws.


Matt Cianci explains the cant of a backsaw he made.

SAPFM membership is open to anyone interested in period furniture, whether you are a maker, a restorer, a collector, or just enjoy learning about the history of these beautiful pieces, from hobbyist to professional. As you can see, one of the great benefits of membership is a chance to meet people like the presenters here.