 Woodworkers Guild of Rhode Island monthly meeting at Keeseh Workshop.
Week before last was extremely busy. Saturday I finished up the shop work and photos for an article I'm writing for the
Guild Of New Hampshire Woodworkers Journal. Wednesday after work I drove down to Providence, RI to do a demo for the
Woodworkers Guild Of Rhode Island monthly meeting.
The next Saturday morning I was in Rollinsford, NH for the GNHW Period Furniture Group meeting with Al Breed. Sunday afternoon I taught a sharpening class at
Woodcraft in Woburn, MA. All week I worked on the text for the article, finishing up while commuting on the train.
Whew! Plus my wife and I spent the first Saturday night at a small concert where the main act came on at 10:30, and then Friday night we did the 5k walk at the
Electric Run held at Foxboro Stadium.
Journal Article
The Guild of New Hampshire Woodworkers
Journal article is on breaking down and dimensioning stock with hand tools. It'll be spread over two issues due to length. I've been on a bit of a kick with this topic lately, since that was most of what I covered at
my last Woodcraft class, and was my demonstration at the WWGRI meeting.
One of the main points I want to convey is that these skills allow you to setup a workshop anywhere. When you combine them with hand-cut joinery, the simplest space can become a workshop temporarily or permanently. No power required, no noise or big mess. They open the craft to a broader range of people who otherwise might not be able to participate.
The quarterly
Journal is one of the benefits of membership. Soft copies of back issues are available online free to members. If you'd like to get this article in glorious glossy hard copy, along with other fine articles contributed by members, join the Guild
here. It's open to anyone, not just those in New Hampshire, and the cost is very modest.
WWGRI Monthly Meeting
Woodworkers Guild Of Rhode Island Program Coordinator Bob Fontenault had contacted me a few weeks ago to invite me to be the guest speaker at their October meeting. I replied that I was happy to do so and suggested the stock preparation demo.
He asked for a brief bio to include in their
newsletter, and Editors Ned Quist and Julian Peters spent some time here on the blog picking out some photos. In addition to the meeting announcement they always put on the cover, Julian did a very nice full page spread inside. They billed me as the busiest amateur woodworker in New England. I won't argue this week. Thanks, guys!
The Guild has recently started holding their meetings at the
Keeseh Workshop in Providence. This is a very nice membership facility with lots of room and a variety of tools available for people to use. There were 32 people in attendance.
President John Heaney opened the meeting with general business, followed by brief show-and-tell. A young fellow named Suresh showed a hand plane that had belonged to his grandfather. One of the other members had shown him how to clean it up with electrolysis and other restoration methods. It looked brand new, ready to go to work, and Suresh said he really wanted to learn how to use it. It's great to work with a tool that has a family history.
During the break I got to meet a couple of people who are readers here. Thanks, Dave and Chris! I had also commented on
Ralph Boumenot's blog that I would be at the meeting, and Ralph came as well. Thanks for coming, Ralph!
For my demo, I had my
Queen Anne footstool to show the kind of work you can do with hand tools, my
portable toolbox with saws, planes, and accoutrements, as well as saw bench, shooting board, and
portable sharpening station. For lumber I had a length of rough milled pine from
Parlee Lumber, marked up for a variety of rips and crosscuts.
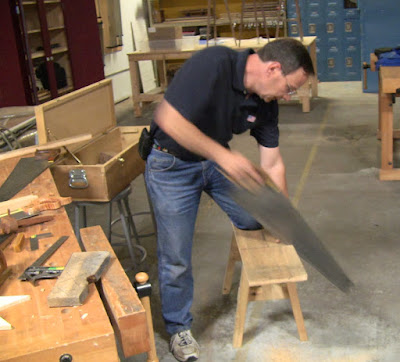
I started off with the difference between rip and crosscut saws. I ripped a strip off the full length of the board on the saw bench, explaining how to steer the saw, then crosscut a few sections off. I ripped one of the smaller pieces in half in the main bench vise, then
resawed one of the halves. In a few minutes I had a variety of pieces roughed out.
 Starting a full-length rip. Photos by John Heaney.
 Starting a crosscut.
 Resawing a piece.
From there I talked about hand planes and proceeded to four-square one of the pieces. I showed how to shoot the ends precisely on a shooting board.
Tico Vogt had been guest speaker at their August meeting, showing his
Super Chute board, so they were familiar with the concept.
 Shooting the end of a piece.
Everybody enjoyed the demo. After some question and answer, the meeting broke up and people came up to talk and try out the tools. I mentioned the upcoming Woodcraft class to John, and he sent out an email about it to members late that night.
GNHW Period Furniture Group Meeting
This was the first in the third series of bi-monthly meetings that Al Breed has been conducting for the group. In each series he's presented a number of specialized topics building various period furniture projects. First was a Townsend Document Chest, second was a Plymouth Federal Table, and this one is a Townsend Pembroke table (you can see photos of the Townsend pieces in the book
John Townsend: Newport Cabinetmaker
). He demonstrates, we watch, then a number of members build along at home.
 Al Breed carving out the end of the flutes on a Pembroke table leg.
Al is a fantastic craftsman. A winner of the
Society of American Period Furniture Makers Cartouche Award, he does museum-quality work. Where is he getting the details of the Pembroke table? Well, there are some measured drawings in the book
Construction of American Furniture Treasures
, but he's going straight to the source, making a trip to the Metropolitan Museum of Art in New York City to take measurements from the actual piece.
They don't let just anybody touch their exhibits. It's the opportunity to spend time with people like this that make membership in organizations like the Guild and SAPFM invaluable.
I've shot video of nearly all these meetings. By now I've accumulated 2 years worth, which I'll be editing down to produce a DVD for sale. The main challenge of filming in this type of venue is there's a lot of start and stop as people ask questions. That makes capturing a linear narration tricky.
I'm also trying to capture detailed footage of what he does. Since some of the operations require repeated work, I'm able to get a couple shots of it. So I have a big editing job. Ultimately I want to have a video that's engaging to watch and conveys a lot of useful information. A huge thanks to Al for doing this. Yet another example of how generous he is with his skills.
As an example of what you can expect, here's a rough edit of one of the meetings, where he demonstrated turning a leg for the Plymouth table.
Woodcraft Sharpening Class
Sunday afternoon I brought a variety of sharpening setups and saw sharpening tools to Woodcraft in Woburn, MA. I had three students, one of whom turned out to be Suresh from the Rhode Island meeting. Thanks for coming, Suresh!
I went through my usual discussion of sharpening media and methods, bevel angles and shapes. I had a separate granite floor tile with various grits of sandpaper for back polishing for each student. I demonstrated all the procedures for freehand sharpening, then turned them loose.
They soon had their tools taking nice pine end grain test shavings. Suresh opted to try the convex bevel method, which I first learned from
Jacob Butler, also promulgated by
Paul Sellers.
 Suresh flattening the back of a chisel.
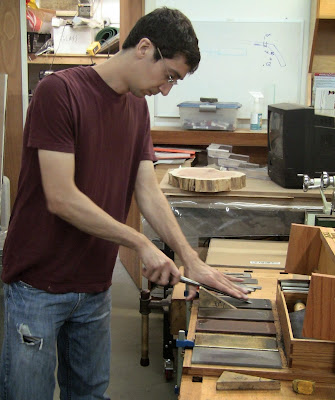 Using the convex bevel method to sharpen the chisel on Norton oilstones.
One student had a large antique framing chisel that looked like it had been through a war. It had been so abused in a past life that someone had repaired it by filling the cracks in the socket with molten bronze. Made for an interesting look.
The student had done a good job hollow-grinding it, so I showed him how to register the two points of the grind on the stones and hone it. I tried it out, and wow! A chisel with this much mass moves through pine like it was butter.
He was unfamiliar with shooting boards, so since I still had everything in my van from Wednesday night, I brought one in and demonstrated it. He had an old low angle block plane that made a nice shooter.
I went over saw sharpening, explaining the difference between rip and crosscut teeth. I demonstrated the process, then Suresh filed the teeth on his backsaw.
 Filing a backsaw.
My next class there will be
mortise and tenon by hand, December 8.


