Book cover, showing the plane till in my basement workshop.
If you'd like a copy of my book, Hand Tool Basics, published by Popular Woodworking Books, it's now available online at ShopWoodworking.com.
It's available in both hardcopy and e-book formats. It's a direct companion to my video series, Intro to Hand Tools (more information on the series, including the free Part 1 and sample lesson, is at Intro To Hand Tools Downloadable Videos).
Whether you want to augment your power tool woodworking with some hand skills or you want to do everything with hand tools, whether you have a big shop or just a tiny space, this is for you.
The images in the book are taken from the digital video I recorded for the series, and its organization and content match the series. The book is therefore a matching visual reference for hand tool woodworking, with some 1400 captioned photos.
Why have a book version identical to the video series? Several reasons:
Some people prefer learning from videos. Some people prefer learning from books.
It's nice to have both so you can sit back and watch the videos, then have the book with you on the workbench as you follow the steps for a procedure.
The dynamic images in the video allow you to watch the tools in motion, while the static images in the book freeze the action so you can take your time examining details. These complementary views help you get the whole picture.
You can see my acknowledgements and references here. These are the people who gave me the knowledge.
Here are the full Contents and Index pages so you can see what's covered. As always, I like to show multiple ways of doing things, so you can tackle any situation based on the tools you have available, your personal preferences, and your current skill level.
Here are a few sample pages representative of the layout and level of detail in the book.
From Chapter 1: The Tools, showing a selection of the tools covered.
From Chapter 5: Mortise and Tenon Joinery, showing some of the fistfights and fundamentals.
From Chapter 6: Dovetail Joinery, showing some of the steps laying out and sawing a tails-first through-dovetail.
Feel free to email me at sdbranam@gmail.com if you have any questions about anything in the book. One of the challenges is getting just the right explanation that conveys the information to all readers regardless of their experience and skill level, and sometimes that fails.
The Queechee Gorge near Woodstock, VT, on the drive home, beautiful even on a gray day.
Friday and Saturday, October 7 and 8, I demonstrated hand tool techniques at the Lie-Nielsen Hand Tool Event at Shackleton Thomas, in Bridgewater, VT, run by Charles Shackleton, furniture maker, and his wife Miranda Thomas, potter.
Also at the event were Matt Bickford with his wonderful wooden molding planes, book, and DVD, and Isaac Smith of Blackburn Tools, selling saws.
I was promoting my Intro To Hand Tools online course at Popular Woodworking University. See this blog post for a full episode guide, tool list, and sample videos.
And newly available, the course parts can now be purchased individually as digital downloads from Popular Woodworking's online store, along with my recorded webinars and digital magazine issues containing my articles.
My setup, with workbenches, boxes of tools, Nick Offerman's book, and large-screen monitor in the background running my trailer.
I did my usual ad hoc demonstrations as people asked questions and I offered to let them try anything they saw on the workbench.
Two things proved especially popular: Terry Moore's scraper sharpening method, and Yoav Liberman's gouge sharpening method (where I add a concave surface to the block, and use it with my in-cannel scribing gouge). Both of these tools present particular sharpening challenges, so people are eager to see effective methods.
I must have sharpened my scraper 15 times over the two days. Since I had only brought white pine, Lindley Brainard, the shop manager and one of the Shackleton Thomas furniture makers, let me pick a few nice pieces of hardwood from the basement scrap pile so I could demonstrate real scraping.
The results were glorious. I produced a cloud of white, brown, and reddish shavings in maple, walnut, and cherry as people watched and tried it for themselves. I really should have gotten a photo. You could have stuffed a nice comfy throw pillow with the pile of feathery shavings.
I've included Terry's method below, because I've gone through at least 5 other methods before I settled on this one, and it's worth sharing.
Pizza With The Shackletons
As I mentioned in my post about last year's event, Charles is the cousin of Ernest Shackleton, who accomplished one of the greatest feats of leadership and survival of the past hundred years. If you're not familiar with the story of the Endurance, take some time to read this.
Friday afternoon, Charles came through and invited us all to pizza at his house. My wife and I joined the caravan following Lindley's car up the narrow winding roads in the hills above Bridgewater to an absolutely spectacular spot. The entire valley lay before us in magnificent Fall color as the last rays of the sun dropped below a cloudless horizon, a fire crackling in the firepit in the yard.
I expected this to be a delivery from one of the local pizza parlors. But no! Nothing so mundane. Miranda had made up dough and toppings, and we each made up a pie. Then, Charles shoved them into the stone oven built into the giant fireplace in the living room of their antique Colonial house. Because, of course, that's how you have pizza!
Along with the LN crew and some of the Shackleton Thomas employees and spouses, Charles' brother Arthur and his wife, artist Carol Booth were visiting from Ireland.
Charles Shackleton baking a pizza. The fire was actually orange, not purple!
It was a magical evening, the kind that lives in your memory forever. There we were, enjoying pizza fresh from the hearth in a home with a deep connection to history, with a group of happy woodworkers. I probably had too much wine as I basked in the warmth and companionship of new and old friends.
Our Accommodations
My wife and I spent Friday and Saturday nights at the lovely Deer Brook Inn just down the road in Woodstock. Innkeepers Phil Jenkins, Win Coffin, and Reba Burress provided excellent food and service.
Phil bought the inn this past Spring after having previously owned the beautiful 1842 Inn in Macon, GA. You can read a nice article about the new ownership here.
Terry Moore's Scraper Sharpening Method
This is actually an article I did for the Guild Of New Hampshire Woodworkers' quarterly Journal. I've made one addition to the original text regarding burnishing, as noted below. This is the exact procedure that I showed people, and it worked every time, with great repeatability.
Fig. 1: Using a freshly sharpened card scraper to thin down walnut strips to 1mm for practice bending violin sides.
I've recently taken an interest in making violins by hand, and after having watched a number of videos and read several books, I was very happy to see a meeting of the Granite State Luthiers at BJ Tanner's workshop in Manchester.
The topic of the day was sharpening. Several attendees demonstrated their setups for sharpening chisels and plane irons. I showed freehand sharpening a chisel on oilstones with my portable sharpening station. Terry Moore demonstrated sharpening a card scraper. This was the one that stood out for me.
Terry is a founding member of both the Guild and the New Hampshire Furniture Masters, with decades of experience. This is why I love being a member of the Guild. Amateurs and hobbyists like myself get to mix with and learn from masters of the art, who are happy to share their knowledge. Terry graciously gave me permission to write up his method. Sharpening is challenging enough for beginners, but scrapers are downright voodoo mystery. I collect scraper sharpening methods like I collect planes and chisels, always eager to acquire another one. I've settled on one that produces good results. But when I tried Terry's method in my own shop, I found it far superior. The proof was in the gorgeous fluffy shavings I was able to produce on a variety of hard and soft woods. The method I've been using isn't all that much different from his (and in fact all the methods are pretty similar), but he's distilled it down to bare essentials that quickly produce superior results. Simple, fast, effective, and repeatable. That's an almost magical combination. Scrapers are valuable tools for furniture and cabinet makers, but they're absolutely essential for luthiers. In addition to flat surfaces, stringed instruments have a variety of simple and compound curves that must be rendered smooth and fair. Scrapers are the final tools used to produce these graceful satin surfaces. Instruments also require very thin materials. Violin sides need to be 1 mm thick. Planing stock this thin can be difficult. It's very easy to damage the piece. Scrapers can be used to thin down the stock after it has been resawn and planed flat at some more manageable thickness. In addition to being able to take very fine, delicate shavings, scrapers can take them at very controlled points. This allows you great precision in fine tuning the thickness.
Even a simple scraper, just a rectangle of metal, has an anatomy. It has two long edges and two short edges. Because it has some thickness, each long edge will actually be sharpened to two working edges, one on each side of the scraper, front and back. So you up end with four sharp working edges. A working edge is called a hook, because you draw the metal out to a tiny hooked cutting edge.
Terry's method, like most others, consists of three stages: filing, honing, and burnishing. The trick is in the details. He's a believer in keeping it simple, not turning it into a religion. A quick sharpening and then back to work on the wood.
You can adapt this slightly to the tools you have. Like Terry, I’m honing with a fine India stone (oilstone), but this should work with any kind of stone. One step common in most other methods that he doesn’t do is lay the scraper down and burnish the old hook flat. He simply files down past it in the filing stage, which all the other methods do anyway.
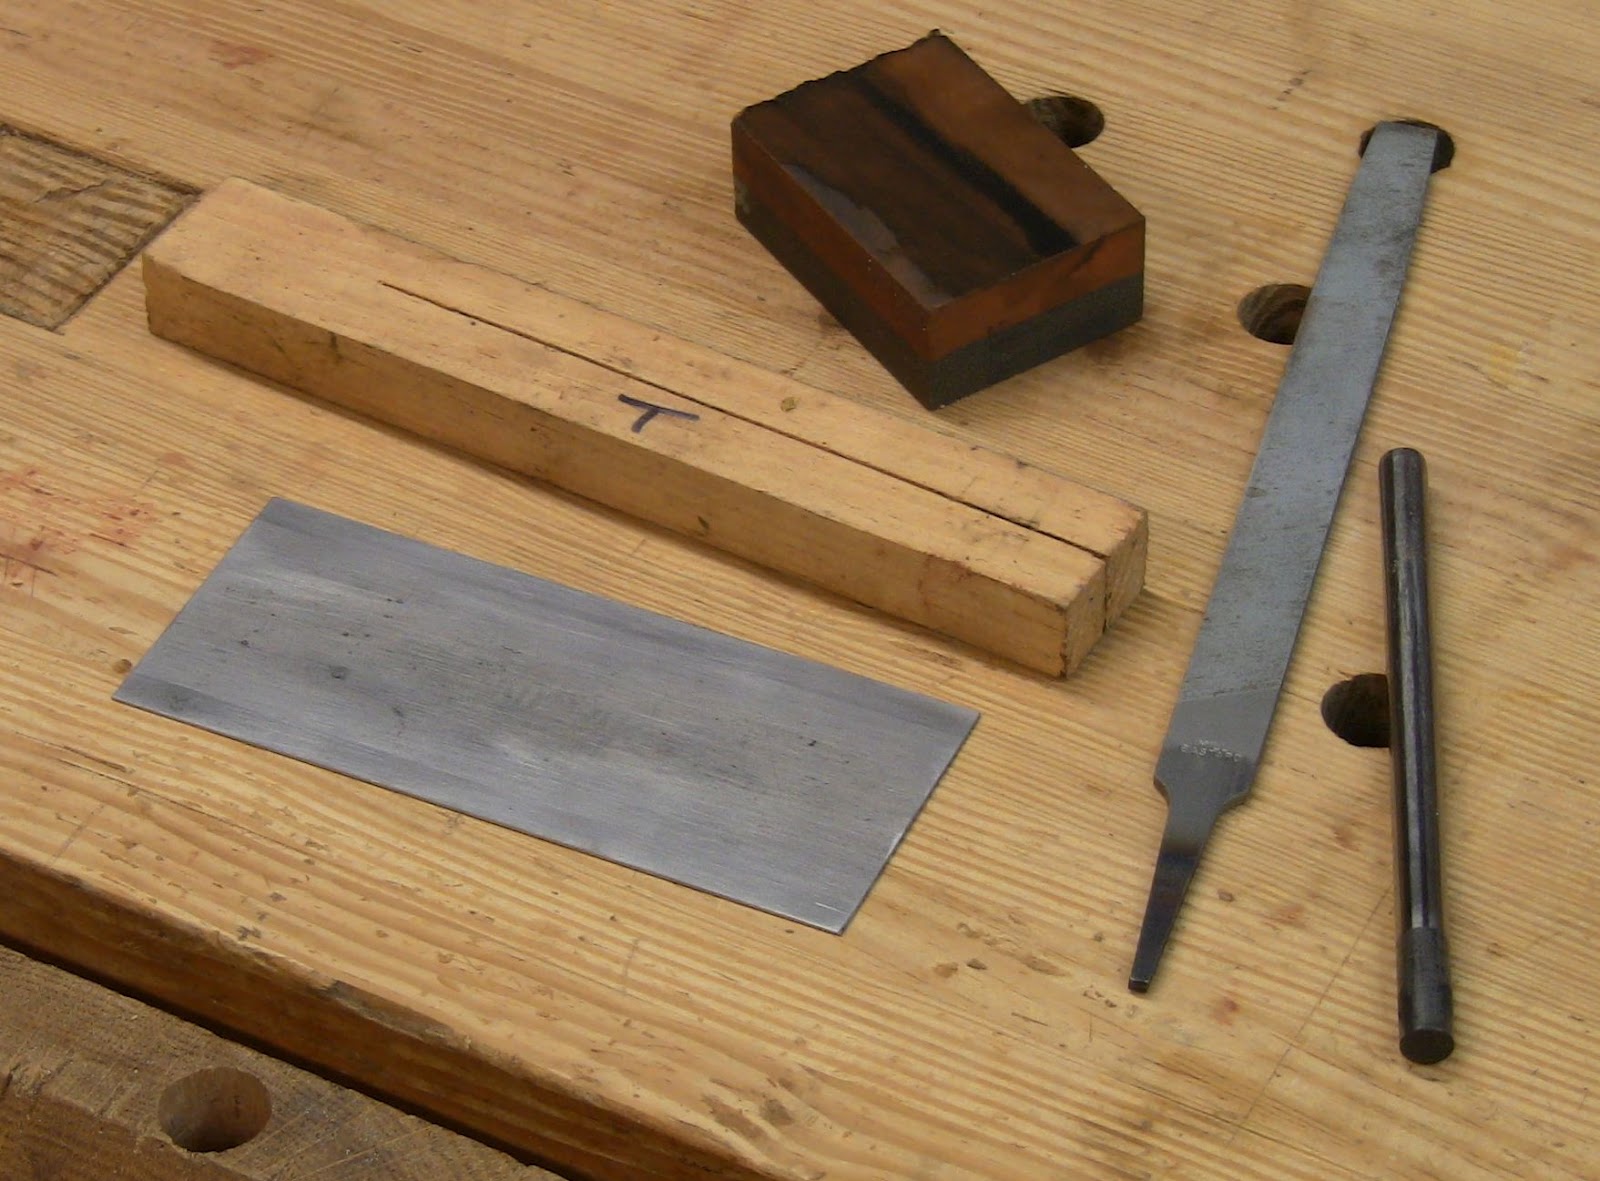
Fig. 2: The tools: scraper, wooden holder, chunk of fine India stone, mill bastard file, and burnisher (with or without handle).
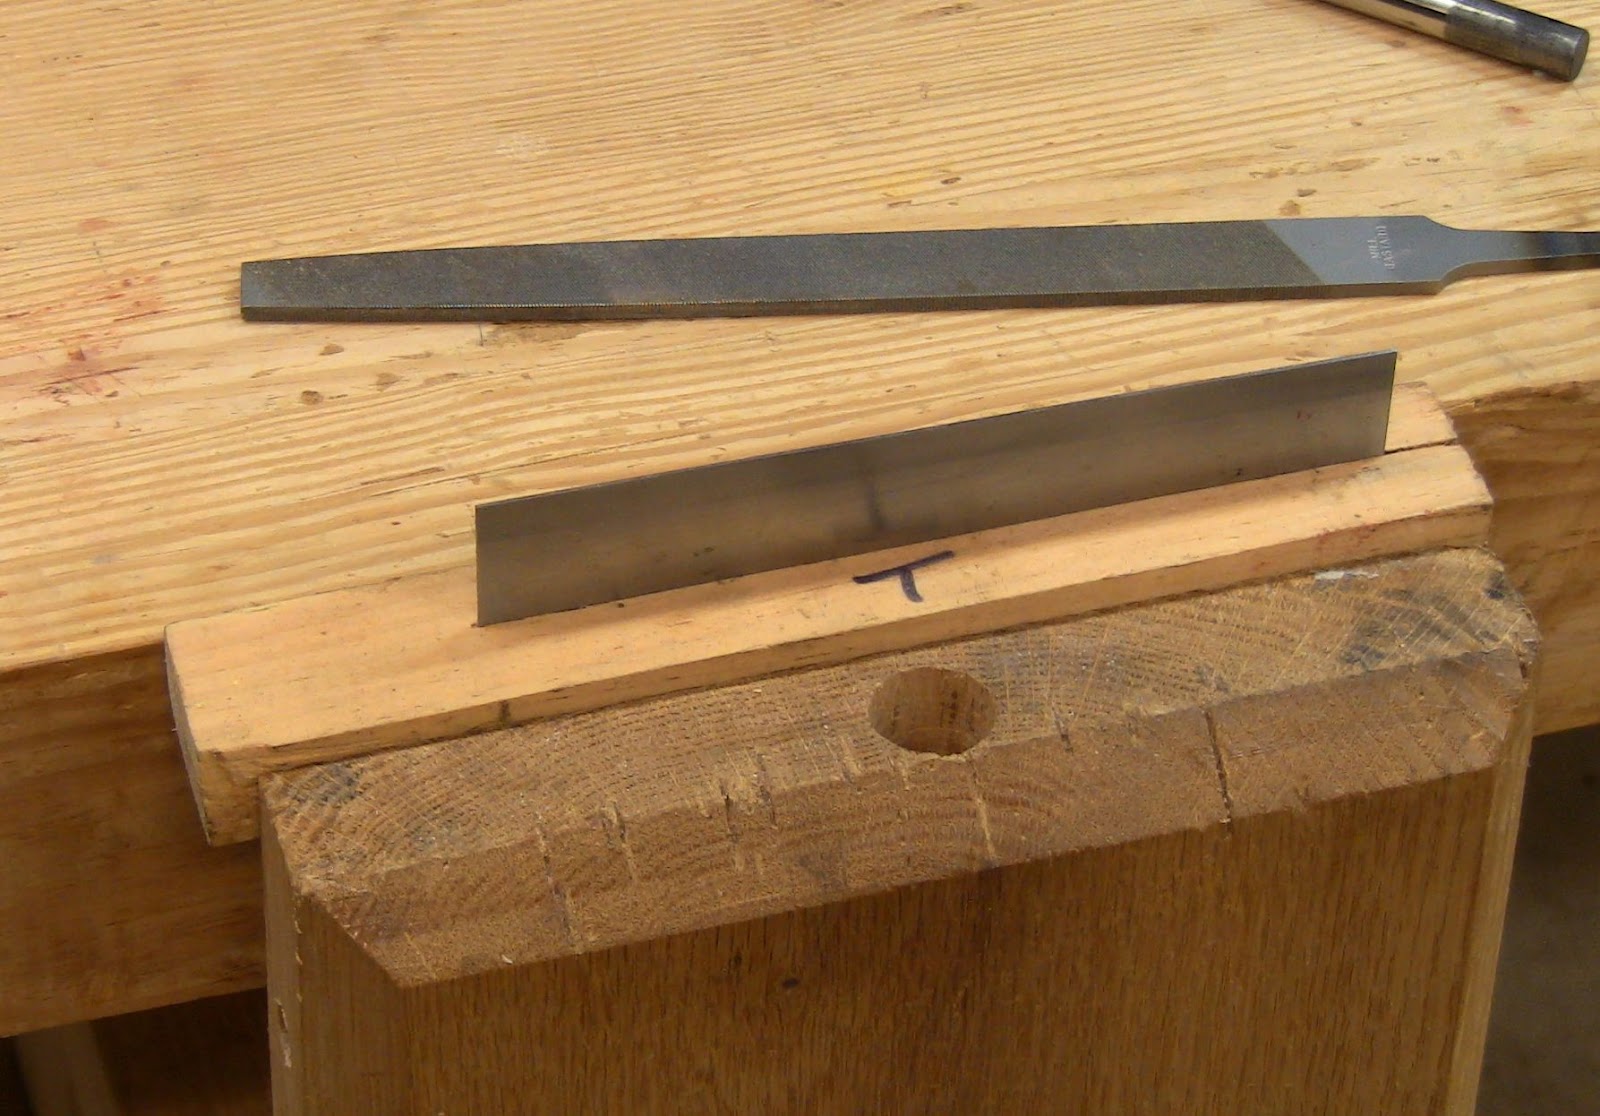
The first key point is to mount the scraper in a vise. Terry demonstrated on a metalworking vise. I use a face vise with a simple wooden holder as a clamping aid. It's just a length of wood a little longer than the scraper, roughly square in cross-section, with a slot sawn down most of the length. Slip the scraper into the slot, then clamp the holder in the vise. It concentrates the clamping force to keep the scraper from slipping in the vise.
Fig. 3: Slip the scraper into the holder and clamp the holder in the vise.
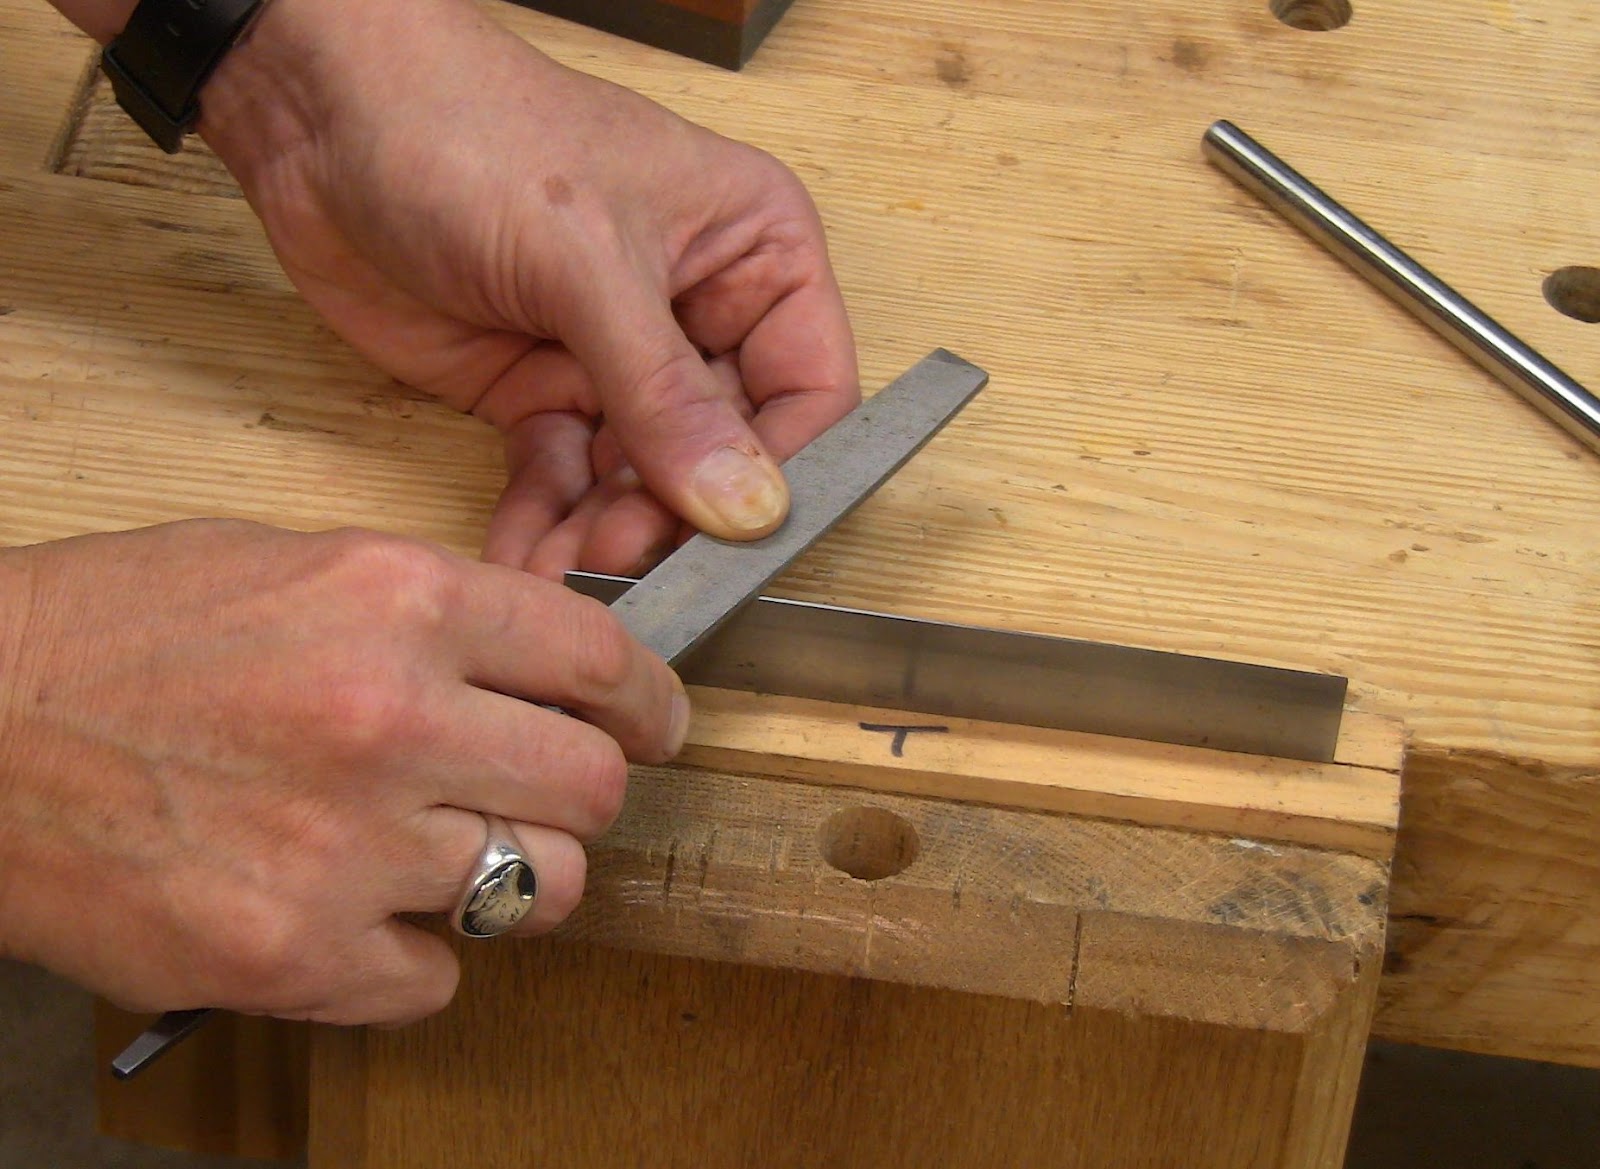
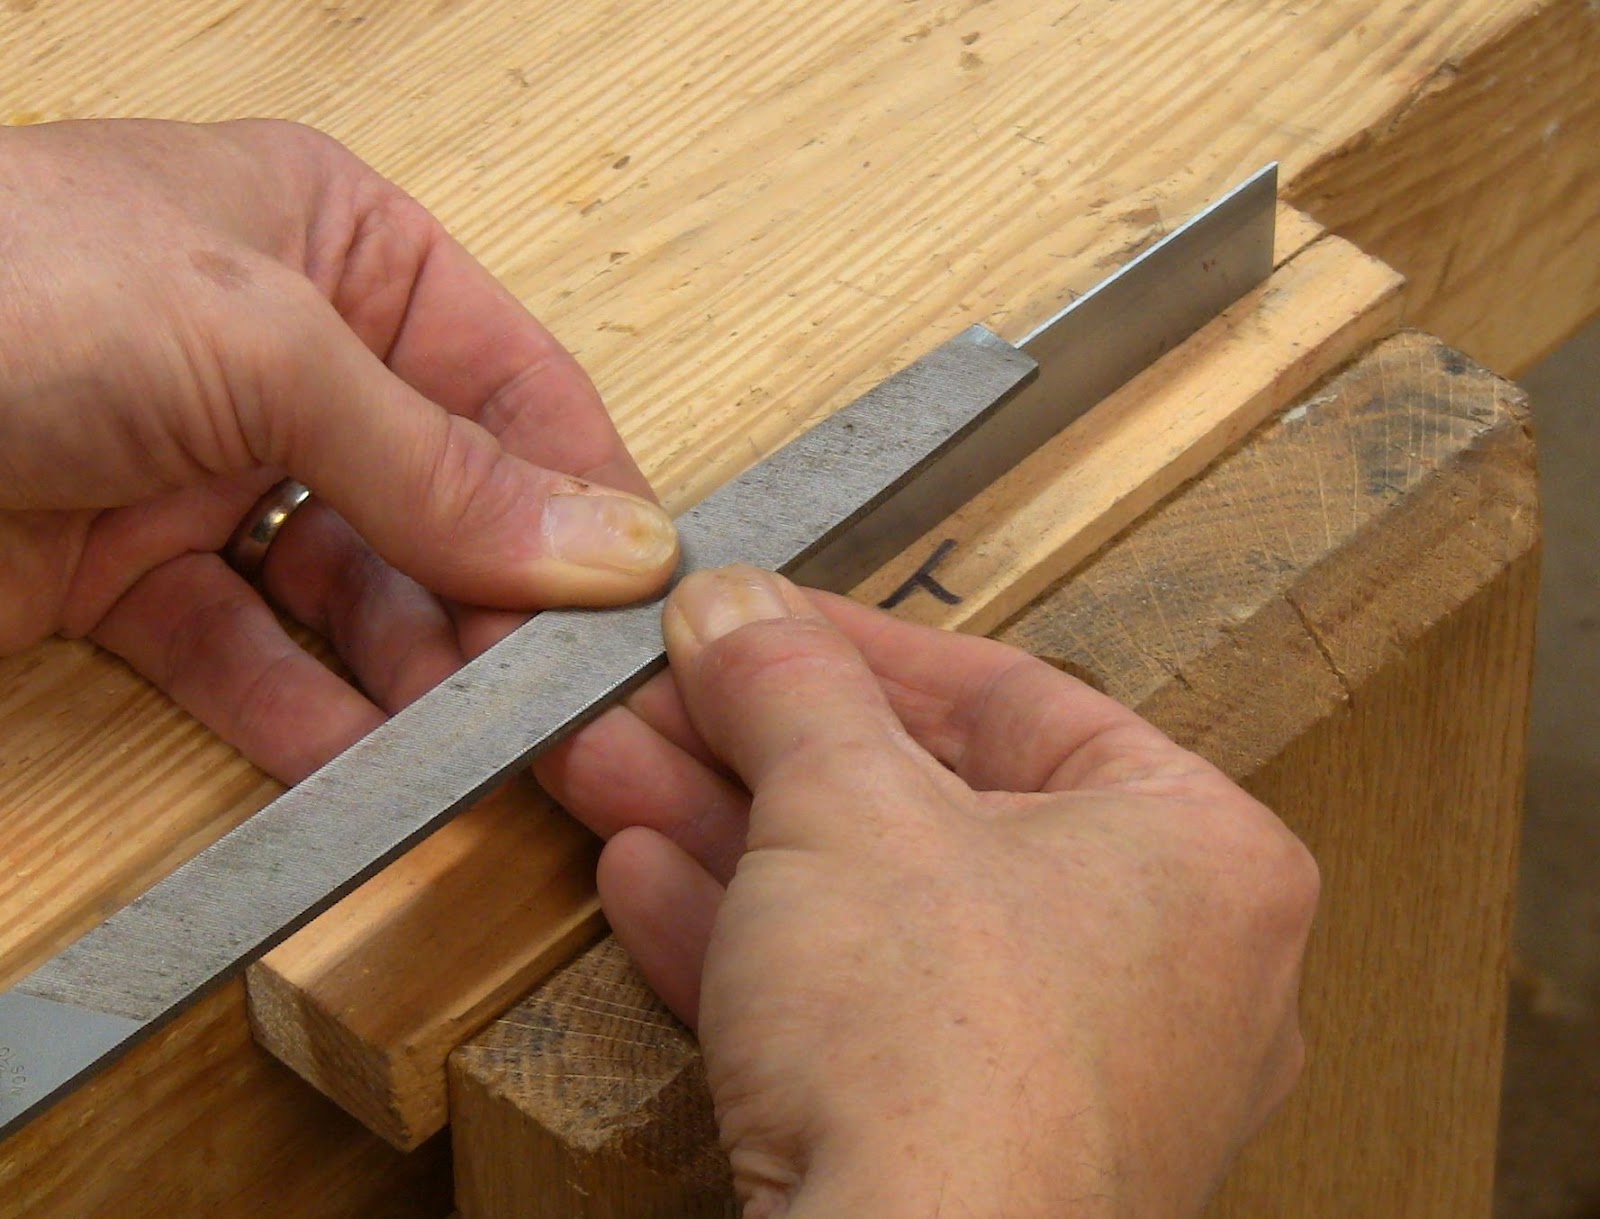
I have a T marked on the holder to show the top front orientation. The T mark helps you keep track of which of the four hook edges you've worked on, although Terry's simple procedure makes it pretty easy to keep track. Filing Using a mill bastard file, file the top edge of the scraper to remove the old prepared edge. Terry used a draw-filing motion. Filing should take 10-20 seconds. Hold the file oriented across the top at an angle to the length of the scraper. By aligning the file teeth visible on the top side with the edge of the scraper, you know that the cutting teeth on the bottom side are properly aligned across the edge to cut the metal. The key point is to hold it dead level, so that you file the edge flat, square to the sides. Run the file sideways down the length of scraper with moderate pressure. You should feel it start to bite and remove metal. Take enough passes to be sure you’ve removed the old hook edge, 5-10 strokes.
Fig. 4: With the file level across the top edge, push it sideways along the length of the scraper.
Fig. 5: The file needs to be dead level so that it files the edge square to the sides.
Every 5 or 6 filings, joint the scraper to maintain the straight edge. Hold the file level and oriented lengthwise along the scraper. Run the file down the length of the scraper for several strokes.
Fig. 6: Holding the file level, lengthwise along the scraper, joint the edge flat.
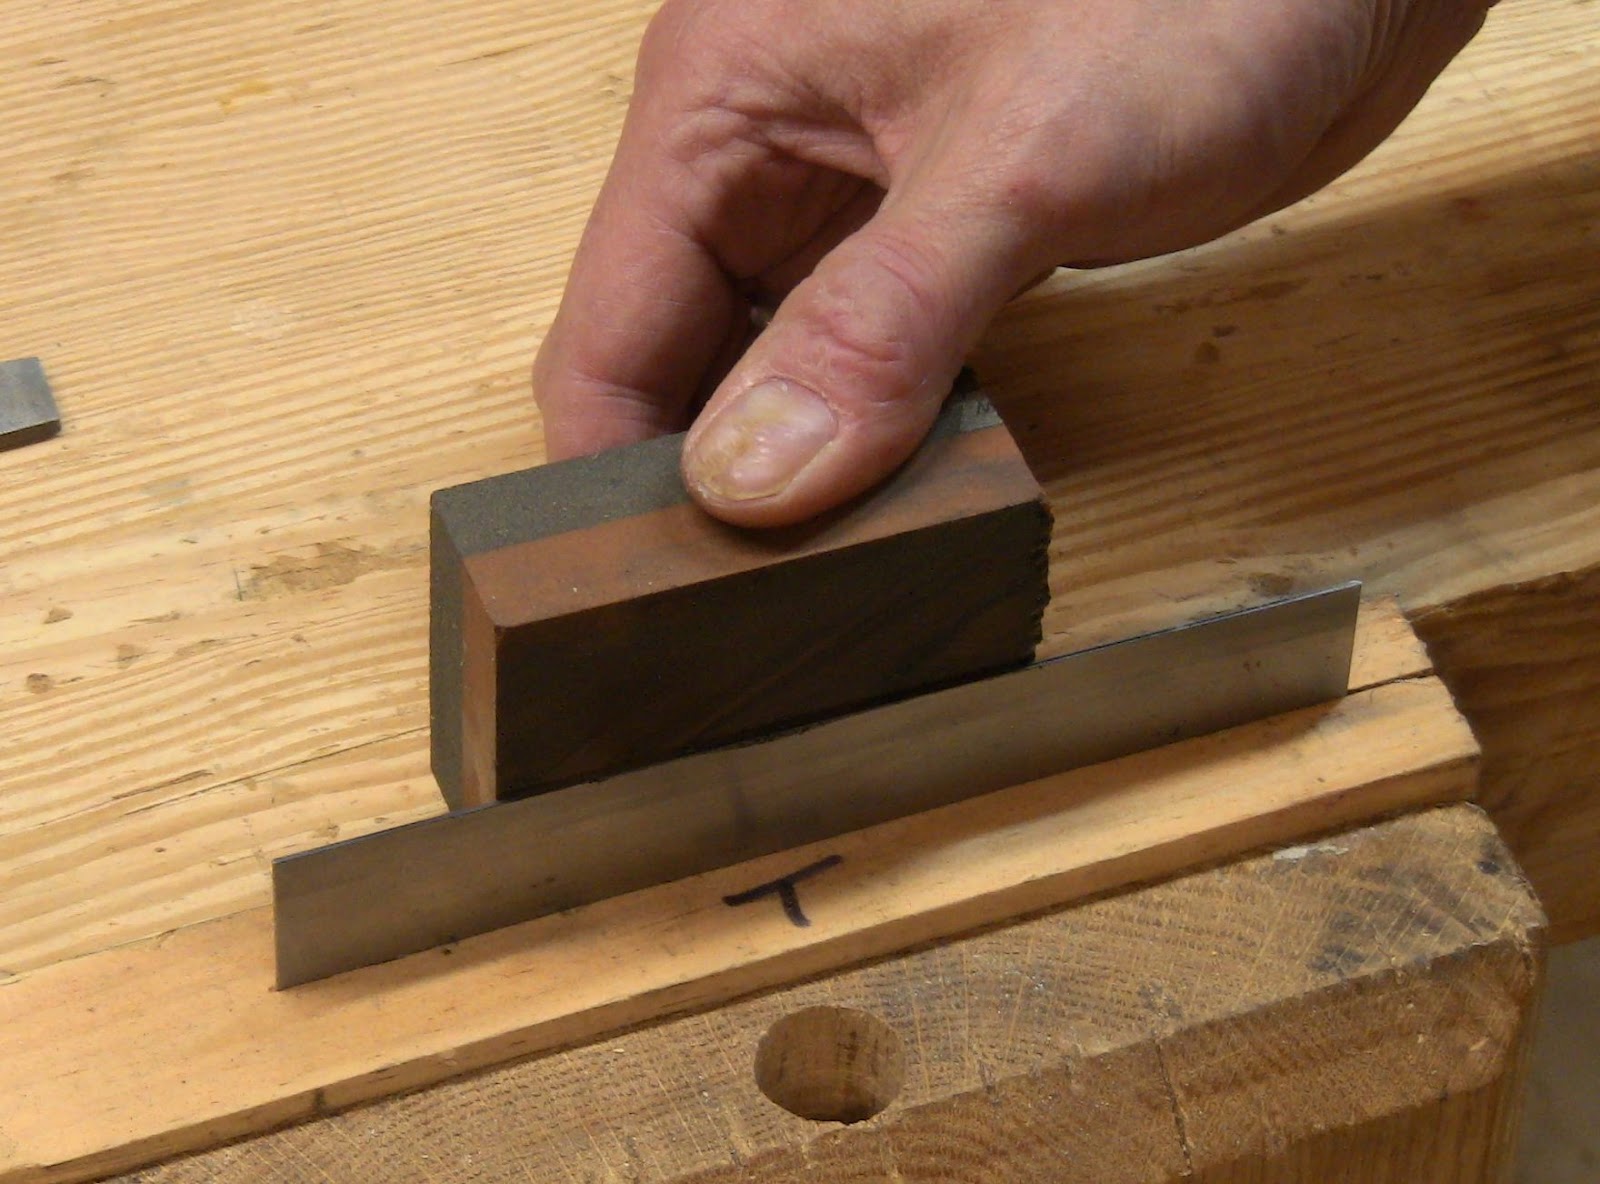
Honing Using a fine oilstone with a little oil on it, hone the top and sides of the scraper. Honing should take 20-30 seconds total for the top and both sides. Lay the stone across the filed edge oriented roughly diagonal to the length of the scraper. Again, the key point is to hold it dead level. Run it down the length of the scraper for several passes, 5-10 strokes, shifting it around to spread the wear across the surface of the stone. The goal is to remove the file marks, leaving polished metal.
Fig. 7: Holding the fine stone level, run it up and down the filed edge several times.
Now hone the front side. Lay the stone flat across the front face of the scraper and move it back and forth along the length for a few passes, 5-10 strokes. Repeat on the back side.
Fig. 8: Lay the stone along the front side of the scraper and run it back and forth across the length.
Fig. 9: Hone the back side.
The result is that the thin top edge of the scraper and the front and back faces meet at square, sharp corners down the length of the scraper. These will be the cutting edges. Burnishing This last step is where things tend to go wrong. People are usually able to file and hone the edge straight and square without any problems, but burnishing is the voodoo part. Burnishing turns the hook on each long corner of the scraper edge, drawing out the metal to its working edge. The problem is that people tend to overdo it. As Terry points out, most people have a long burnisher with a handle. That means they’re able to apply a lot of force and leverage as they run the burnisher down the edge. But this just ends up over-turning it. Then they compound the problem by making multiple passes. This is the secret to Terry's method. He has a short, stubby burnisher that he prefers to use, but with a long burnisher he showed how to choke up on the end, mimicking the stubby shape. The key point is that you use just the end of the burnisher with moderate direct pressure, not heavy leverage. Burnishing should take less than 5 seconds total for both sides.
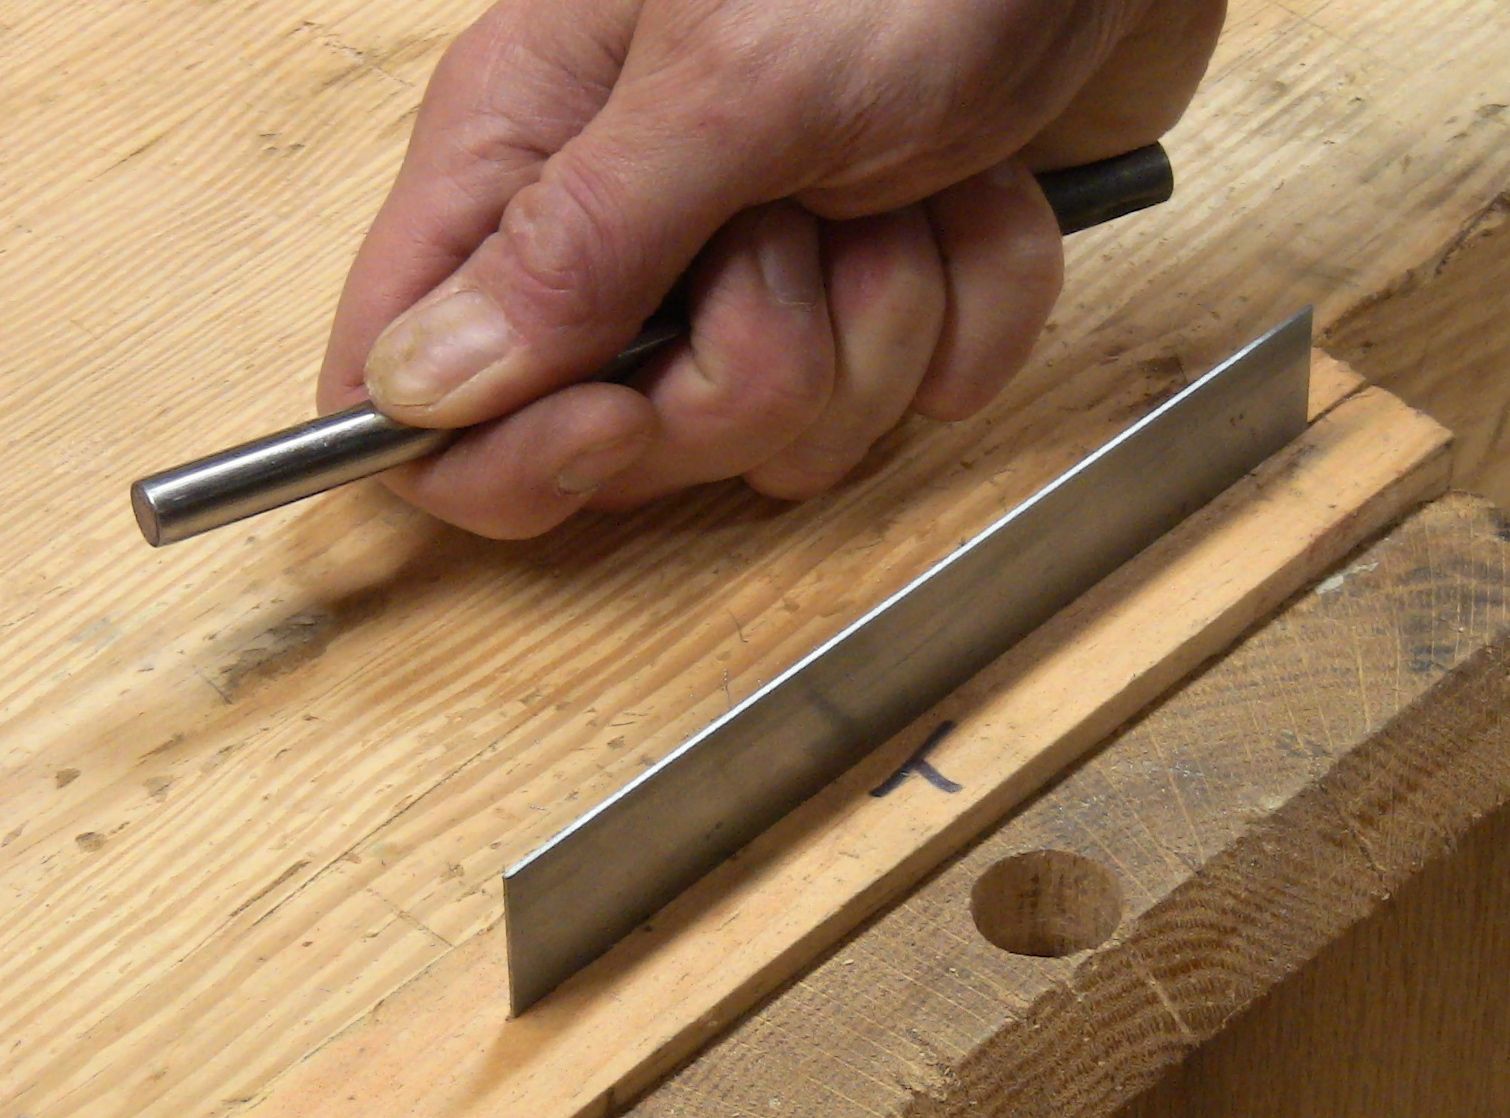
Fig. 10: Hold the burnisher in your hand...
Fig. 11: ...and choke up on it, leaving only the end exposed.
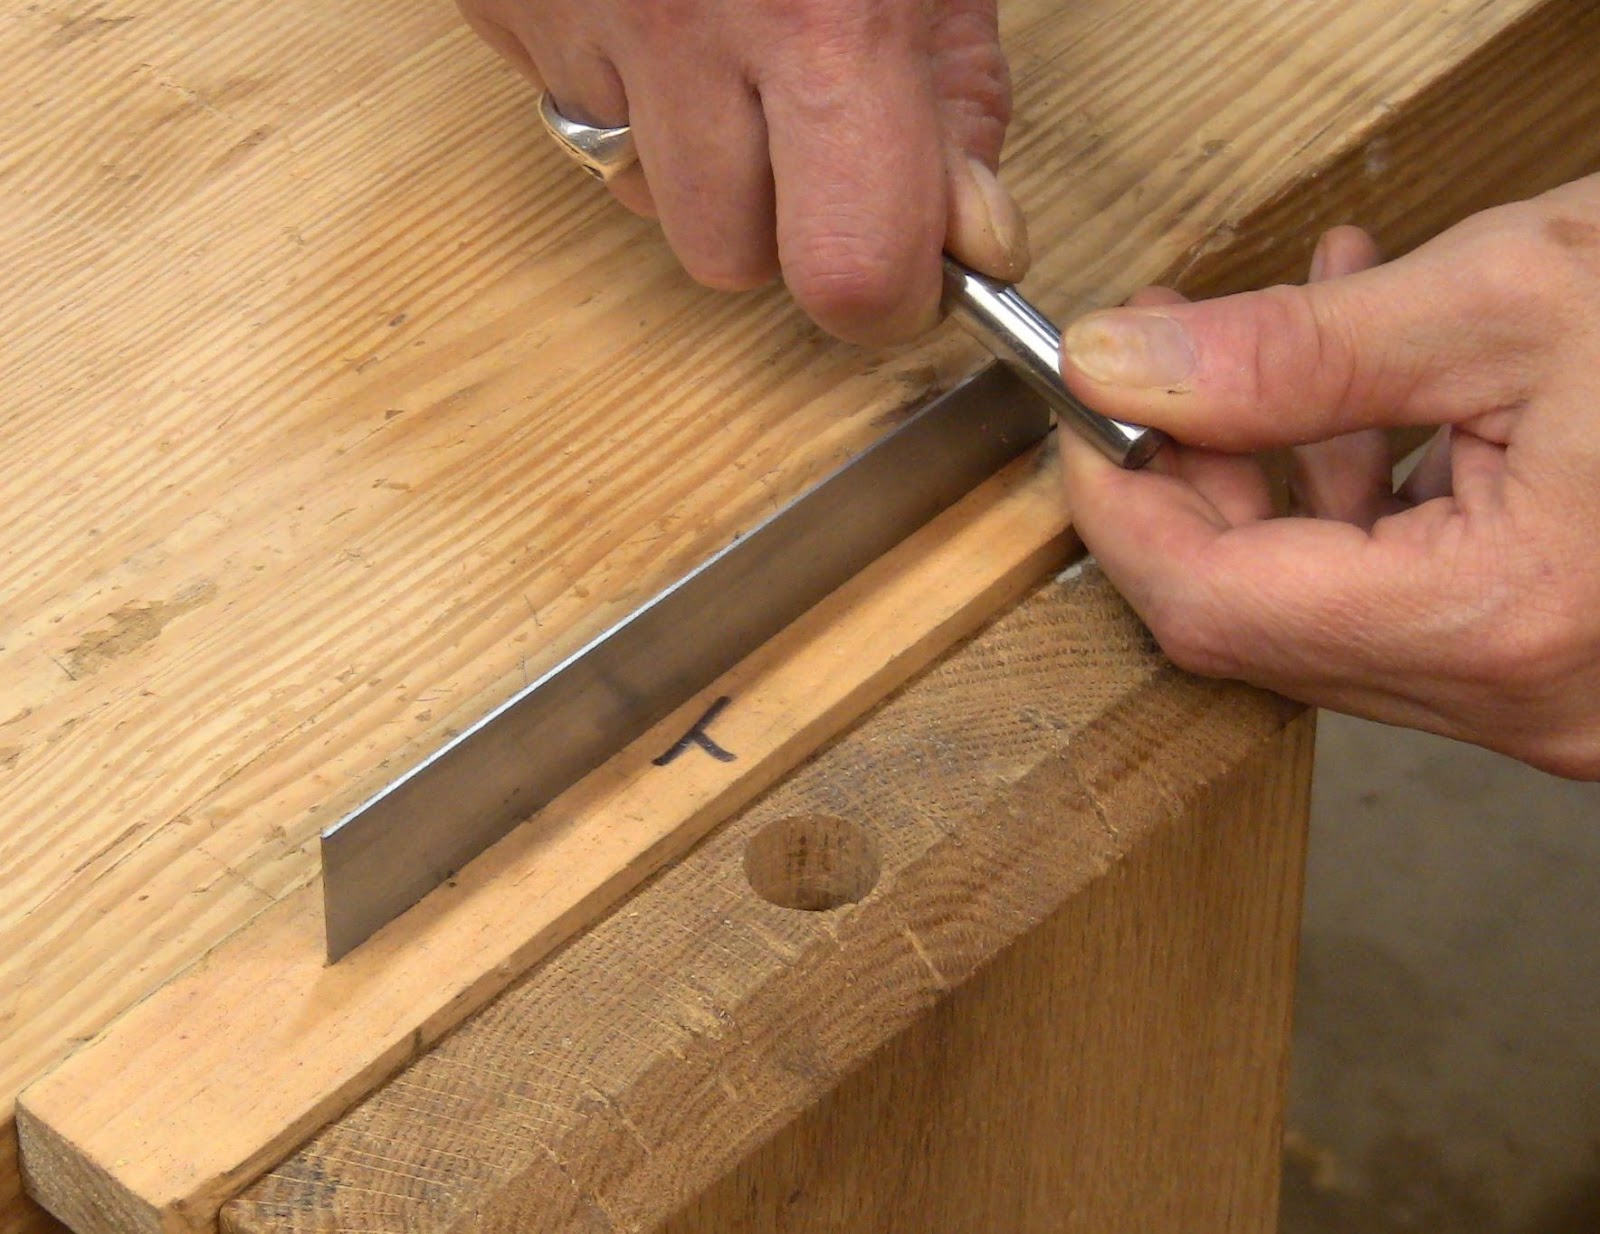
With the burnisher in your hand, hold it near the end to leave just about an inch exposed. Take the tip in your other hand and set the small exposed portion of the burnisher on the edge of the scraper at the near end.
This paragraph is the addition to the original article, adding the step of burnishing flat across: Holding the burnisher level, flat across the edge, push it along the length of the scraper for one quick stroke. Zip! Don't use too much pressure! Just light hand and finger pressure. Set the burnisher flat on the far end, and pull it along the length of the scraper for another quick stroke. Zip! That's it, zip, zip, just two equal, flat strokes in opposite directions to slightly mushroom the edge out to each side. The residual oil from the stone provides lubrication for the burnisher. Then do the same thing, but with the burnisher tipped over each face of the scraper.
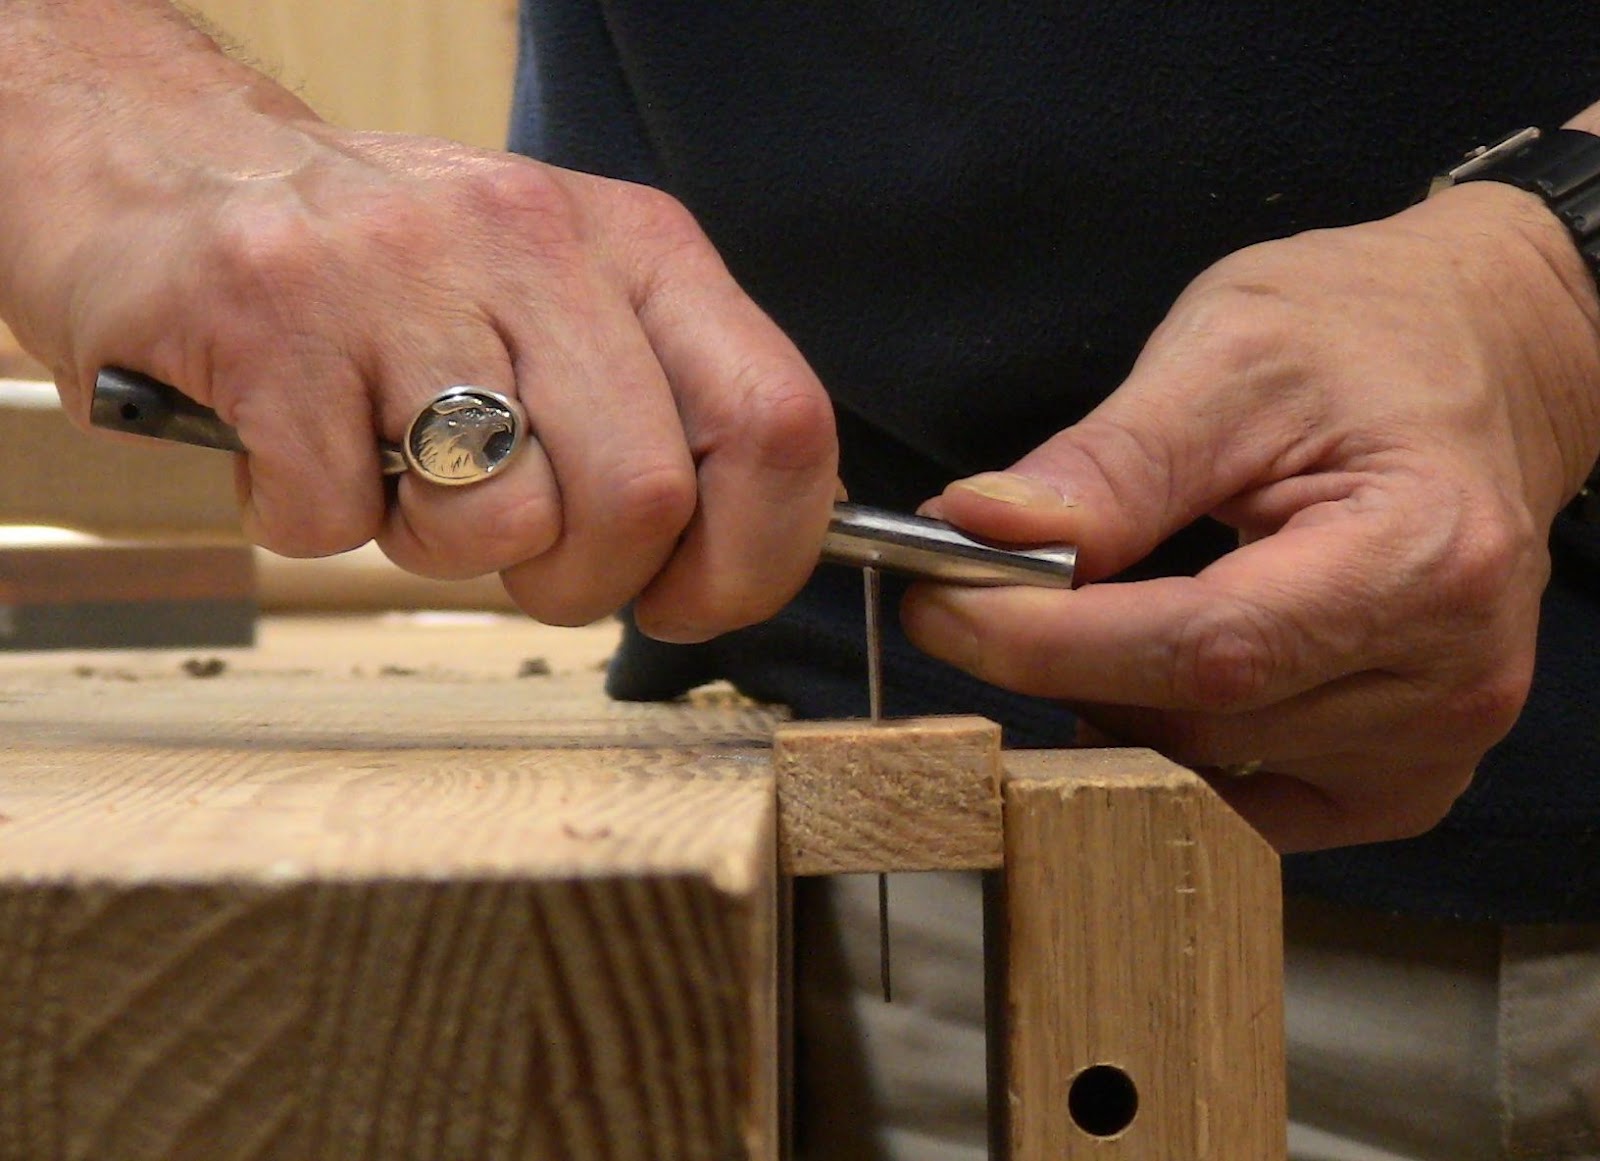
Tip the burnisher down over the face of the scraper by about 5 to 10 degrees; you may need to experiment a bit to find what angle works best for you.
Fig. 12: Hold the tip in your other hand and set it on the edge of the scraper.
Fig. 13: Tip the end down somewhere between 5 and 10 degrees.
Push the burnisher along the length of the scraper for one quick stroke. Zip! Set the burnisher on the far end the same way, and pull it along the length of the scraper for another quick stroke. Zip! That's it, zip, zip, just two equal strokes in opposite directions.
If you curl your fingers into hooks and pull them up the face of the scraper, your fingernails should catch on the tiny hook edge you've just turned. Don't run your fingers along this edge, it's extremely sharp!
Fig. 14: Hook your finger and pull it along the face of the scraper toward the edge. Your fingernail should catch on the hook.
Now burnish the second edge, on the back face. You can leave the scraper as is or spin it around in the vise. Two strokes, zip, zip. That's it. Repeat Now flip the scraper over in the vise and repeat the process on the other edge. This is where the T mark on the wooden holder helps you keep track of which edge and face you're working on.
Fig. 15: Flip the scraper in the holder over and repeat on the second edge.
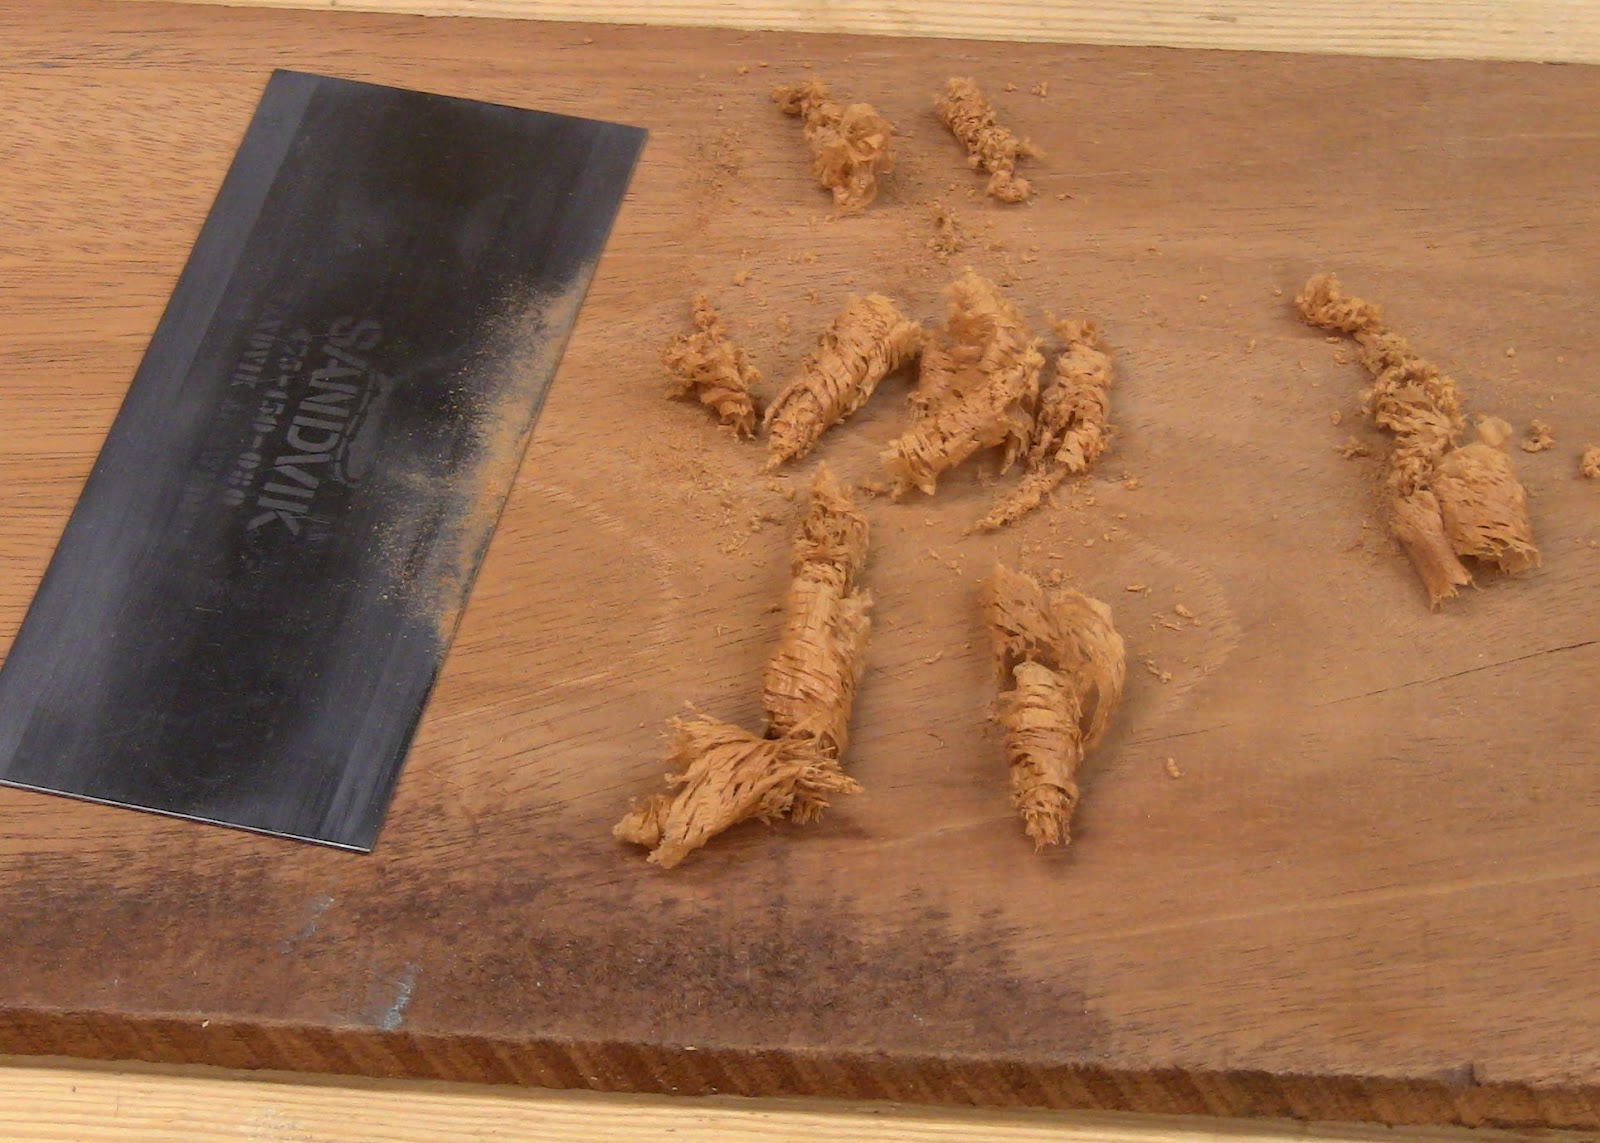
Time required to do the entire scraper is 1-2 minutes. This is so fast and simple you should never hesitate to do it if you feel the scraper isn’t performing as well as it should. Have your scraper sharpening kit ready to go at a moment’s notice so it doesn’t feel like a chore. Testing The Scraper Setup a piece of test stock as if you were going to plane the surface. Hold the unsharpened short sides of scraper in both hands and use your thumbs to bow out the center. This bow cambers the cutting edge; experiment with various degrees of bowing. Set the bowed edge on the workpiece with the scraper straight up. Start tipping the scraper forward and moving it forward. At some point between vertical and 45 degrees, you should feel the hook edge bite into the wood. Experiment with a few degrees more or less tilt to find the best bite. Then with moderate pressure, run the bowed scraper at this tilt angle down the length of the wood. Lean forward with your whole upper body as you extend your arms. Your response to this action should be GOOD GOD LOOK AT THAT! The scraper should produce amazing fine fluffy rolls of shavings similar to those from a fine set smoothing plane. It should NOT just be producing dust.
Fig. 16: The fluffy rolls of shavings on a piece of mahogany after the above sharpening.
Lean back, returning the scraper to the near end of the piece, and take some more shavings. Don't scrape repeatedly in the same spot, or the bowed edge will scrape a divot into the wood. Spin the scraper around and flip it over to try all four hook edges. Don't be surprised if they all perform a little differently, requiring different degrees of bowing and tilt to work effectively. Turn the board around and try it from the other direction. On a flat surface, scrapers often work just as well in either grain orientation. That's less true on angled or curved surfaces. In general, you went to scrape with the grain, down the slope across it. Test the scraper on several different woods. Softer woods tend to fuzz up unless the scraper is very sharp. On hard tropical woods, it's like shaving glass. What If It Doesn't Work? What if your results aren't as advertised? What if all you get is dust, or unimpressive shavings? Dust from the scraper is a sign that it’s not sharp enough (also a sign that it needs to be resharpened). Try again, and pay particular attention to the key points. Poor shavings are a sign of either poor sharpening, or poor use. First, experiment a bit more with the bowing and angling of the scraper. Bow it more heavily, tip it down further. Once you're sure it's not a usage problem, try sharpening again. As simple as the procedure is, it may take a few attempts to get it right. Some details are very objective: filing and honing square across the edge, and honing along the sides. You should be able to hold the file and stone level on the edge and flat to the sides easily without any kind of guide, but there are also simple guides available if you're still having difficulty. And it doesn't hurt if you use more pressure or strokes than necessary with the file or stone, you just may end up removing a little more metal than you need to. Overdoing it won't hurt. The only mistake you can make is using too little pressure or too few strokes. Once you've adequately filed and honed, you should have two good sharp corners along the edge. But other details are much more subjective. Specifically, the angle and force of the burnishing. Remember, two strokes, zip, zip, at an angle 5 to 10 degrees down from level, with moderate pressure. Not enough angle, or not enough pressure, will fail to turn enough of a hook. But overdoing it is a real mistake. That will over-turn the hook. Achieving the right hook is a delicate balance and takes a little practice. The hook itself is a delicate and subtle thing. There's that voodoo again! You can slightly unroll an over-turned hook by laying the scraper down flat, standing the burnisher up at an angle with the tip caught in the hook, and lightly drawing it down the length of the edge. That may salvage a sharpening job. Reburnishing You can often get a couple of burnishings out of an edge before having to go all the way back to a full sharpening, although this method is fast enough that a complete resharpening is easy. First unroll the hook entirely flat. Lay the scraper down flat and lay the burnisher down flat across it. Draw the burnisher along the edge once or twice. Now if you run your fingernails across the scraper to the edge, they won't catch.
Mount the scraper in the vise and repeat the burnishing. That should restore a usable hook.
You can do this a couple of times, but eventually metal fatigue and wear will reduce the hook to an unusable state. At this point, resharpen the scraper completely. Practice Session Take an hour and repeatedly sharpen, test, unroll, re-roll, and re-test the scraper. Invest the time to completely resharpen it two or three times, with multiple burnishings in between, as you explore the limits of the tool. By the time you're done, you'll have significantly developed and refined your skill. You should notice a definite improvement in the effectiveness of the scraper and your efficiency getting it there.
A newly-made leather fold-up sharpening kit, setup and ready for use.
Two stones and a strop walk into a bar. The bartender says, "Oh great, do we really need another story about sharpening?"
But after watching the video below, he says, "Yes we do!" Because the punchline is that's all you need to get a tool razor sharp in seconds.
This video shows the method in action. For details, including how to make the sharpening kit, read on below.
So roll your eyes and bear with me! But this is a great method for beginner and experienced woodworker alike.
Credit To Charles Hayward
This method is based on reading the first chapter in the new compilation from Christopher Schwarz and the folks at Lost Art Press, The Woodworker: The Charles H. Hayward Years. This is a spectacular set, an invaluable resource.
Hayward was editor of The Woodworker magazine from 1939 to 1967. He covered a period when hand tool use was still widely practiced in the British trades. Many of the articles were written by working tradesmen with decades of experience. Hayward himself was superbly skilled.
These were people worth listening to. You can just picture these practical, no-nonsense craftsmen who needed to get a job done efficiently, no messing about, because time was money, and mistakes meant docked pay and rework. They did this stuff every day for a living.
That's no less true for today's professionals. Things are more relaxed for those of us who are hobbyists, but we can certainly benefit from their experience and methods.
Sharp tools were the key. The articles in Chapter 1 cover sharpening from several different authors. While there are some differences, there are a number of common points. They needed to get a good sharp tool quickly and get back to work, because sharpening time was overhead time. What struck me most was the simplicity in their process.
I've distilled that information and combined it with what I've learned from other sources, my own experience and learning curve, and what I've observed when teaching others how to sharpen. So while this my interpretation and presentation, it is consistent with the book.
This is going back to fundamentals. What's old is new again. Again.
Now, I know Chris also has a DVD called The Last Word On Sharpening, and it was his articles on sharpening in Popular Woodworking that first allowed me to achieve a sharp tool. But really, the last word won't happen until they pry the chisel from the last woodworker's cold, dead hands.
The Fundamentals
For bevel-down plane irons and bench chisels, the bevel angle at the cutting edge is 30 degrees. For paring chisels, the angle is 25 degrees. Other specialty irons and chisels may have other angles.
Sharpening consists of 3 steps:
Grinding
Honing
Polishing
Grinding
Grinding takes place on a coarse stone, at 5 degrees less than the cutting edge angle. This is known as the primary bevel. Because the bevel for the cutting edge is formed after the primary, it is known as the secondary bevel.
Grinding has one purpose: to remove metal to make honing easier. All other considerations are secondary. It doesn't matter how flat the primary bevel is, how rough or smooth it is, or how precisely angled it is. As long as it removes metal adequately, it's sufficient. At this coarse stage, speed is what counts.
It also doesn't go all the way to the edge. It goes close to the edge, about 1/32" away from it. By stopping short, you don't waste metal or effort unnecessarily.
Because grinding is on a fast-cutting coarse stone, it's fast and easy, even though the primary bevel is a large surface area.
Honing
Honing takes place on a fine stone, at the cutting edge angle, forming the secondary bevel.
Honing is where things get critical. This is where you produce the actual cutting edge. At this fine stage, precision is what counts.
Honing forms a burr, or wire edge, where the thinned metal flaps up. If you don't have a burr all across the edge of the tool, you need to continue honing until you do. The presence of a burr confirms that you've actually reached the edge. But as soon as you have a full-width burr, stop.
Because grinding has removed the bulk of the metal, leaving only a small surface area for the secondary bevel, honing is fast and easy, even though it's on a slower-cutting fine stone.
Polishing
Polishing takes place on a leather strop charged with compound, at the cutting edge angle, refining the secondary bevel and removing the burr. That last part is especially important, since even the finest stone will leave some burr behind.
This polishes the faces of the secondary bevel and the back of the tool. It wears off the burr and polishes out the microscopically jagged edge left behind where bevel and back meet. A polished surface meeting a polished surface intersects at a line to form what Ron Hock calls a zero-radius edge.
Burr removal can be accelerated by running the edge across the fibers of a piece of wood. You can also remove it by folding it back and forth with your thumb or across the palm of you hand carefully.
Back Preparation
This assumes that you've separately polished the back of the tool to remove all traces of machine marks. The back should be at a near-mirror polish before sharpening.
Don't obsess over slight low spots over the length of the tool, apparent as unpolished regions, just be sure the last half inch or so is flat and polished. Because the back is an enormous surface area, the amount of work required to get it absolutely flat with no low spots rapidly approaches diminishing returns and is not worthwhile.
The polishing step in sharpening refines the back at the edge and polishes off the burr remnants. Over the life of the tool, as it get shorter and your sharpening approaches any low spots in the back, you'll hone and polish them out bit by bit.
Repeat
When the tool is dull, repeat the entire 3-step process. By going through it all each time, the primary and secondary bevel are maintained in relative proportion, ensuring that each one is easy to restore.
Once you condition the tool initially to establish that profile, you'll always have existing primary and secondary bevels when you resharpen. Resharpening then establishes new primary and secondary bevels after removing just a thin layer of metal from each one.
An alternative approach is to only resharpen the secondary bevel, so that it grows over several resharpenings until you need to re-establish the primary bevel. The one drawback to this is that it makes the amount of honing required each time variable. Part of the simplicity here is in avoiding variability.
With this latter approach, the two bevels chase each other up and down the end of the tool over time, the demarcation line between them moving up until the primary bevel is almost gone, then down until the secondary bevel is almost gone.
Either way, just don't wait until the tool gets so dull that it needs a major resharpening job. It's tempting to keep using the tool as you remain focused on a task, but the work will go better if you take a quick sharpening break whenever needed.
Sometimes just a few licks on the strop are sufficient to tune up the edge. Two Stones And A Strop
In these 3 steps, you can see the 3 abrasives needed: coarse stone, fine stone, and strop. While the book talks about oilstones, this method works with any modern abrasive: diamond plates, pre-soak waterstones, non-soak ceramic waterstones, sandpaper, etc.
The one major deviation I've taken from the book is in the use of a third stone before stropping. Several of the articles state that you can optionally hone further on an Arkansas stone if you have one, after removing the burr on a piece of wood.
I've opted not to include that third stone, because I found that it didn't improve the results I got from the other stones followed by the strop. That may be simply be a matter of my technique, so if you have one, it doesn't hurt to try it. See which option gives you the best results.
If a third stone doesn't offer noticeable improvement, it's an unnecessary complication. For me, the great value value in this system is spectacular results from breathtaking simplicity.
Is this the "best sharpening method"? I'll merely claim that it's simple, fast, and effective. I'll let others argue over how many angels can dance on a zero-radius edge. Meanwhile I'm getting back to woodworking.
The Process
I'll start using a simple shop-made portable sharpening kit. Portability is one of the other benefits of simplicity. I don't need to drag a lot of stuff around with me, and it stashes easily into a toolbox.
The kit consists of a leather fold-up case with wooden stone holders and a strop bonded to it, and a small Japanese toolbox matched to its size to hold the assorted items used in sharpening. I'll show how to make these in subsequent parts.
The leather case folded up, and matching Japanese toolbox.
The contents of the toolbox, for sharpening chisels, plane and spokeshave irons, scrapers, and saws. This photo is missing the 20 degree guide block and a sawset. I've shortened the bar clamp handle ends to make them fit more easily.
I use oilstones in the kit. I'll also show photos of other sharpening media. The process is exactly the same regardless: coarse stone, fine stone, and strop.
Mistakes
I show people how to use both convex bevel method and double-bevel method and let them choose whichever they prefer. I've been using a visual guide block for setting the tool to the right angle.
Convex bevel requires starting at this angle on the forward stroke, and returning to this angle on the backward stroke. Double-bevel requires maintaining this angle throughout the forward and backward strokes.
The primary mistake I've observed people make is judging angle, both at the start and on the return stroke. They may have difficulty aligning to the block initially, or difficulty knowing where to return to. The result can be an angle that's too high or too low by a good 5 degrees.
Too high an angle produces an obtuse edge that may be sharp but doesn't cut easily. Too low an angle means the sharpening doesn't actually reach the edge, it only sharpens somewhere behind the edge.
The other mistake I've observed is in the number of stokes. Too few strokes results in insufficient removal of metal. Too many strokes is unnecessarily wasted metal and effort, producing a large flap of burr that takes longer to remove and polish out.
To address the first issue, I've changed to a different type of guide block that gives you positive registration both at the start and the at the return.
In addition to 25 and 30 degree blocks for flat plane irons, I've made 23 and 28 degree blocks for chisels that are tapered in thickness. The 2-degree difference offsets the angle of the taper so that the back of the chisel is at 25 or 30 degrees relative to the sharpening stone. I also have a 19 degree block for grinding tapered paring chisels, which will be honed to 25 degrees.
The key thing about these is that while using them, you're training your hands to recognize specific angles. Eventually, like a violinist putting his hands on the strings at some specific point on the neck with nothing to guide him, you will be able to simply pick up the tool, put it on the stone, and set it to the right angle with nothing to guide you. This may take you 10, 20, or 50 sharpenings to achieve.
These two photos show how to use the guide blocks, here at the honing stage on a combination India stone. I hold the block with my thumb as I snug up the tool to the slope and just slide it down to contact the stone. The second photo especially shows what I mean when I say that the only purpose for grinding is to remove metal to leave a small surface for honing.
Aligning for honing.
Closeup: note the gap formed by the primary bevel, leaving just the edge touching the stone to hone the secondary bevel.
To address the second issue, I count strokes. This requires a calibration stage where you test your specific stones with your specific tools to determine how many strokes are necessary. I'll come back to that after I show how to sharpen.
Grinding
I'll start with a tapered chisel. I'm using Norton coarse and fine India stones in my leather case, and Flexcut Gold compound on my strop.
As you can see in the opening photo above, the case is clamped to the bench with a couple of small bar clamps. The heavy leather is stiff enough that this holds everything in place.
I set the 23 and 28 degree guide blocks at the near end of the coarse and fine stones and spread some mineral oil on the stones. The guide blocks make good oil spreaders. Spreading oil on the coarse stone, using the guide block as a spatula.
I set the top face of the chisel flat on the 23 degree guide block bevel and slide it down until the existing primary bevel contacts the stone. Note that because of the existing secondary bevel, the very end of the chisel does not contact the stone.
This establishes the tool at the primary bevel angle.
Lay the chisel bevel down and flat on the guide block and slide it down to the stone.
I slide the tool forward and back while maintaing this angle. But remember that this is grinding, so the angle isn't critical. The key is that it's lower than the secondary bevel angle.
I count out 10 round-trip strokes. Why 10? I've calibrated this process on my stones and found that 10 reliably provides a sufficient grind. Maybe I could get by with 7 or 8, but I like to allow some margin for variability. This covers all my antique tools and my modern O-1 and A-2 tools; some just may be slightly more or less ground than others.
As with any sharpening method, make sure you walk the strokes sideways across the surface of the stone for even wear. Otherwise over time you'll wear a distinct low spot in the stone. The good news is that an unevenly-worn coarse stone will still produce an adequate grinding, it just may not do as pretty a job as a perfectly flat stone.
Maintain the angle reasonably forward and back throughout the stroke.
If you like, you can angle the guide block at 45 degrees across the stone and align the tool to that. If you're sharpening a plane iron that's wider than the stone, this allows you to keep the entire width in contact with the stone.
Alternative holding method: the guide block angled across the stone.
The strokes are the same, except that the tool is diagonal as it moves up and down the stone.
These strokes produce a new slightly convex primary bevel that comes to within 1/32" of the edge, shortening the existing secondary bevel. But only a thin layer of metal has been ground away.
While difficult to photograph, this shows the new primary bevel coming close to the edge. You can just see the remaining secondary bevel in the different reflection along the edge.
Honing
The honing process is virtually identical, using the 28 degree block on the fine stone. The only difference is that now the existing secondary bevel contacts the stone, which means the edge contacts the stone.
Lay the chisel bevel down and flat on the guide block and slide it down so the edge contacts the stone.
As before, I slide the tool forward and back while maintaing this angle. Here on the secondary bevel the angle is more critical. However, we know from the convex bevel method that as long as you don't raise it any higher when you draw back, you'll get the desired angle at the cutting edge.
You'll most likely end up with a very slightly convex secondary bevel. If you prefer to keep it flat, concentrate on holding your arms fixed as you rock your body forward and back. Tucking your elbows into your body helps keep your arms in place.
But as a practical matter, the secondary bevel is so small, and the convexity so slight, that there's no need to obsess over it.
Again, I count out 10 round-trip strokes. Why 10? Same story as before. This is sufficient to reliably produce a small burr with all my tools on these stones.
Also again, make sure to walk the strokes sideways for even wear on the stone. With this stone, that's much more critical than it was on the coarse stone, because this is the surface that shapes your cutting edge.
10 strokes on the edge while maintaining the angle.
Or you can use the alternate orientation of the guide block at 45 degrees across the stone.
Aligning the alternate hold with the block at 45 degrees across the stone.
10 strokes with the edge oriented diagonally across the stone.
This is the resulting new secondary bevel at the edge. It's hardly any bigger than before honing, because again just a thin layer of metal has been removed.
This should have produced a very small burr uniformly across the edge.
If you have a burr that is not uniform, you are probably rolling the tool sideways as you move. Experiment with different orientations, straight or at 45 degrees, or some other angle, or concentrate on avoiding rolling. Narrow chisels are the trickiest, because there's such a small registration surface.
On the back, that bright line at the edge is the burr flapped back and reflecting light differently from the rest of the back.
On the bevel, after flapping the burr forward with my finger, it's visible against a dark background as a bright line. That dark region is the secondary bevel.
To start the removal of the burr, I hold the back of the chisel down flat on the end of the stone and move it sideways back and forth or in circles for 5 strokes. Make sure to keep it flat. Don't lift the handle, or you'll create a back-bevel. While back-bevels can be useful on plane irons, you don't want one on a chisel.
Starting burr removal by moving the back of the chisel around flat on the stone for 5 strokes.
To further aid in removal, I draw the edge in a slicing motion across the fibers in a scrap of wood.
Polishing
I dress the strop liberally with compound. Then I hold the chisel at 30 degrees, the same angle the back had on the fine stone, and draw it down the strop, lifting it off to return to the far end. You can't push forward on the strop, because the edge will cut into it.
I use medium pressure. I don't want to dimple the leather and cause it to run over the edge at a higher angle.
I count out 5 strokes. Again, that's what works for me.
Draw the bevel down the strop for 5 strokes.
I draw the back of the chisel flat down the side of the strop for 5 strokes. Again, keep it absolutely flat to avoid creating a back-bevel.
Draw the back down the strop for 5 strokes.
This usually doesn't completely remove the burr. This is a little more variable because it depends on how big the bits of burr are, how much it was weakened by honing the back and drawing through the piece of wood, how much pressure you use, and the compound you put on the strop.
So after 5 strokes each side, I start taking alternating single strokes on each side, until as I turn the tool in the light, I don't see any more burr.
This produces a highly polished back and bevel.
You should be able to read text reflected in the back of the tool.
It's not perfectly mirrored, there are still tiny scratches visible.
The finished edge. As you turn it in the light, it should be highly reflective.
Testing
My favorite way of testing an edge is to take white pine end grain shavings with hand pressure. Because white pine is so soft, if the tool is not sharp, it will just crush and break the fibers. But if the tool is sharp, it will shear them off cleanly, producing a feathery shaving and leaving a smooth surface. You should also hear a satisfying schussing sound.
If the tool seems to cut well but there are scratches in the cut surface, there may be a bit of burr still left behind. Try a few more licks on the strop to see if that clears it up.
If not, and this is an old tool, there may be tiny cracks or pits in the metal. That might mean the tool is usable for general work where the cut won't be visible, but not for the most visible spots.
Slicing cleanly across the end grain, producing a feathery thin shaving.
The clean surface left behind after taking two shavings.
That's the real acid test. But a further test I like to do is pare off some chips more along the grain, then examine the surface left behind.
When a tool is sharp, I can only describe it as buttery going through the wood. The cut surface is gloriously glassy smooth.
Taking long grain chips, like a hot knife through butter.
The cut surface, with precisely-defined edges. No tearing of edges or surface.
Repeatedly slicing through the wood is joyous, creating beautiful curls and sharp facets.
Of course pine is easy. But you should find the chisel just as effective in hard woods, leaving cleanly sheared surfaces and edges. You just may need to use a mallet instead of hand pressure.
Review
Take a moment here to note how simple and fast this is:
10 strokes grinding.
10 strokes honing.
5 strokes polishing the bevel.
5 strokes polishing the back.
Another 4-10 strokes total polishing.
That's fast. And it's highly effective.
Conditioning
When I first sharpen a tool with this method, I have to condition it to this bevel profile. Whether it has a factory profile, a profile some previous owner put on it, or one I put on it with some different method, I need to spend some time preparing it.
This is often more than I want to do on my coarse stone. First, there is enough metal to remove that it would be a lot of work on that stone, and second, doing all that work puts more wear on the stone than I like.
For the heavy shaping required by conditioning, I use a DMT extra-extra coarse diamond plate, held in the divider/auxiliary holder from my kit. Lubricated with water or window cleaner, this thing eats metal.
I setup the tool with the 23 or 25 degree grinding guide block and work the primary bevel 10-20 strokes at a time, just like on the coarse stone. I check it after each batch of strokes to make sure I'm shaping it as desired and see how close this new primary bevel is getting to the edge. I want it to get within about 1/32".
Conditioning a plane iron to this method on the XX-coarse diamond plate.
For a tool is seriously out of shape, I follow up with a few strokes with the 23 or 25 degree honing guide block to work the secondary bevel. On this small surface area, it goes really fast, so be careful about taking too many strokes. If you overdo it, do a couple more strokes on the primary bevel.
This establishes the bevel profile and relative proportions of primary and secondary bevel that the tool with have moving forward. If you prefer a longer secondary bevel than I use, do a few more strokes on the secondary bevel. Then during calibration you'll determine how many strokes are necessary on the fine stone to hone that larger secondary bevel.
Once I've done the heavy grinding on the diamond plate, I go back to the regular method. The coarse stone cleans up the heavy scratches left by the plate and takes the primary bevel down just a hair. The fine stone does the same for the secondary bevel.
With a few tools, I've found it useful to immediately go through an additional coarse and fine sharpening cycle. That extra sharpening gets the shape exactly where I want it.
Then I finish up with the strop and the tool is conditioned to the method and ready for use.
Calibration
When I try out a different set of stones, I need to determine how many strokes each one needs. While 10 strokes has worked out as a good general purpose number, some stones are definitely different from others.
One major difference is when using waterstones. Because I want to avoid scoring or gouging the surface of the stone, I only apply pressure on the back stroke. On the forward stroke, I ease up and just glide over the surface. So the abrasive action is only happening on the trailing half of the round-trip. That means only half the strokes are doing anything, possibly requiring more strokes.
I calibrate 5 strokes at a time. I setup the appropriate guide block for the stone and take 5 strokes. Then I examine the results. If it needs more I do another 5. I repeat if necessary. In general I prefer to overshoot just a bit. That ensures I'm getting a full sharpening. A couple of extra strokes won't hurt anything.
For the coarse stone, I have enough when I see the primarily bevel is within 1/32" of the edge.
For the fine stone, I have enough when I feel a small uniform burr as I run my finger forward along the back and over the edge.
I keep things simple by using the same number of strokes for different stones and different metals. The result is that the exact profile is a little different depending on which stones I used, due to the relative cutting speeds of the different abrasive types on different modern and old steels.
Typically, though, you'll probably just use one set of stones, so it's just a matter of calibrating your particular set of stones and tools.
Plane Irons
Plane irons are exactly the same process. The only additional considerations are that now you're dealing with a much wider surface area for the primary and secondary bevels, you may want to feather the sides of the edge, and you may have a skewed or cambered iron.
For plane irons that are flat, not tapered, I use the 25 and 30 degree guide blocks. Some irons for wooden planes are tapered, so I use the 23 and 28 degree blocks. Specialty plane irons such as low-angle bevel-up planes may call for other angles.
You may find that the wider iron surface calls for a couple of additional strokes because there's more overall friction. Regardless, make sure you're applying even pressure all across the edge, which may require spreading your fingers across it.
Setup on the coarse stone at the 25 degree grinding angle and take 10 strokes.
Setup on the fine stone at the 30 degree honing angle and take 10 strokes.
If you want to feather the sides, this is when to do it. Tip one corner just off the stone and apply pressure down on the other corner. Take 10 strokes. Repeat on the opposite corner.
Feathering the edge on the left, with right corner tipped off the stone and finger pressure on the left corner.
Next lay the end of the back flat on the stone and take 5 circular strokes to work the burr a bit, then run the edge through a scrap of hardwood to weaken it further.
Running the edge through the corner of a scrap of cherry.
Dress the strop with compound and strop the secondary bevel and back.
Drawing the secondary bevel down the strop for 5 strokes at 30 degrees.
Drawing the back flat down the strop for 5 strokes.
Repeat alternating strop strokes as necessary to remove the last vestiges of burr. Remember that any little bit left behind will leave scratches in the planed surface.
The end-grain shaving test, producing beautiful feathery shavings and leaving a cleanly-sheared surface.
The long-grain shaving test, taking beautiful curls and leaving a glassy surface.
Planing end grain, producing long continuous pencil-sharpener shavings and leaving a clean surface.
Skewed Irons
There's really nothing special about doing skewed irons. You just hold the iron skewed as you align it to the guide block. Then you maintain that skew as you do your strokes.
This may be a bit more awkward to hold and maintain, but shouldn't be difficult. Cambered Irons
A cambered iron is similar to a feathered edge, except you need to apply the camber at the grinding stage as well as the honing stage.
I do the edge in linear segments, flat across the center, than working to each side in two segments, then just a little across the points where the segments meet. This produces an approximation of the true curve of the camber, and is sufficient for irons used for rough work, such as as scrub and jack planes.
If I want to smooth out this approximation, I hold the iron at the proper angle, then rotate it sideways left and right from my wrist, tipping the edge as I move through the stroke to make the sure the entire curve goes through contact with the stone.
Other Types Of Stones
This method works with any kind of stone, and should work with any kind of abrasive surface, such as sandpaper or abrasive films. Whatever you use, you just need coarse and fine grits.
I've used it succesfully with DMT Duo-Sharp diamond plates, Ohishi non-soak ceramic waterstones, and Norton pre-soak waterstones.
You can even use a single combination coarse/fine stone as a low-cost alternative. I've used a humble Norton IB8 combination India stone; it wasn't even a full stone, just a shortened one where a 2" chunk had been broken off, equivalent to an IB6.
Using DMT Duo-Sharp diamond plates, Black and Green color codes.
Using Ohishi waterstones, 1,000 and 10,000 grits. There's a DMT Dia-Flat lapping plate at the far end for flattening them. Looks like I need to cut this holder down to eliminate the extra space! Also, you can see I used to use a green chromium oxide stick on my strop.
Using Norton waterstones, 1,000 and 8,000 grits. There's a DMT Dia-Sharp coarse plate for flattening them.
Using a 6" chunk of Norton IB8 combination India stone.
I found the Ohishi stones produced the finest edge right off the stone, but the strop was the great equalizer. It may offer the least benefit for those stones, but it brought all the other stones up on par with them, so any of them work equally well with this method.
Just remember that regardless of how good a job the fine stone does, the strop is still necessary to remove the last remnants of burr and polish out the microscopically jagged edge it leaves behind.
When choosing which type of stones to use, it's a matter of deciding which mess and other considerations (such as flattening stones) you want to deal with.
Spokeshave Irons
Spokeshaves and other specialty tools have short irons of varying widths. These can be difficult to hold, and even harder to align to the angle blocks.
For these I've made up an auxiliary holder that acts as an extension handle. This makes these stubby blades much easier to manage.
Setting up for honing with a spokeshave iron in the auxiliary holder.
Closeup of the alignment and primary bevel gap.
Top view of the holder, with a knob-attached screw for tightening.
Bottom view, with a square nut let in so it can sit flat against the angle block. A longer screw in the handle would've been nice!
Continue to part 2 to see how to make the angled guide blocks.
I'm a software engineer and woodworking hobbyist in central Massachusetts. "Hobbyist" means I'm free to spend unlimited amounts of time, energy, and money without expecting any return on my investment. I'm a firm believer in see one, do one, teach one.
You can find my book "Hand Tool Basics" at Amazon and other booksellers.










 Posts
Posts


