
The Queechee Gorge near Woodstock, VT, on the drive home, beautiful even on a gray day.
Friday and Saturday, October 7 and 8, I demonstrated hand tool techniques at the Lie-Nielsen Hand Tool Event at Shackleton Thomas, in Bridgewater, VT, run by Charles Shackleton, furniture maker, and his wife Miranda Thomas, potter.
Also at the event were Matt Bickford with his wonderful wooden molding planes, book, and DVD, and Isaac Smith of Blackburn Tools, selling saws.
I was promoting my Intro To Hand Tools online course at Popular Woodworking University. See this blog post for a full episode guide, tool list, and sample videos.
And newly available, the course parts can now be purchased individually as digital downloads from Popular Woodworking's online store, along with my recorded webinars and digital magazine issues containing my articles.
I also had my copy of Nick Offerman's new book Good Clean Fun: Misadventures in Sawdust at Offerman Woodshop, which is now available. You can read my review of it here.

My setup, with workbenches, boxes of tools, Nick Offerman's book, and large-screen monitor in the background running my trailer.
I did my usual ad hoc demonstrations as people asked questions and I offered to let them try anything they saw on the workbench.
Two things proved especially popular: Terry Moore's scraper sharpening method, and Yoav Liberman's gouge sharpening method (where I add a concave surface to the block, and use it with my in-cannel scribing gouge). Both of these tools present particular sharpening challenges, so people are eager to see effective methods.
I must have sharpened my scraper 15 times over the two days. Since I had only brought white pine, Lindley Brainard, the shop manager and one of the Shackleton Thomas furniture makers, let me pick a few nice pieces of hardwood from the basement scrap pile so I could demonstrate real scraping.
The results were glorious. I produced a cloud of white, brown, and reddish shavings in maple, walnut, and cherry as people watched and tried it for themselves. I really should have gotten a photo. You could have stuffed a nice comfy throw pillow with the pile of feathery shavings.
I've included Terry's method below, because I've gone through at least 5 other methods before I settled on this one, and it's worth sharing.
Pizza With The Shackletons
As I mentioned in my post about last year's event, Charles is the cousin of Ernest Shackleton, who accomplished one of the greatest feats of leadership and survival of the past hundred years. If you're not familiar with the story of the Endurance, take some time to read this.
Friday afternoon, Charles came through and invited us all to pizza at his house. My wife and I joined the caravan following Lindley's car up the narrow winding roads in the hills above Bridgewater to an absolutely spectacular spot. The entire valley lay before us in magnificent Fall color as the last rays of the sun dropped below a cloudless horizon, a fire crackling in the firepit in the yard.
I expected this to be a delivery from one of the local pizza parlors. But no! Nothing so mundane. Miranda had made up dough and toppings, and we each made up a pie. Then, Charles shoved them into the stone oven built into the giant fireplace in the living room of their antique Colonial house. Because, of course, that's how you have pizza!
Along with the LN crew and some of the Shackleton Thomas employees and spouses, Charles' brother Arthur and his wife, artist Carol Booth were visiting from Ireland.

Charles Shackleton baking a pizza. The fire was actually orange, not purple!
It was a magical evening, the kind that lives in your memory forever. There we were, enjoying pizza fresh from the hearth in a home with a deep connection to history, with a group of happy woodworkers. I probably had too much wine as I basked in the warmth and companionship of new and old friends.
Our Accommodations
My wife and I spent Friday and Saturday nights at the lovely Deer Brook Inn just down the road in Woodstock. Innkeepers Phil Jenkins, Win Coffin, and Reba Burress provided excellent food and service.
Phil bought the inn this past Spring after having previously owned the beautiful 1842 Inn in Macon, GA. You can read a nice article about the new ownership here.
Terry Moore's Scraper Sharpening Method
This is actually an article I did for the Guild Of New Hampshire Woodworkers' quarterly Journal. I've made one addition to the original text regarding burnishing, as noted below. This is the exact procedure that I showed people, and it worked every time, with great repeatability.

Fig. 1: Using a freshly sharpened card scraper to thin down walnut strips to 1mm for practice bending violin sides.
I've recently taken an interest in making violins by hand, and after having watched a number of videos and read several books, I was very happy to see a meeting of the Granite State Luthiers at BJ Tanner's workshop in Manchester.
The topic of the day was sharpening. Several attendees demonstrated their setups for sharpening chisels and plane irons. I showed freehand sharpening a chisel on oilstones with my portable sharpening station. Terry Moore demonstrated sharpening a card scraper. This was the one that stood out for me.
Terry is a founding member of both the Guild and the New Hampshire Furniture Masters, with decades of experience. This is why I love being a member of the Guild. Amateurs and hobbyists like myself get to mix with and learn from masters of the art, who are happy to share their knowledge. Terry graciously gave me permission to write up his method.
Sharpening is challenging enough for beginners, but scrapers are downright voodoo mystery. I collect scraper sharpening methods like I collect planes and chisels, always eager to acquire another one. I've settled on one that produces good results.
But when I tried Terry's method in my own shop, I found it far superior. The proof was in the gorgeous fluffy shavings I was able to produce on a variety of hard and soft woods.
The method I've been using isn't all that much different from his (and in fact all the methods are pretty similar), but he's distilled it down to bare essentials that quickly produce superior results. Simple, fast, effective, and repeatable. That's an almost magical combination.
Scrapers are valuable tools for furniture and cabinet makers, but they're absolutely essential for luthiers. In addition to flat surfaces, stringed instruments have a variety of simple and compound curves that must be rendered smooth and fair. Scrapers are the final tools used to produce these graceful satin surfaces.
Instruments also require very thin materials. Violin sides need to be 1 mm thick. Planing stock this thin can be difficult. It's very easy to damage the piece.
Scrapers can be used to thin down the stock after it has been resawn and planed flat at some more manageable thickness. In addition to being able to take very fine, delicate shavings, scrapers can take them at very controlled points. This allows you great precision in fine tuning the thickness.
Even a simple scraper, just a rectangle of metal, has an anatomy. It has two long edges and two short edges. Because it has some thickness, each long edge will actually be sharpened to two working edges, one on each side of the scraper, front and back. So you up end with four sharp working edges. A working edge is called a hook, because you draw the metal out to a tiny hooked cutting edge.
Terry's method, like most others, consists of three stages: filing, honing, and burnishing. The trick is in the details. He's a believer in keeping it simple, not turning it into a religion. A quick sharpening and then back to work on the wood.
You can adapt this slightly to the tools you have. Like Terry, I’m honing with a fine India stone (oilstone), but this should work with any kind of stone.
One step common in most other methods that he doesn’t do is lay the scraper down and burnish the old hook flat. He simply files down past it in the filing stage, which all the other methods do anyway.
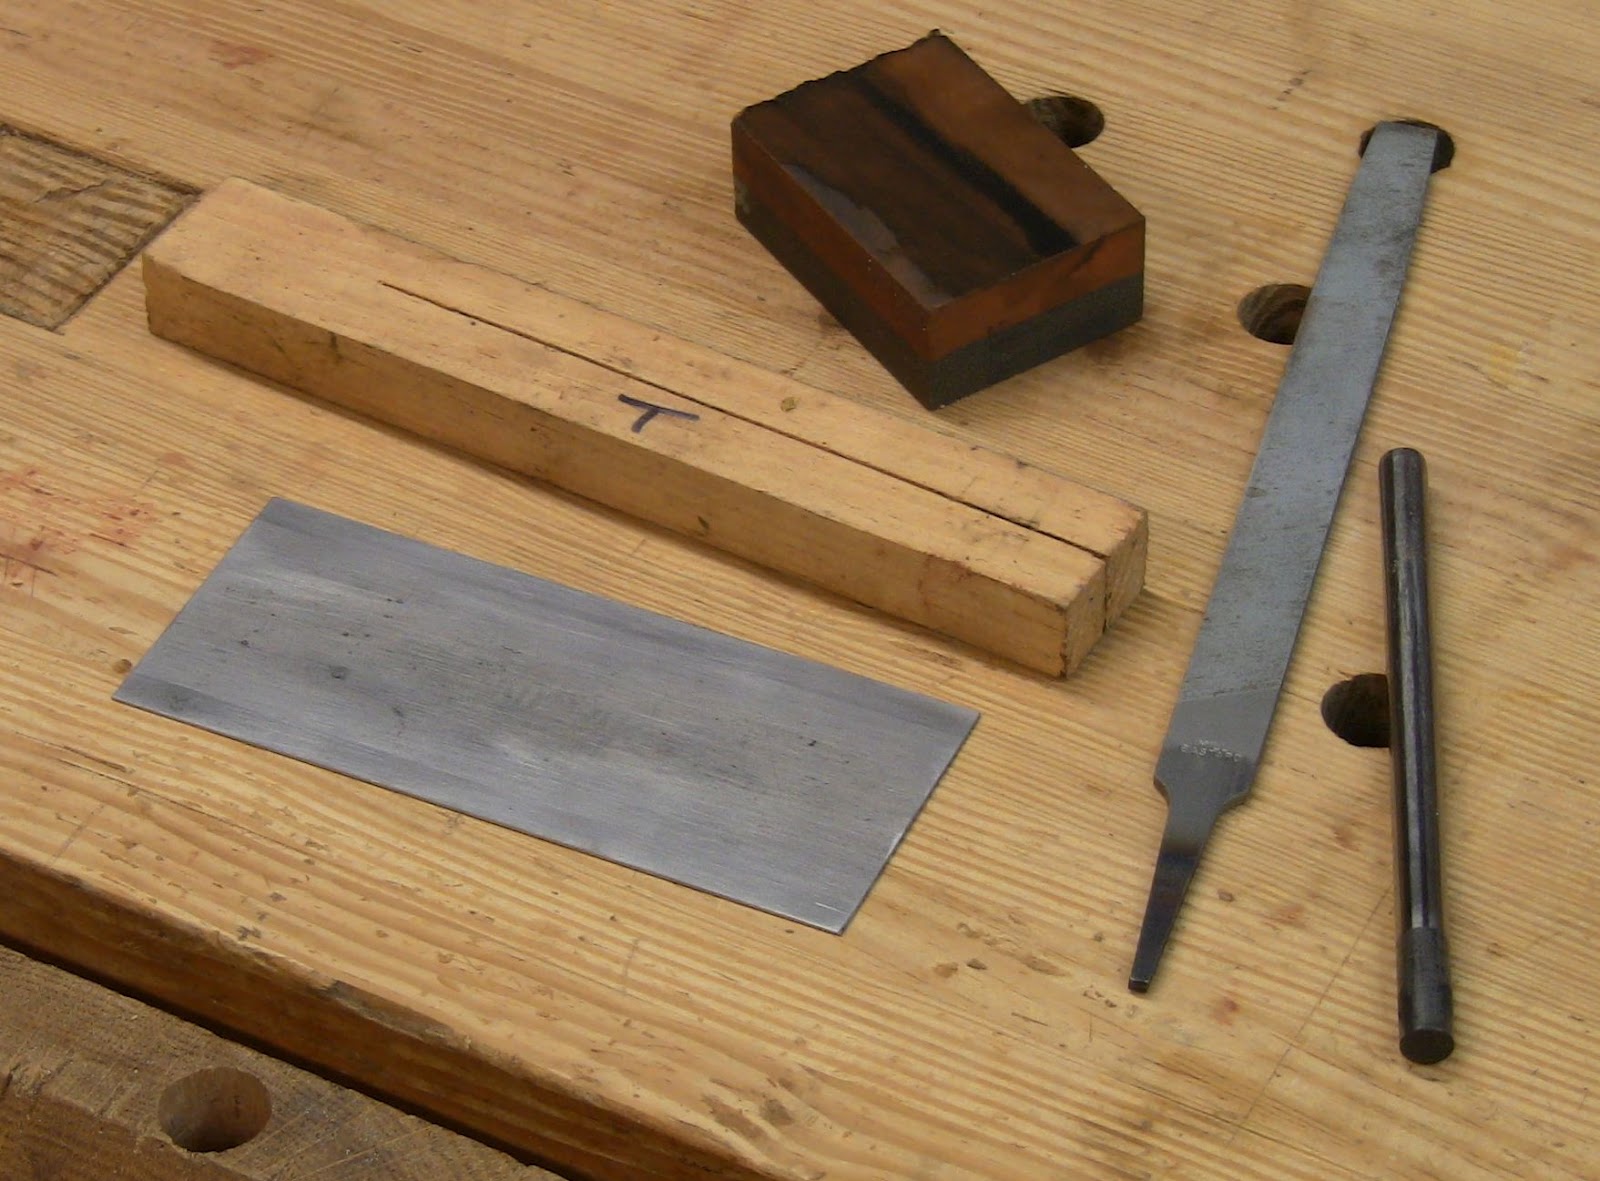
Fig. 2: The tools: scraper, wooden holder, chunk of fine India stone, mill bastard file, and burnisher (with or without handle).
The first key point is to mount the scraper in a vise. Terry demonstrated on a metalworking vise. I use a face vise with a simple wooden holder as a clamping aid. It's just a length of wood a little longer than the scraper, roughly square in cross-section, with a slot sawn down most of the length. Slip the scraper into the slot, then clamp the holder in the vise. It concentrates the clamping force to keep the scraper from slipping in the vise.
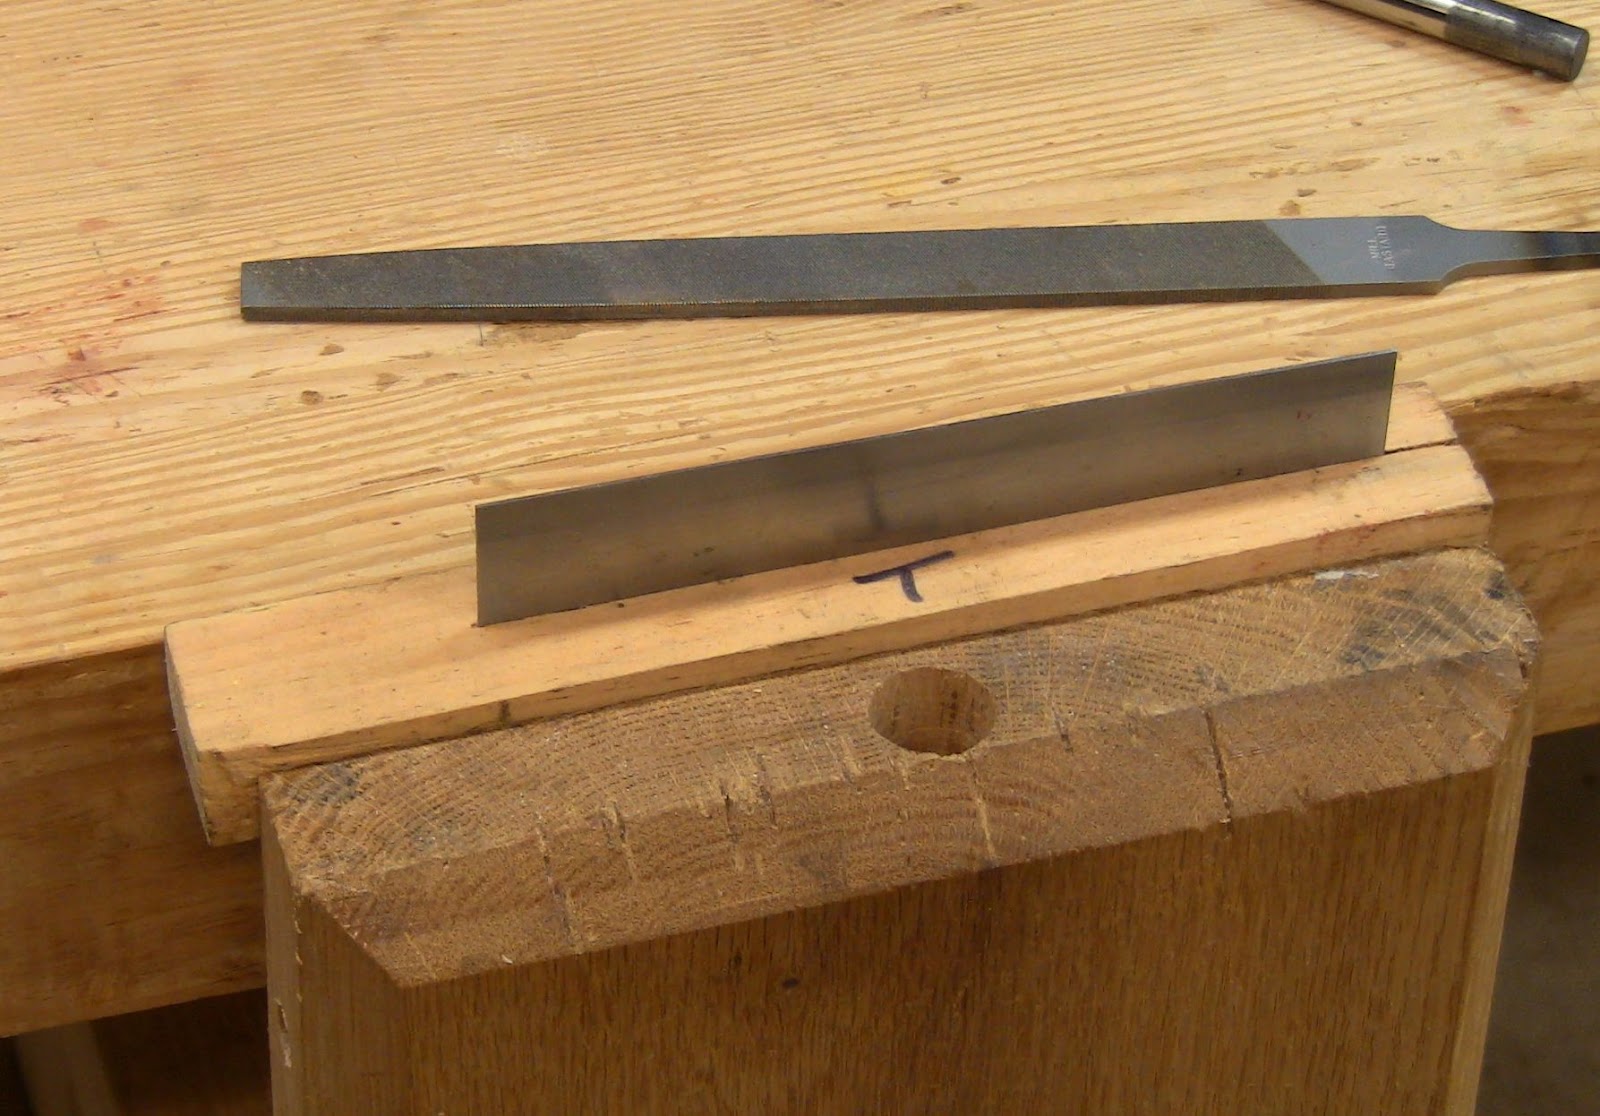
Fig. 3: Slip the scraper into the holder and clamp the holder in the vise.
I have a T marked on the holder to show the top front orientation. The T mark helps you keep track of which of the four hook edges you've worked on, although Terry's simple procedure makes it pretty easy to keep track.
Filing
Using a mill bastard file, file the top edge of the scraper to remove the old prepared edge. Terry used a draw-filing motion. Filing should take 10-20 seconds.
Hold the file oriented across the top at an angle to the length of the scraper. By aligning the file teeth visible on the top side with the edge of the scraper, you know that the cutting teeth on the bottom side are properly aligned across the edge to cut the metal.
The key point is to hold it dead level, so that you file the edge flat, square to the sides. Run the file sideways down the length of scraper with moderate pressure. You should feel it start to bite and remove metal. Take enough passes to be sure you’ve removed the old hook edge, 5-10 strokes.
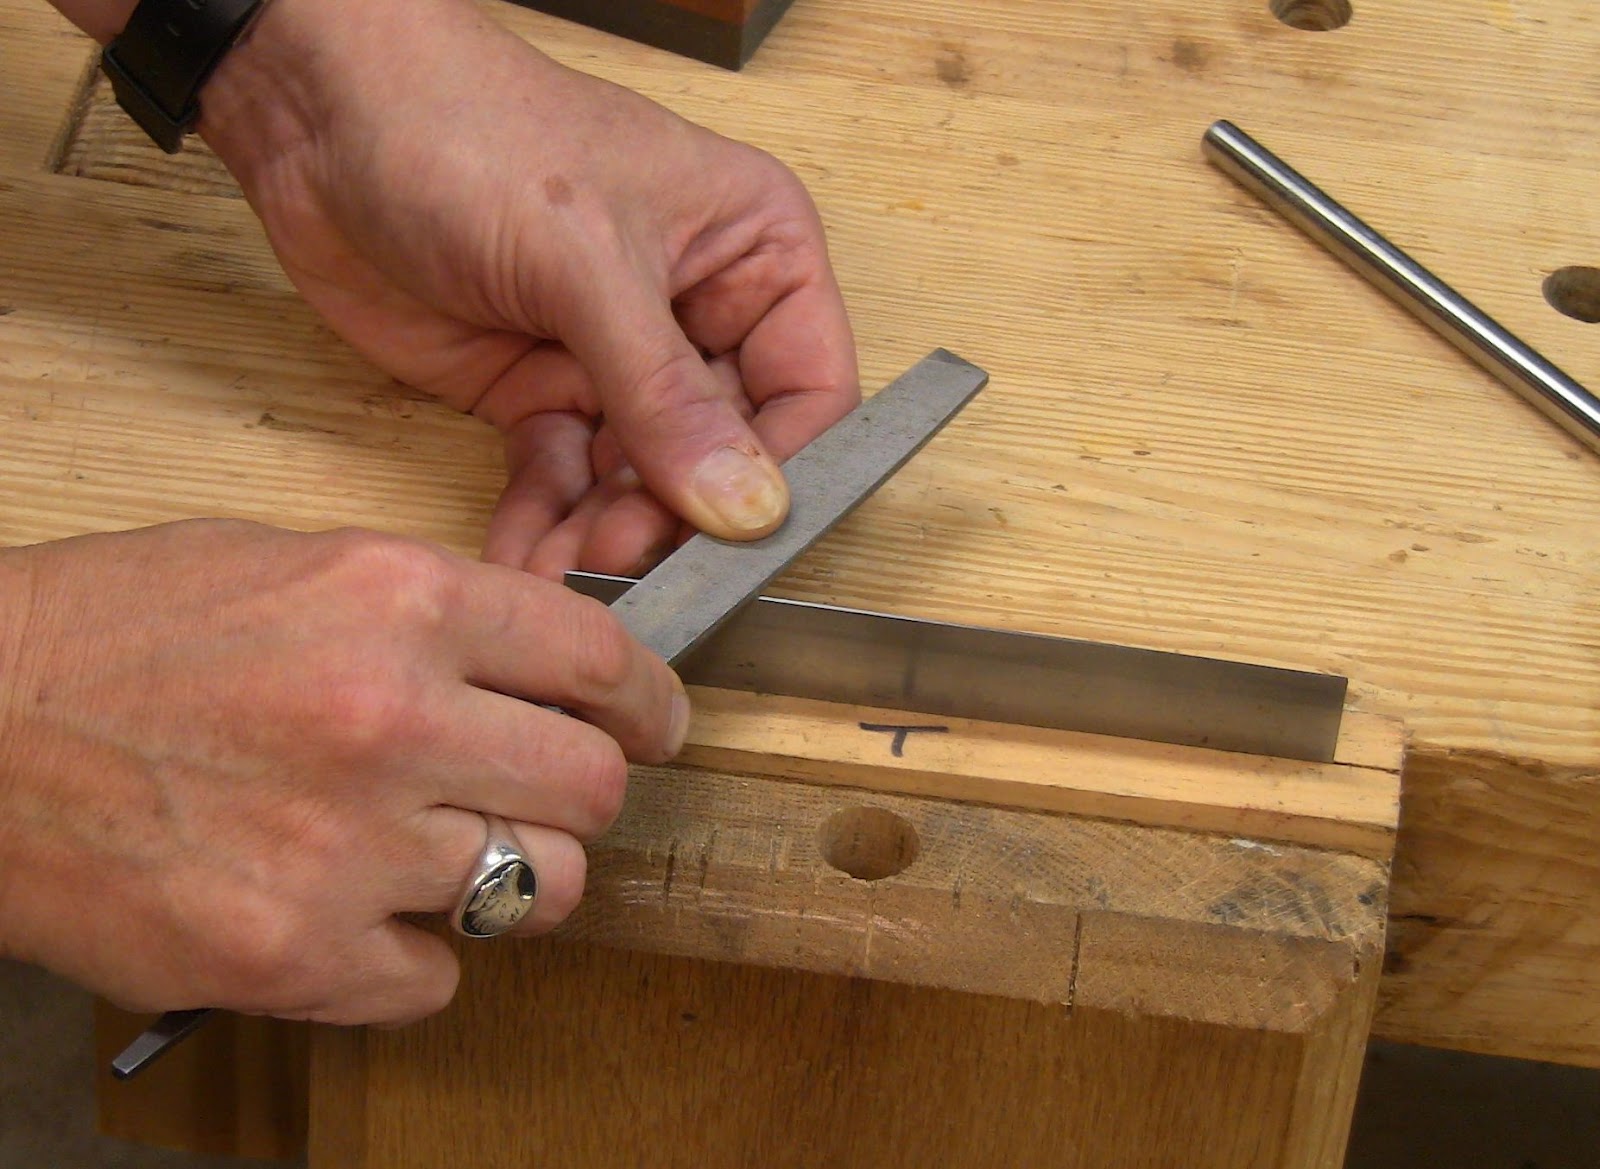
Fig. 4: With the file level across the top edge, push it sideways along the length of the scraper.

Fig. 5: The file needs to be dead level so that it files the edge square to the sides.
Every 5 or 6 filings, joint the scraper to maintain the straight edge. Hold the file level and oriented lengthwise along the scraper. Run the file down the length of the scraper for several strokes.
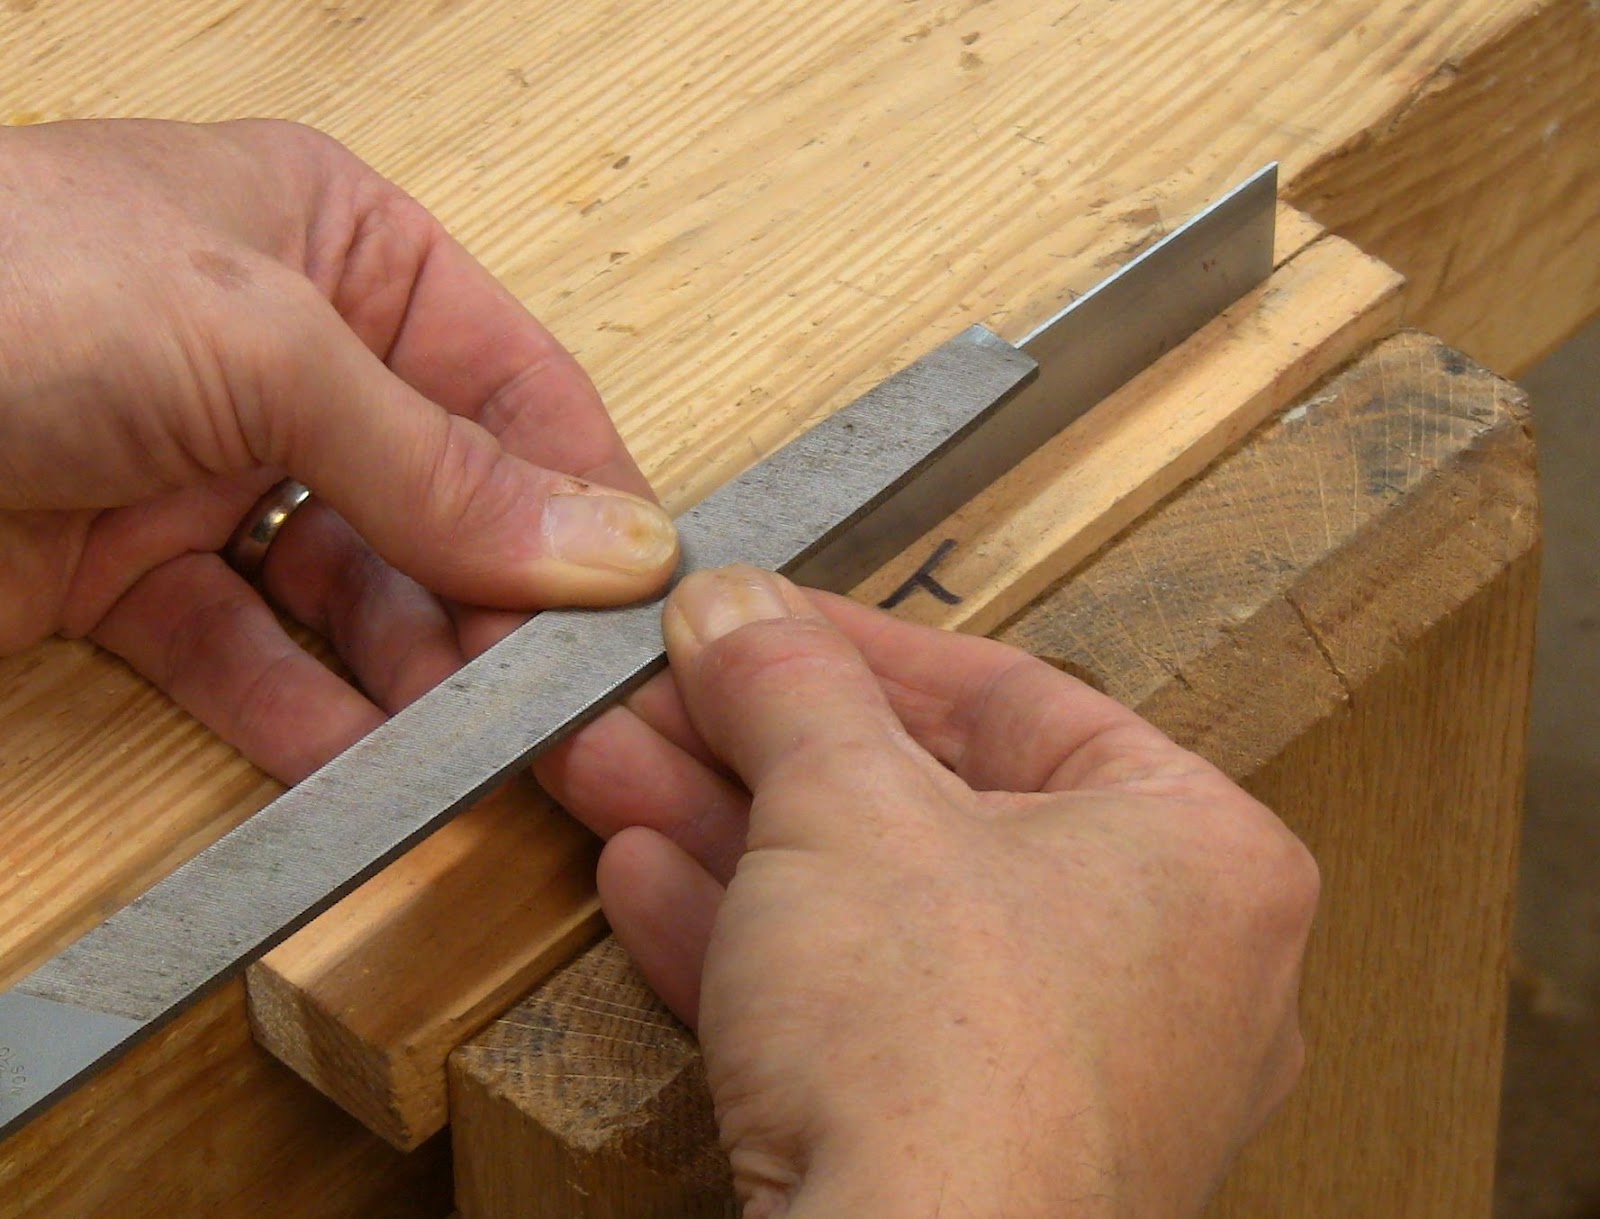
Fig. 6: Holding the file level, lengthwise along the scraper, joint the edge flat.
Honing
Using a fine oilstone with a little oil on it, hone the top and sides of the scraper. Honing should take 20-30 seconds total for the top and both sides.
Lay the stone across the filed edge oriented roughly diagonal to the length of the scraper. Again, the key point is to hold it dead level. Run it down the length of the scraper for several passes, 5-10 strokes, shifting it around to spread the wear across the surface of the stone. The goal is to remove the file marks, leaving polished metal.

Fig. 7: Holding the fine stone level, run it up and down the filed edge several times.
Now hone the front side. Lay the stone flat across the front face of the scraper and move it back and forth along the length for a few passes, 5-10 strokes. Repeat on the back side.

Fig. 8: Lay the stone along the front side of the scraper and run it back and forth across the length.
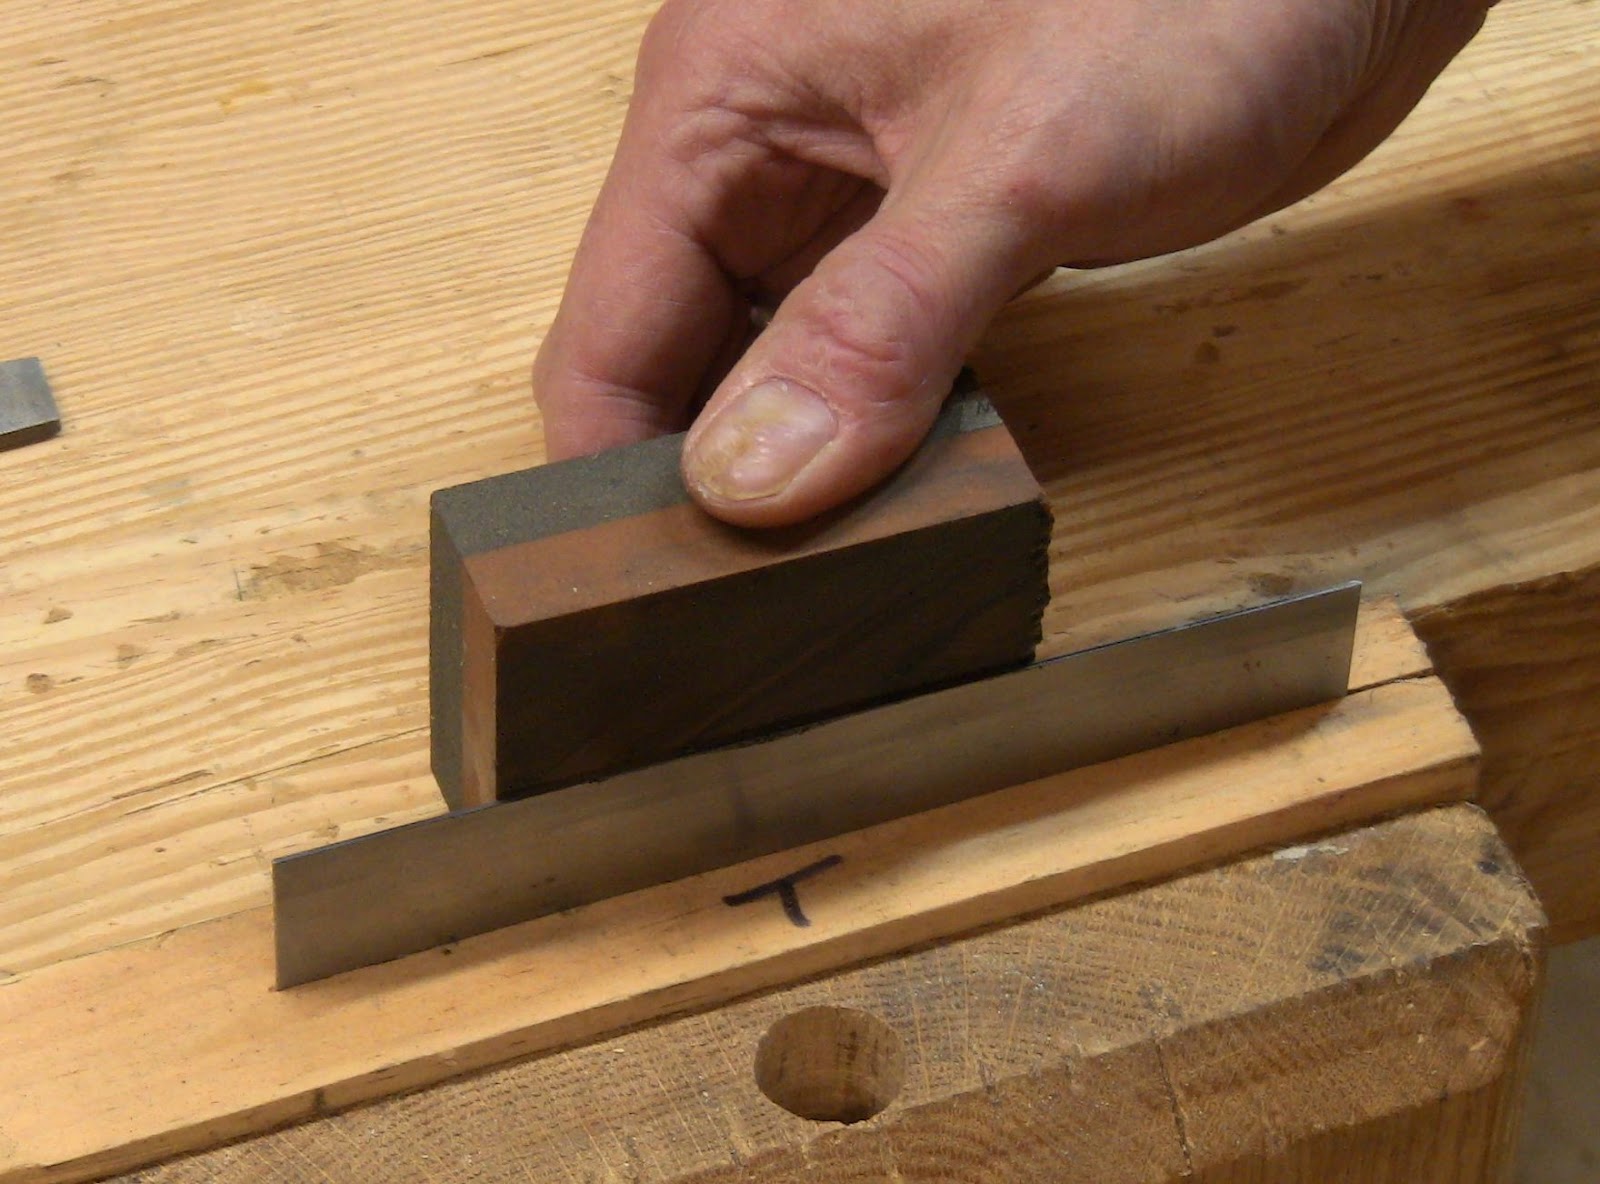
Fig. 9: Hone the back side.
The result is that the thin top edge of the scraper and the front and back faces meet at square, sharp corners down the length of the scraper. These will be the cutting edges.
Burnishing
This last step is where things tend to go wrong. People are usually able to file and hone the edge straight and square without any problems, but burnishing is the voodoo part.
Burnishing turns the hook on each long corner of the scraper edge, drawing out the metal to its working edge. The problem is that people tend to overdo it.
As Terry points out, most people have a long burnisher with a handle. That means they’re able to apply a lot of force and leverage as they run the burnisher down the edge. But this just ends up over-turning it. Then they compound the problem by making multiple passes.
This is the secret to Terry's method. He has a short, stubby burnisher that he prefers to use, but with a long burnisher he showed how to choke up on the end, mimicking the stubby shape. The key point is that you use just the end of the burnisher with moderate direct pressure, not heavy leverage. Burnishing should take less than 5 seconds total for both sides.

Fig. 10: Hold the burnisher in your hand...
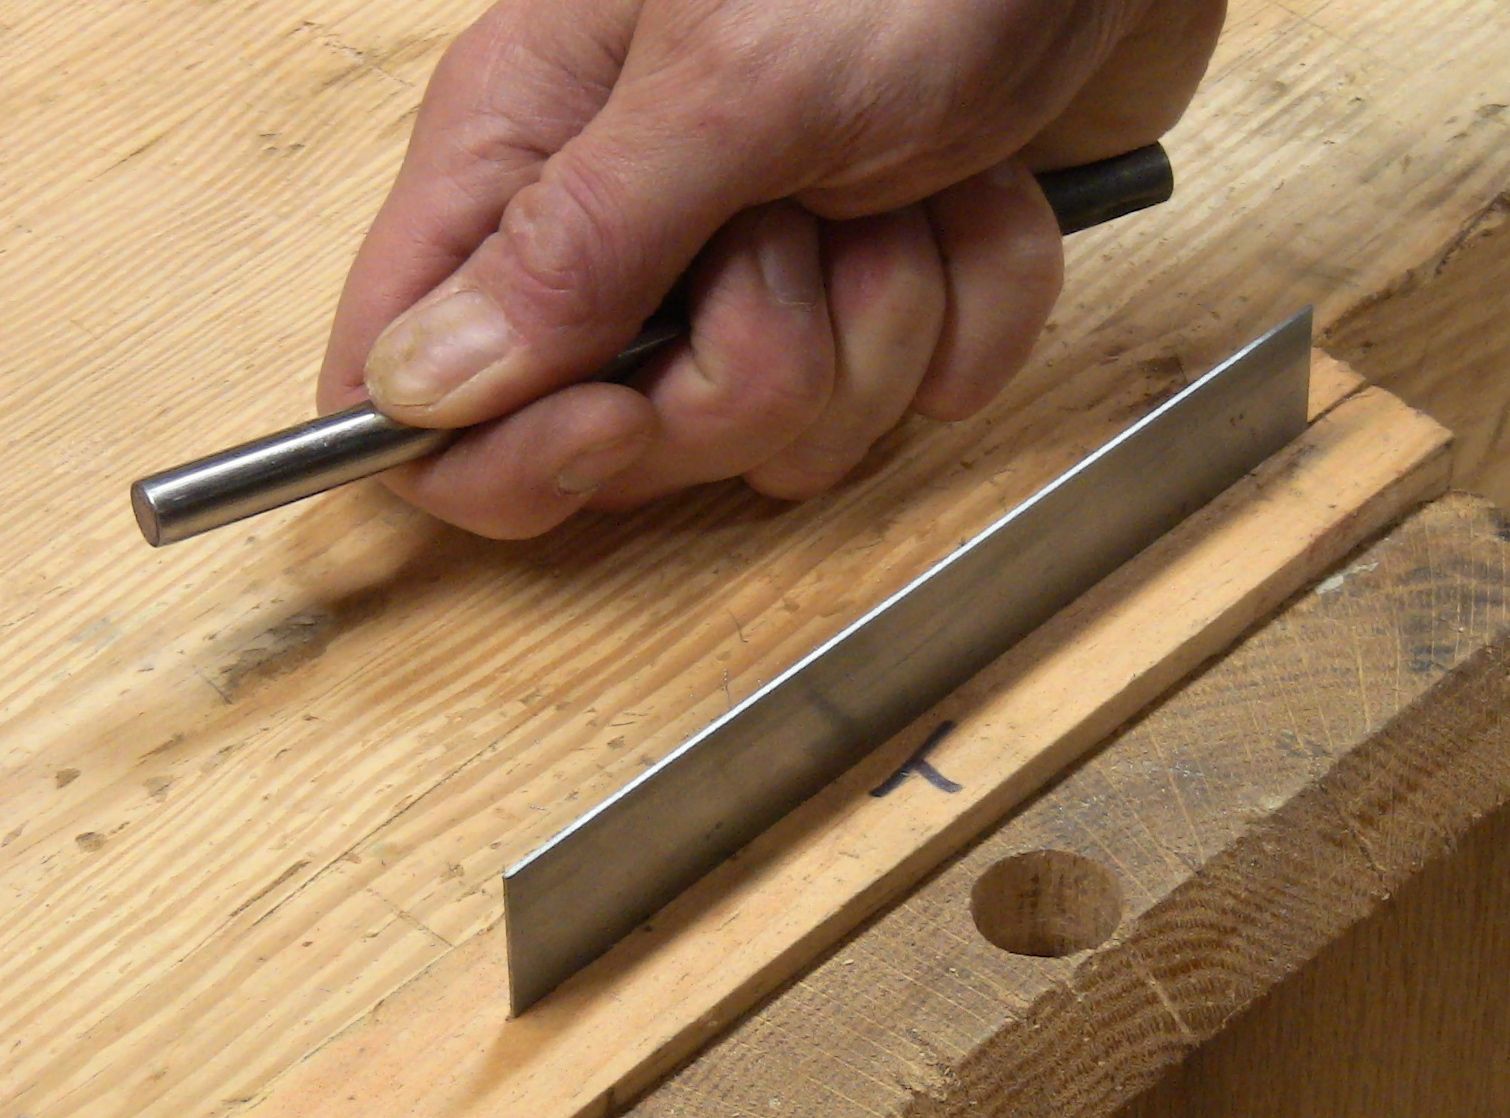
Fig. 11: ...and choke up on it, leaving only the end exposed.
With the burnisher in your hand, hold it near the end to leave just about an inch exposed. Take the tip in your other hand and set the small exposed portion of the burnisher on the edge of the scraper at the near end.
This paragraph is the addition to the original article, adding the step of burnishing flat across: Holding the burnisher level, flat across the edge, push it along the length of the scraper for one quick stroke. Zip! Don't use too much pressure! Just light hand and finger pressure. Set the burnisher flat on the far end, and pull it along the length of the scraper for another quick stroke. Zip! That's it, zip, zip, just two equal, flat strokes in opposite directions to slightly mushroom the edge out to each side. The residual oil from the stone provides lubrication for the burnisher. Then do the same thing, but with the burnisher tipped over each face of the scraper.
Tip the burnisher down over the face of the scraper by about 5 to 10 degrees; you may need to experiment a bit to find what angle works best for you.
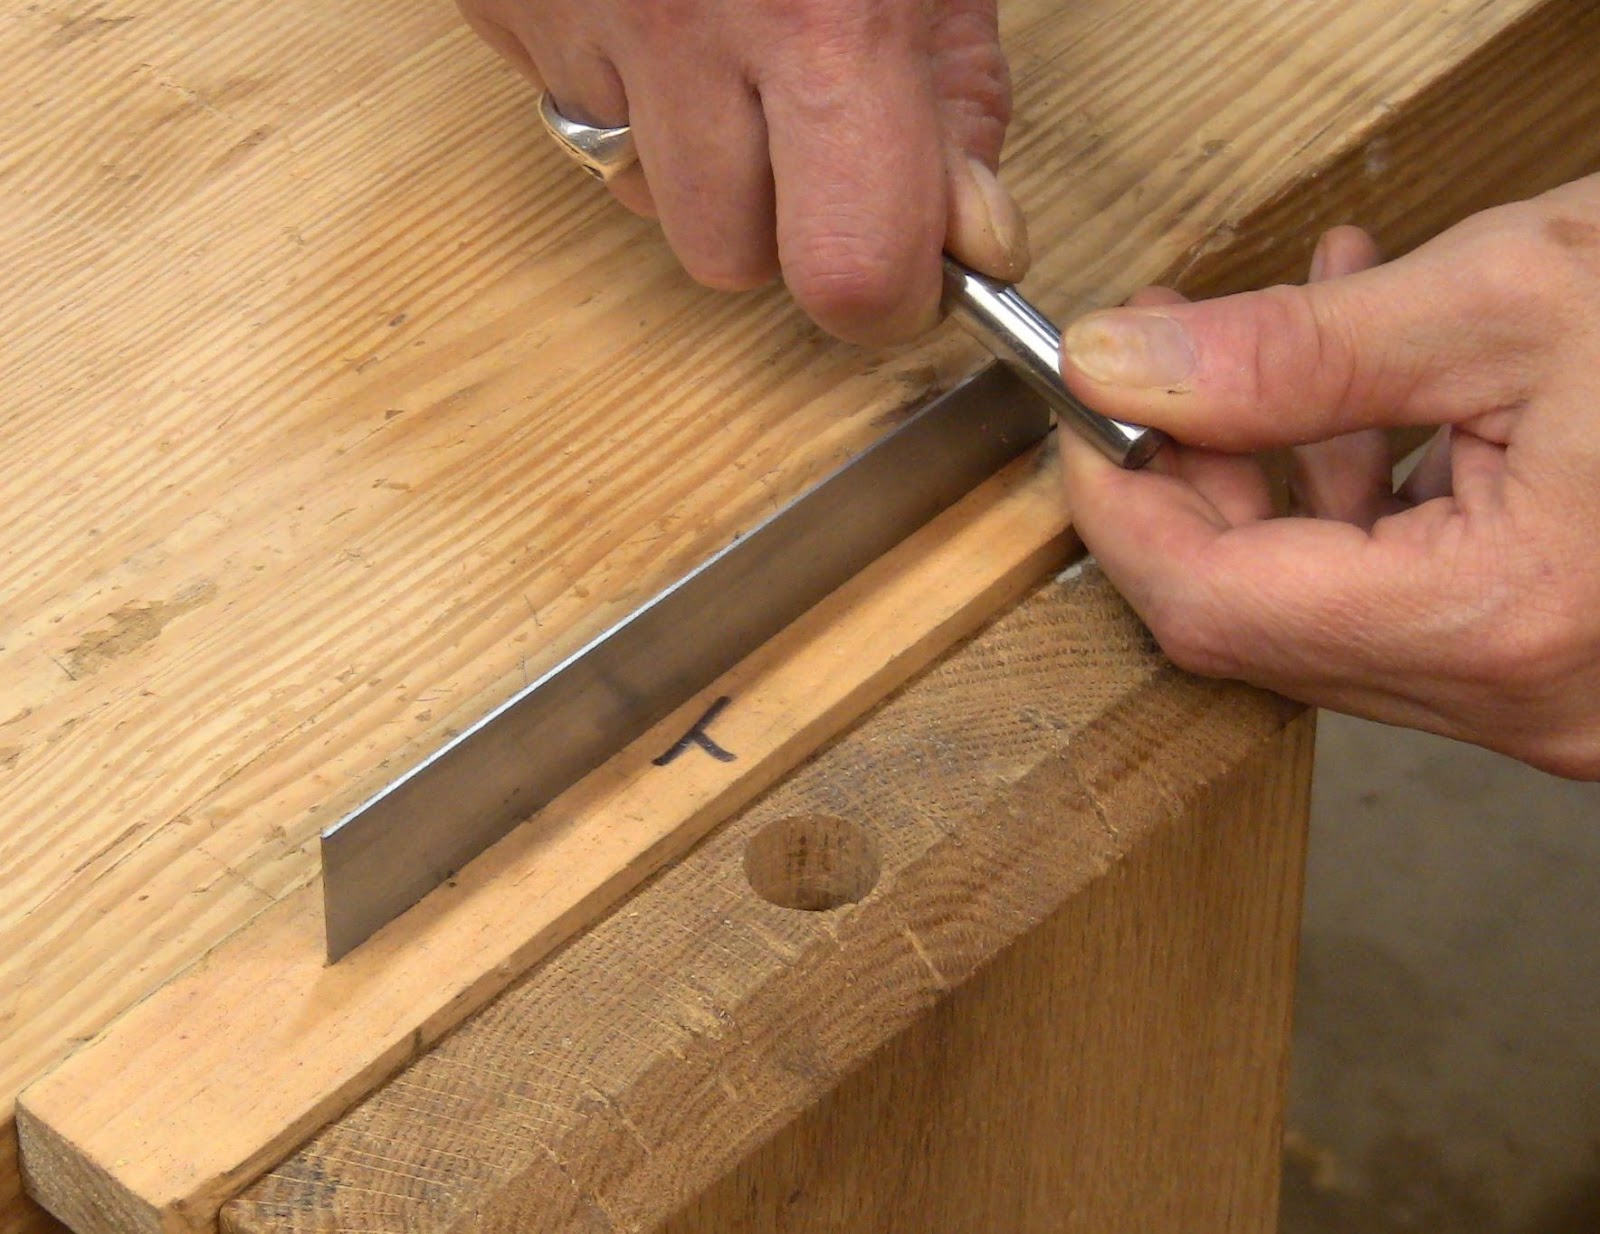
Fig. 12: Hold the tip in your other hand and set it on the edge of the scraper.
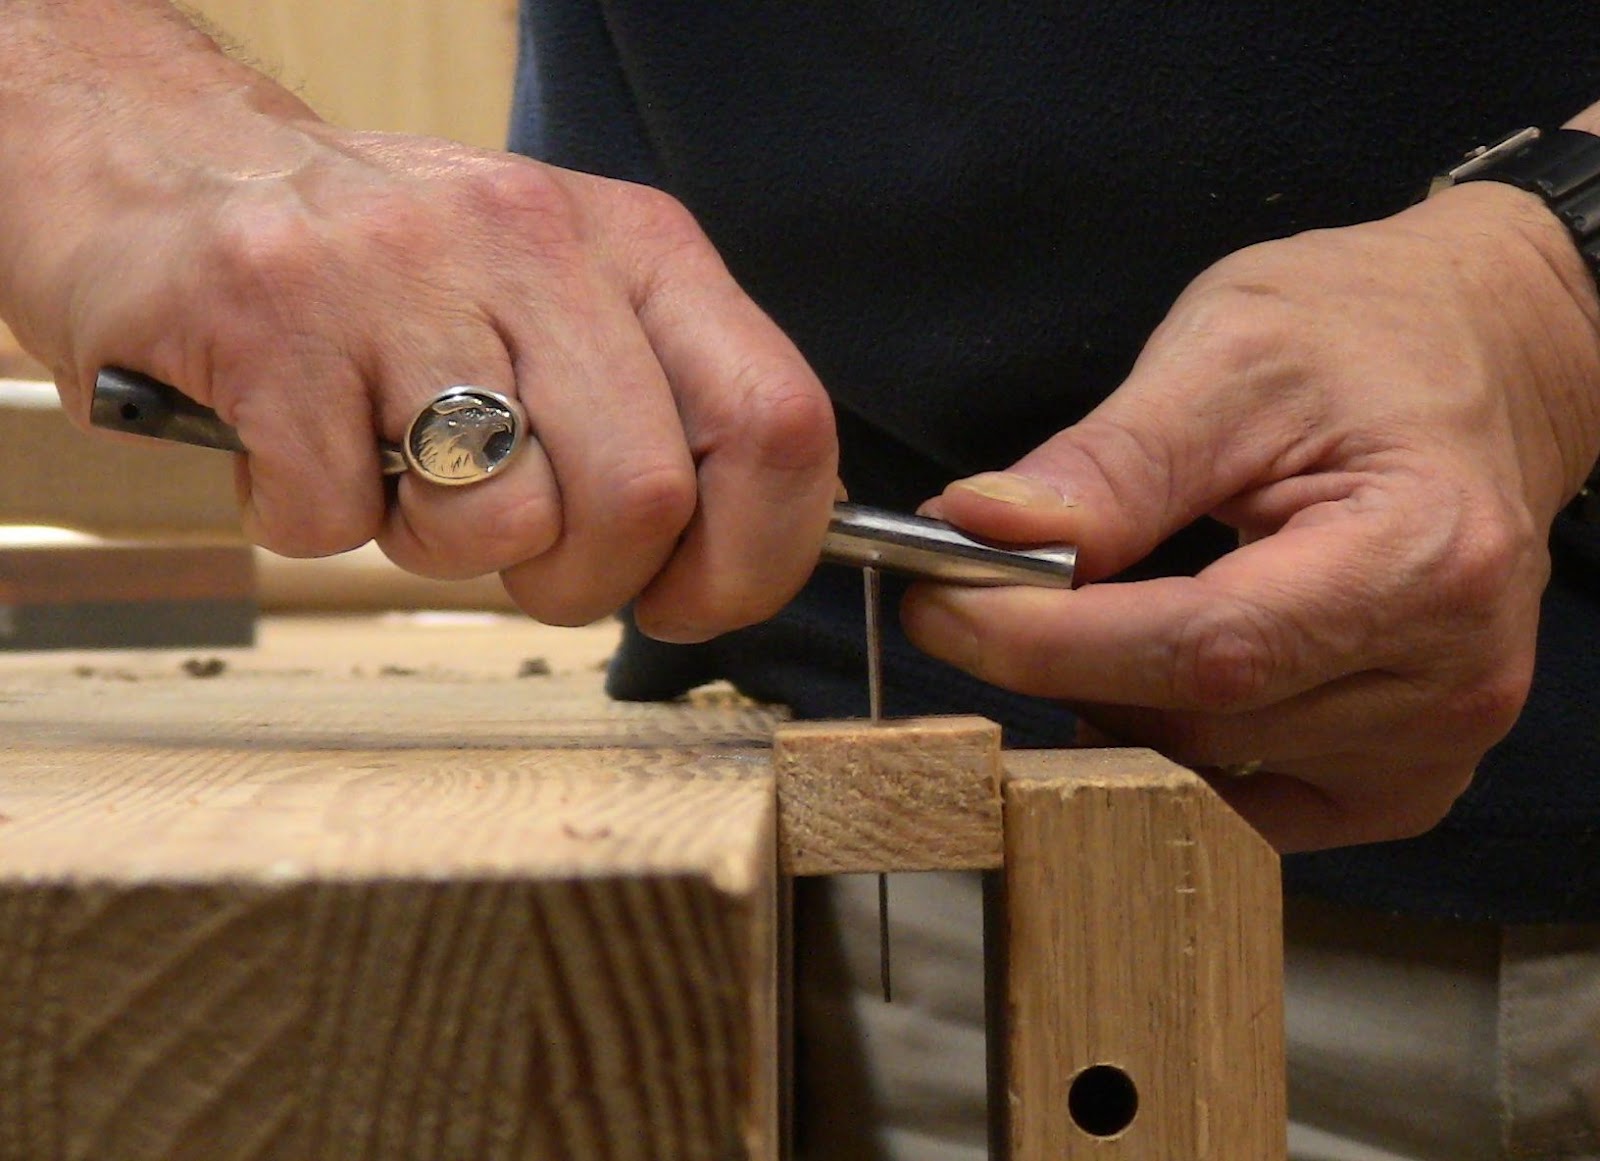
Fig. 13: Tip the end down somewhere between 5 and 10 degrees.
Push the burnisher along the length of the scraper for one quick stroke. Zip! Set the burnisher on the far end the same way, and pull it along the length of the scraper for another quick stroke. Zip! That's it, zip, zip, just two equal strokes in opposite directions.
If you curl your fingers into hooks and pull them up the face of the scraper, your fingernails should catch on the tiny hook edge you've just turned. Don't run your fingers along this edge, it's extremely sharp!

Fig. 14: Hook your finger and pull it along the face of the scraper toward the edge. Your fingernail should catch on the hook.
Now burnish the second edge, on the back face. You can leave the scraper as is or spin it around in the vise. Two strokes, zip, zip. That's it.
Repeat
Now flip the scraper over in the vise and repeat the process on the other edge. This is where the T mark on the wooden holder helps you keep track of which edge and face you're working on.

Fig. 15: Flip the scraper in the holder over and repeat on the second edge.
Time required to do the entire scraper is 1-2 minutes. This is so fast and simple you should never hesitate to do it if you feel the scraper isn’t performing as well as it should. Have your scraper sharpening kit ready to go at a moment’s notice so it doesn’t feel like a chore.
Testing The Scraper
Setup a piece of test stock as if you were going to plane the surface. Hold the unsharpened short sides of scraper in both hands and use your thumbs to bow out the center. This bow cambers the cutting edge; experiment with various degrees of bowing.
Set the bowed edge on the workpiece with the scraper straight up. Start tipping the scraper forward and moving it forward. At some point between vertical and 45 degrees, you should feel the hook edge bite into the wood. Experiment with a few degrees more or less tilt to find the best bite.
Then with moderate pressure, run the bowed scraper at this tilt angle down the length of the wood. Lean forward with your whole upper body as you extend your arms.
Your response to this action should be GOOD GOD LOOK AT THAT! The scraper should produce amazing fine fluffy rolls of shavings similar to those from a fine set smoothing plane. It should NOT just be producing dust.
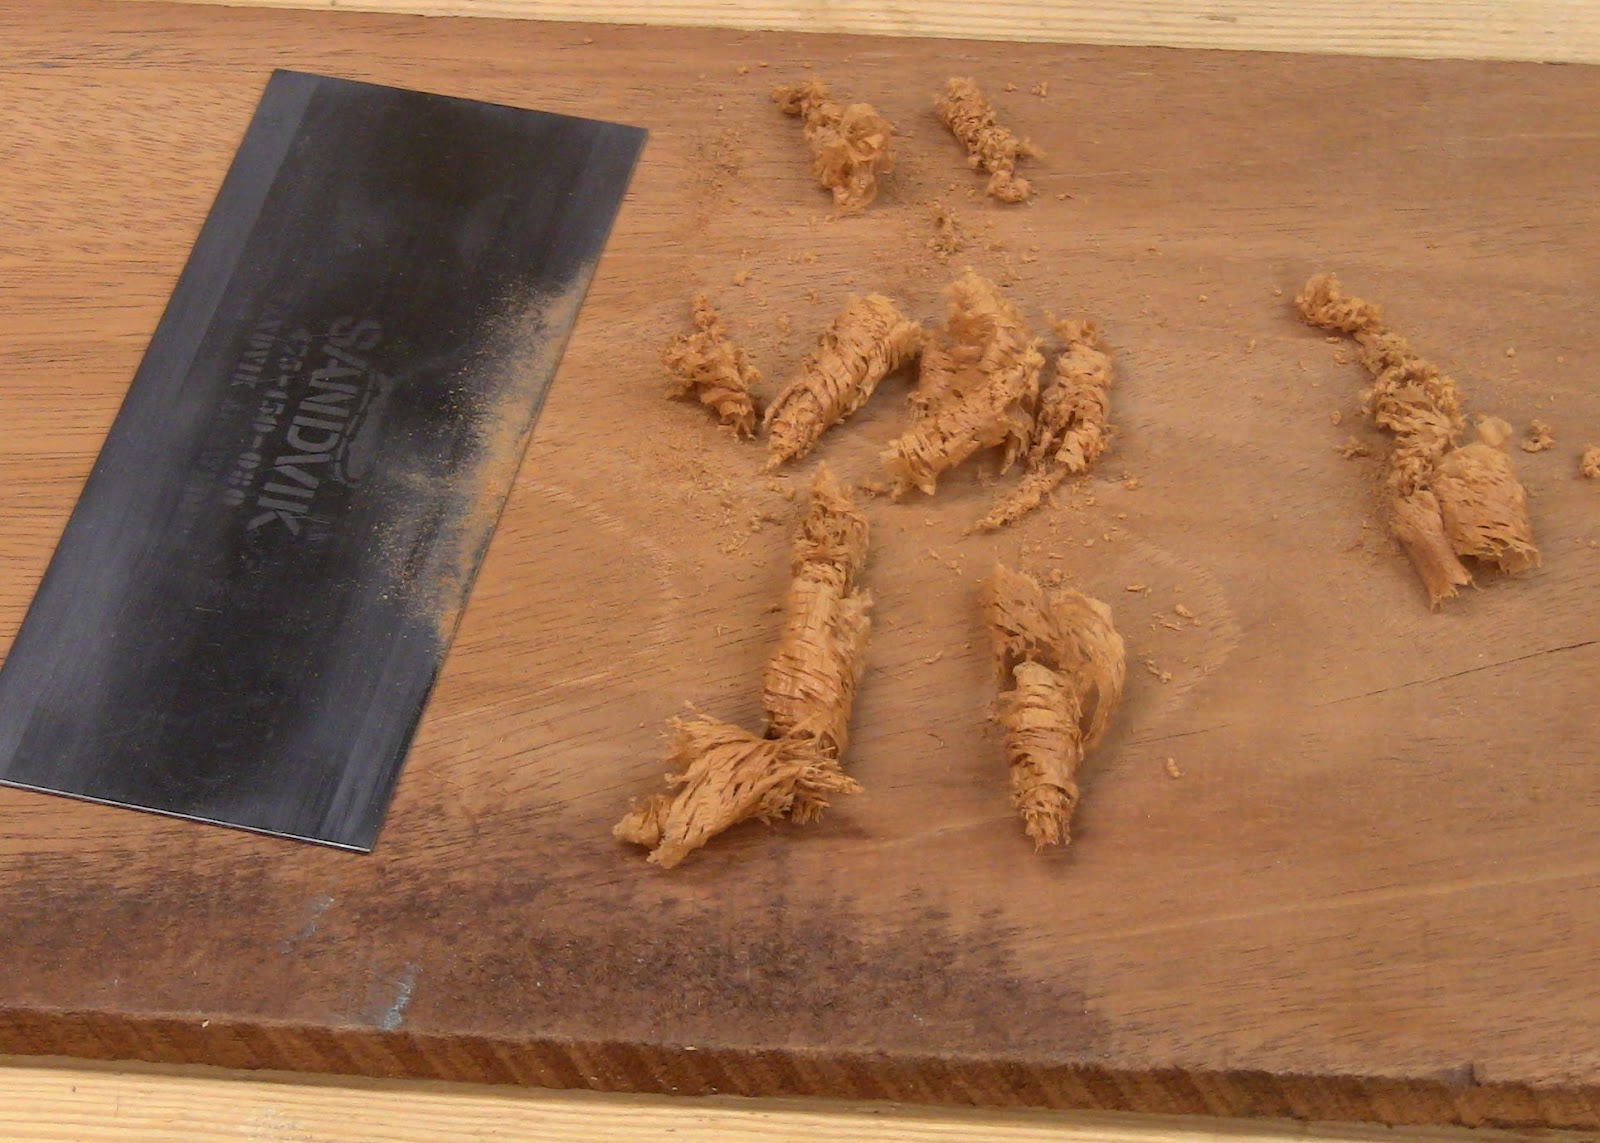
Fig. 16: The fluffy rolls of shavings on a piece of mahogany after the above sharpening.
Lean back, returning the scraper to the near end of the piece, and take some more shavings. Don't scrape repeatedly in the same spot, or the bowed edge will scrape a divot into the wood.
Spin the scraper around and flip it over to try all four hook edges. Don't be surprised if they all perform a little differently, requiring different degrees of bowing and tilt to work effectively.
Turn the board around and try it from the other direction. On a flat surface, scrapers often work just as well in either grain orientation. That's less true on angled or curved surfaces. In general, you went to scrape with the grain, down the slope across it.
Test the scraper on several different woods. Softer woods tend to fuzz up unless the scraper is very sharp. On hard tropical woods, it's like shaving glass.
What If It Doesn't Work?
What if your results aren't as advertised? What if all you get is dust, or unimpressive shavings?
Dust from the scraper is a sign that it’s not sharp enough (also a sign that it needs to be resharpened). Try again, and pay particular attention to the key points.
Poor shavings are a sign of either poor sharpening, or poor use. First, experiment a bit more with the bowing and angling of the scraper. Bow it more heavily, tip it down further. Once you're sure it's not a usage problem, try sharpening again.
As simple as the procedure is, it may take a few attempts to get it right. Some details are very objective: filing and honing square across the edge, and honing along the sides. You should be able to hold the file and stone level on the edge and flat to the sides easily without any kind of guide, but there are also simple guides available if you're still having difficulty.
And it doesn't hurt if you use more pressure or strokes than necessary with the file or stone, you just may end up removing a little more metal than you need to. Overdoing it won't hurt. The only mistake you can make is using too little pressure or too few strokes. Once you've adequately filed and honed, you should have two good sharp corners along the edge.
But other details are much more subjective. Specifically, the angle and force of the burnishing. Remember, two strokes, zip, zip, at an angle 5 to 10 degrees down from level, with moderate pressure. Not enough angle, or not enough pressure, will fail to turn enough of a hook. But overdoing it is a real mistake. That will over-turn the hook.
Achieving the right hook is a delicate balance and takes a little practice. The hook itself is a delicate and subtle thing. There's that voodoo again!
You can slightly unroll an over-turned hook by laying the scraper down flat, standing the burnisher up at an angle with the tip caught in the hook, and lightly drawing it down the length of the edge. That may salvage a sharpening job.
Reburnishing
You can often get a couple of burnishings out of an edge before having to go all the way back to a full sharpening, although this method is fast enough that a complete resharpening is easy.
First unroll the hook entirely flat. Lay the scraper down flat and lay the burnisher down flat across it. Draw the burnisher along the edge once or twice. Now if you run your fingernails across the scraper to the edge, they won't catch.
Mount the scraper in the vise and repeat the burnishing. That should restore a usable hook.
You can do this a couple of times, but eventually metal fatigue and wear will reduce the hook to an unusable state. At this point, resharpen the scraper completely.
Practice Session
Take an hour and repeatedly sharpen, test, unroll, re-roll, and re-test the scraper. Invest the time to completely resharpen it two or three times, with multiple burnishings in between, as you explore the limits of the tool.
By the time you're done, you'll have significantly developed and refined your skill. You should notice a definite improvement in the effectiveness of the scraper and your efficiency getting it there.


A nice burnishing presentation. You need to compare the burnishing pressure to something commonly done--cutting steak, sanding with dull paper, compress a bathroom scale to xx pounds. "Moderate pressure" doesn't work. After hours of effort, and a 1/4-inch of steel, I think I got it correct when I first got serious about mastering the process. Yes, burnishing is the voodoo part.
ReplyDeleteThanks! I like your "cutting steak" comparison. Conveying the proper amount of force to use has definitely been one of the challenges describing this.
DeleteGreat post, Steve. I've come a long way in sharpening my scrapers. I think we can't underestimate the importance of the prep work before using the burnisher. Specifically, getting the edge smooth and square is key. Thanks for the info.
ReplyDeleteMatt